
How to Upgrade Your 64GB Steam Deck's Storage Capacity Now to 512GB for Just $60
At the time when I pre-ordered my Steam Deck, I went the cheap way by securing a 64GB version, My rationale was that by the time the Steam Deck would be in my hands, the price of NVME storage would keep falling and it would be cheaper, if possible, to upgrade the Steam Deck later on by myself. This was a bet, of course, based on things that I did not know at the time: would the Steam Deck be easy to open up, and would the drive be easily accessible? The answer was YES for both questions. Now let’s see what you need to get started if you want to go this way.
Why Upgrade?
Redditors would lead you to believe that a 64GB drive is going to be a huge issue because the shader cache for every game ends up accumulating and taking more and more space until it chokes the 64GB drive. There is some truth to it: shaders indeed get stored in the internal NVME. While I installed more than 50 games, and kept them up to date with more and more shaders over time, it was still far from being a huge problem. This was not a huge contributor to my decision.
However, it felt more and more tedious to switch Micro-SD cards just to play a few games that did not fit on a single one (256 GB ones). I wanted to minimize the manual work involved and ensure that the largest games would fit.
Preparations
Of course, you first need a new drive. That drive has to be in M2 2230 format. 2230 just refers to dimensions, i.e. 22mm*30mm. Desktops or laptop computers usually use large larger, longer drives, so this type is a little less widespread than you’d wish, but with the release of the Steam Deck it’s certainly becoming easier to find. Note that the M2 format is a mess, with numerous different types of drives using the same format and similar connectors, while being completely incompatible. I want you guys to avoid a landmine, so here’s the kind of drive that you want:
- M2 size 2230
- NVME drive (NOT a SATA one!)
- 256 GB, 512 GB, or more if you want.
Note that the connectors the M2 drive can be of different types, B and M, as pointed out by this chart from Wikipedia:
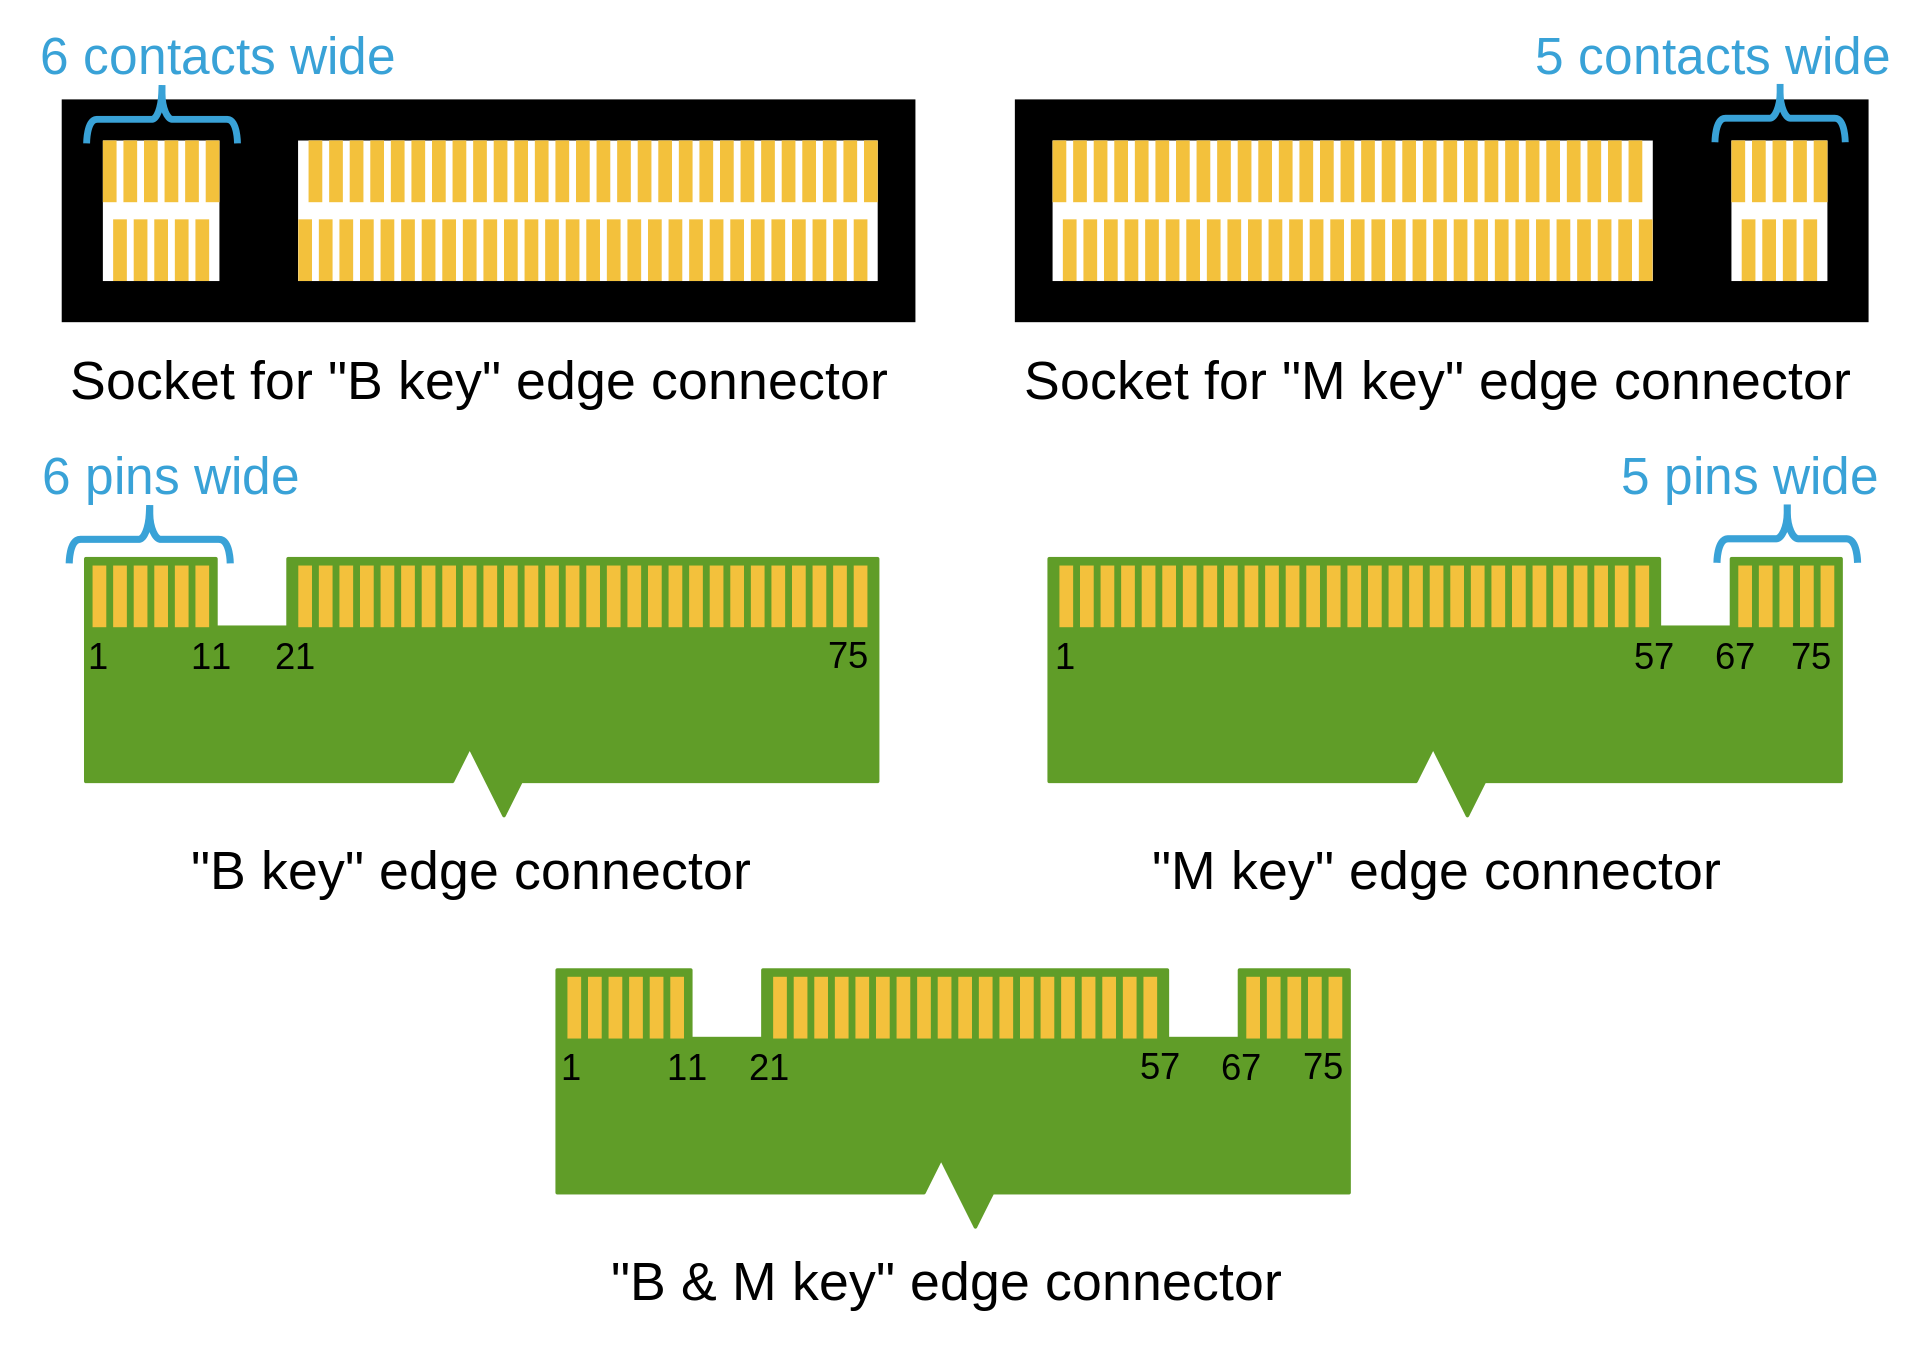
For the Steam Deck you can use either a drive that has the B&M Key connector, or simply the M key connector alone.
Note that recently Framework (the makers of the laptops, that we reviewed recently), started selling 2TB M2 2230 drives that can be used on the Steam Deck. If you want to secure good drives from a reliable place, that’s probably the safest one to use, but it’s going to be pricey.
I went for a 512 GB drive from Aliexpress, this one, for about 60 USD give or take, because it was much cheaper than what I could find locally in Japan on Amazon or other places, and seemed to have good feedback from the buyers’ reviews. Of course, you never know until you actually get it, so YMMV. At least you have one more anecdotal point of reference here.
The things you need in any case are:
- A screwdriver for regular X screws.
- A Dock for your Steam Deck or then a way to attach a drive with the recovery image (through the USB-C port). I used a USB-C to SD-card adapter.
- Recommended: anti-static gloves to make sure you don’t fry anything when touching the internals
If you plan to transfer what’s on your existing Steam Deck internal NVME drive, you will also need
- A computer
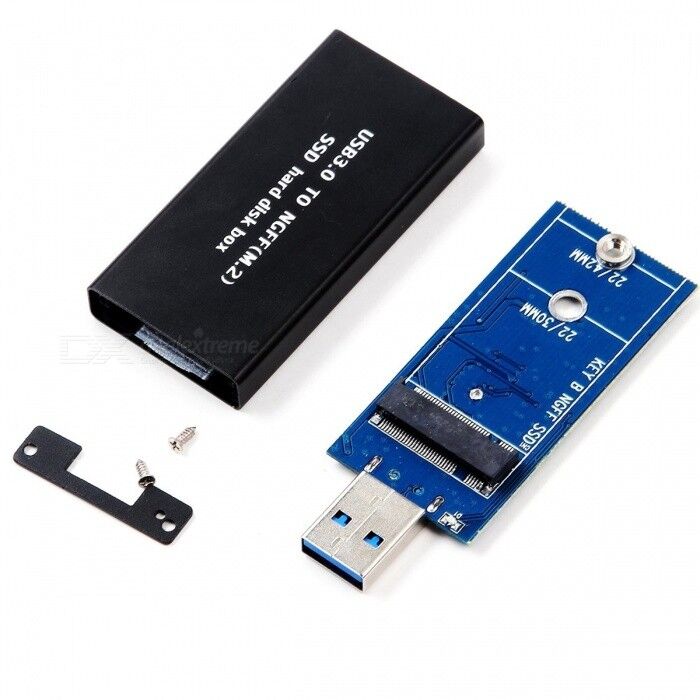
- An adapter to mount a M2 drive via a USB connector. This is fairly cheap (less than 10 USD). Once again make sure that your adapter works with M2 NVME cards! (there are adapters for SATA m2 drives that are NOT compatible!). Here’s what it could look like:
If you plan to just dispose of your existing NVME drive without keeping the data:
- A Dock for your Steam Deck or then a way to attach a drive with the recovery image (through the USB-C port). I used a USB-C to SD-card adapter.
- The recovery image from Valve
Getting your hands dirty
So the action itself should be limited to a few steps:
If you want to start anew and forget about whatever your existing drive had on it, you can simply:
- Wait for your Deck to be less than 25% of battery power (for safety purposes - in case you puncture the battery by mistake there is less chance it would ignite and burn your house) and turn your Deck off
- Remove your MicroSD card from the slot, in case you have any in it
- Open up the back of your Steam Deck (by removing 7 screws). You should see something like this afterwards:
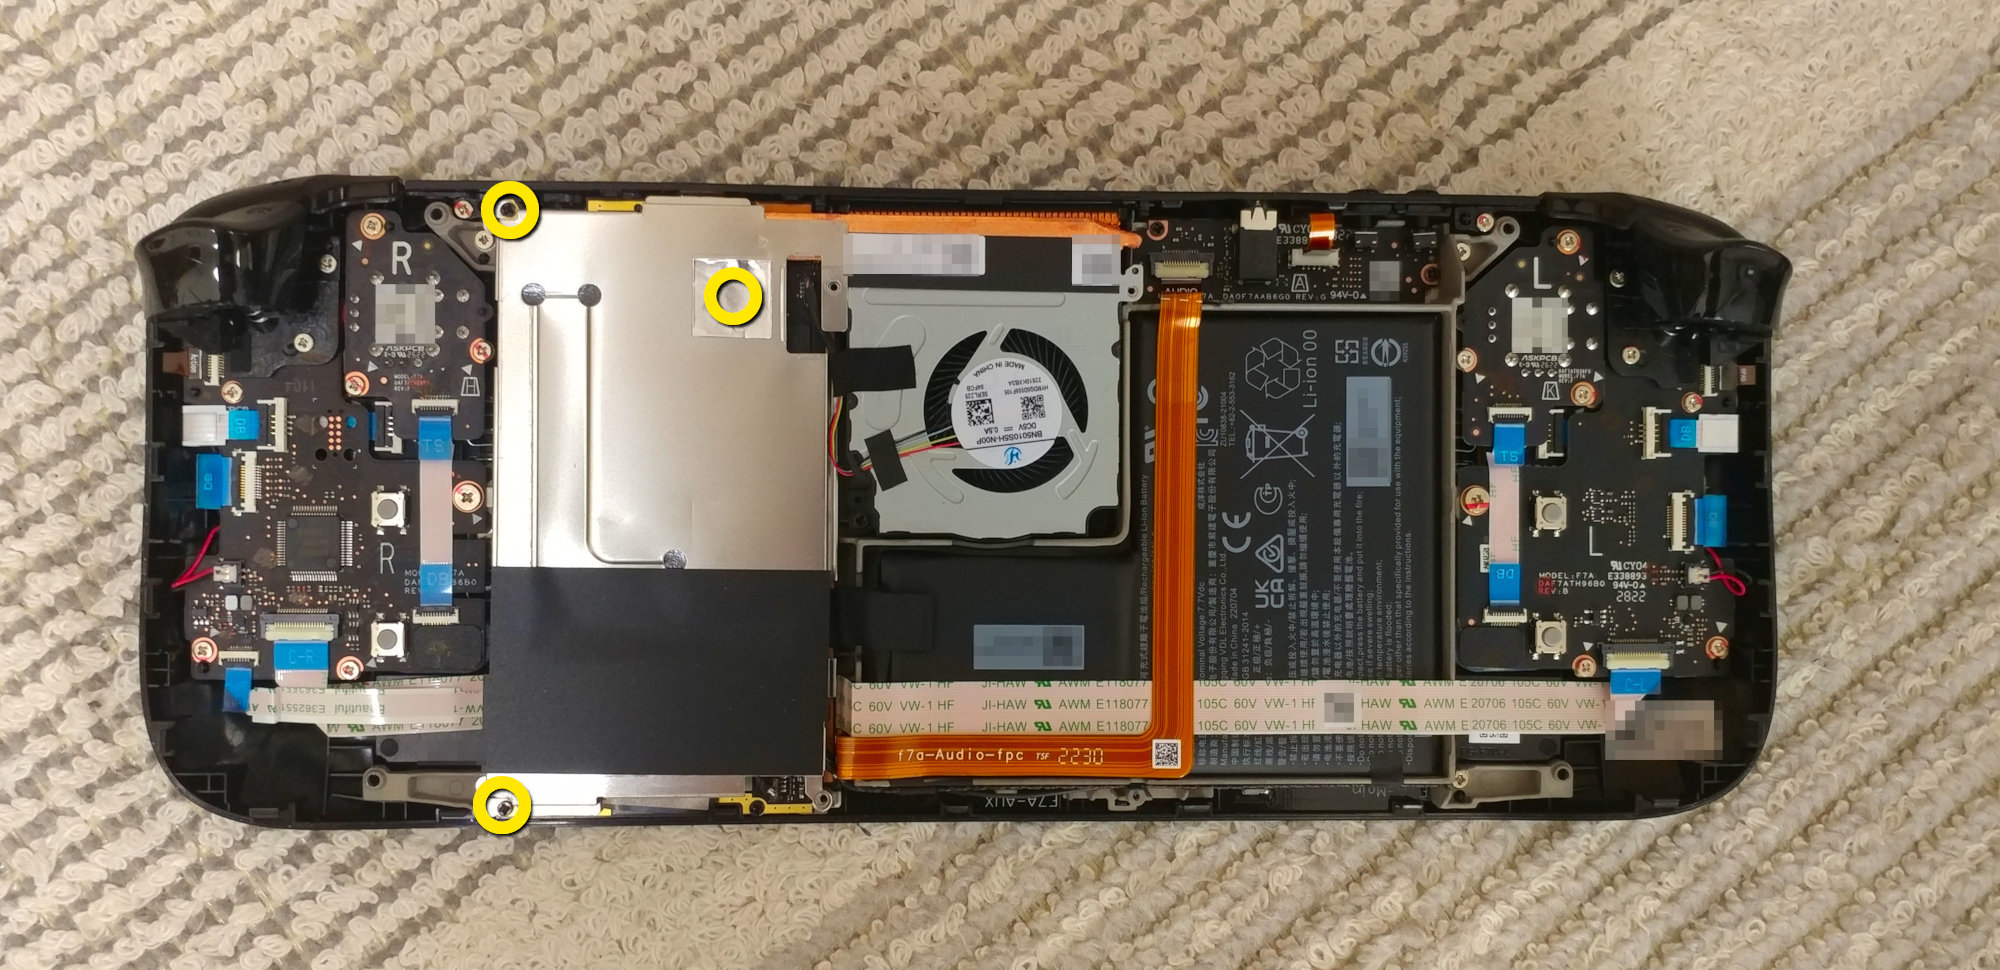
- Remove the metallic plate covering the components on the left side (3 screws, highlighted in yellow in the above picture, with one hidden behind some kind of metallic sticker).
You should now see this:
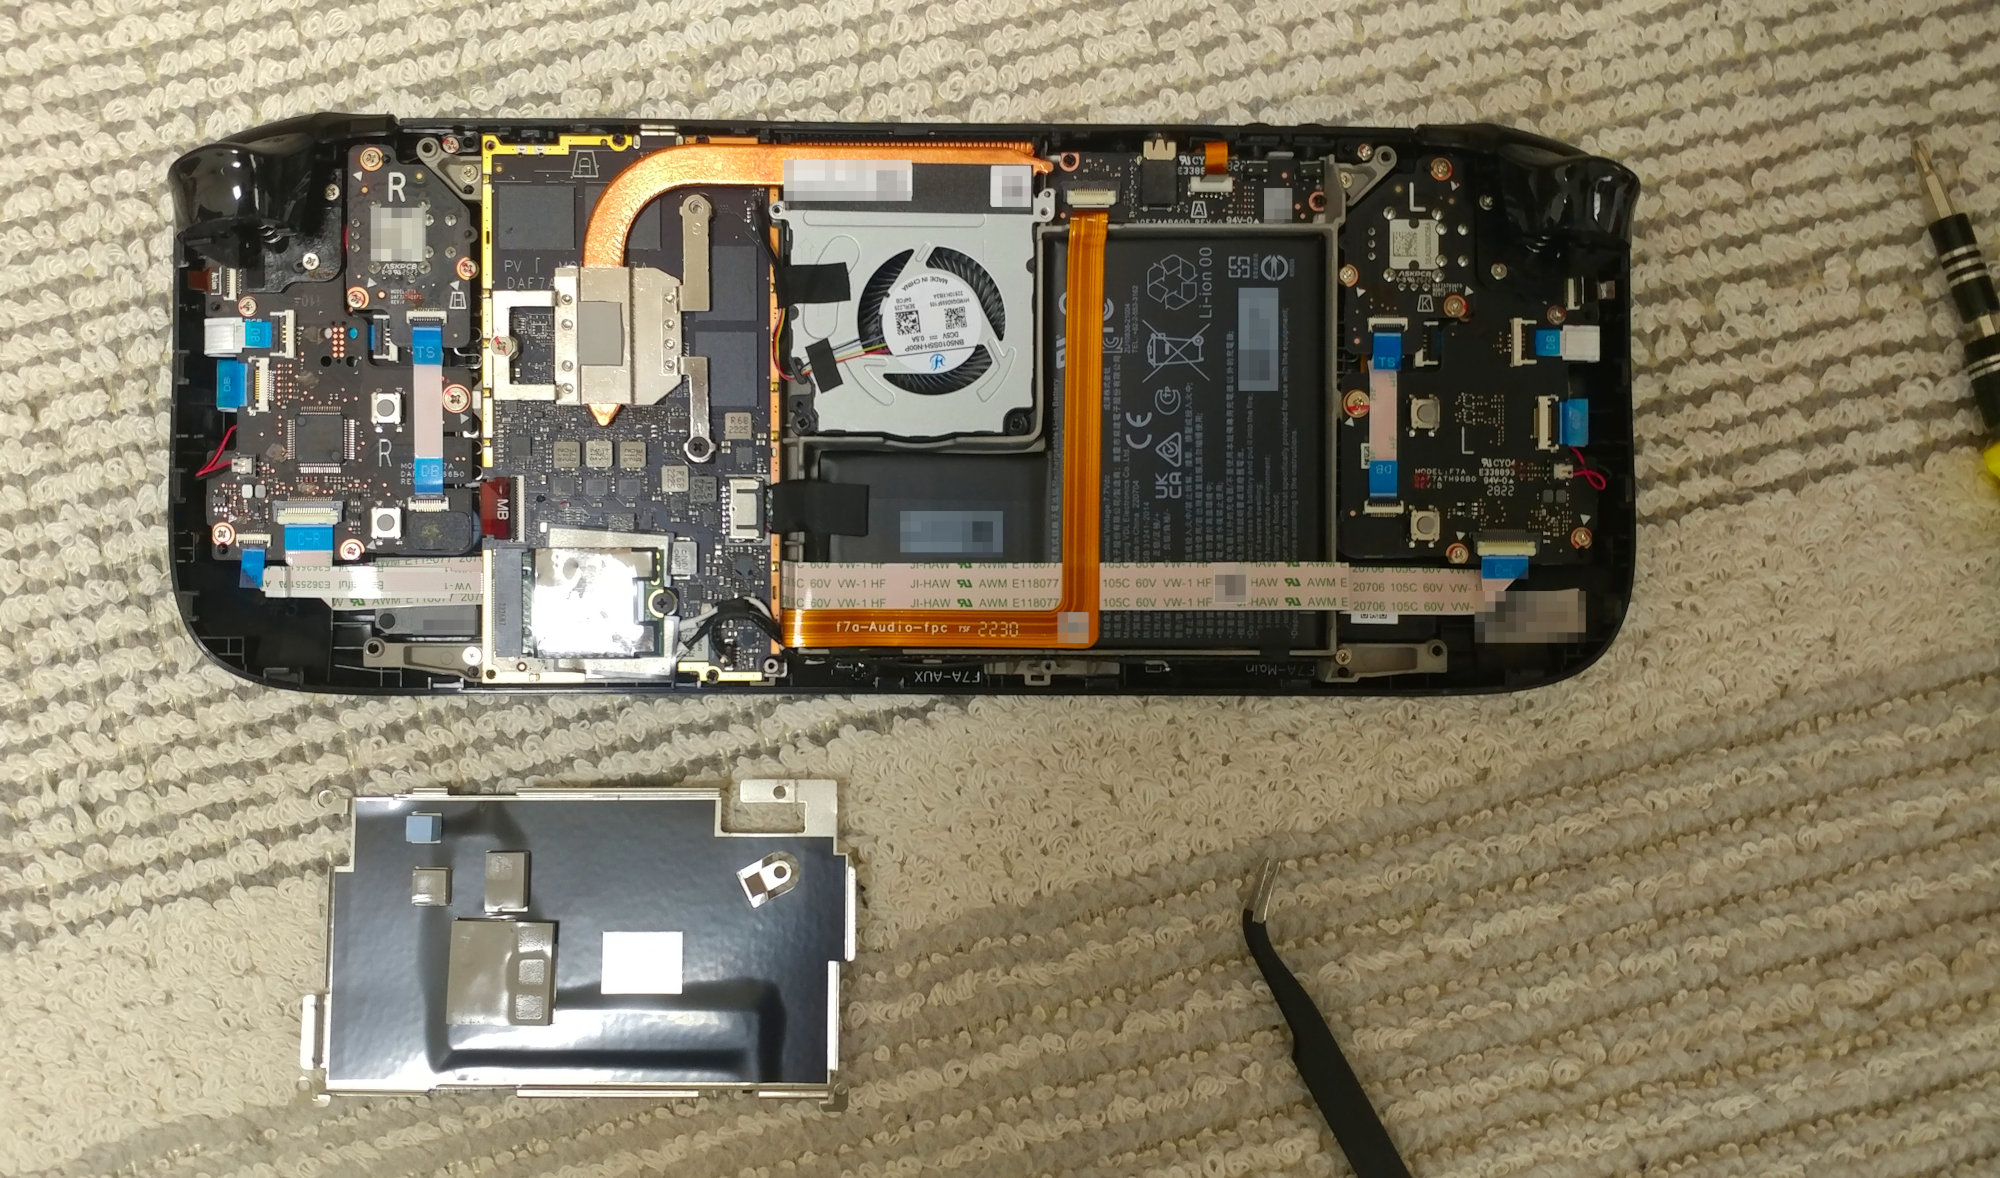
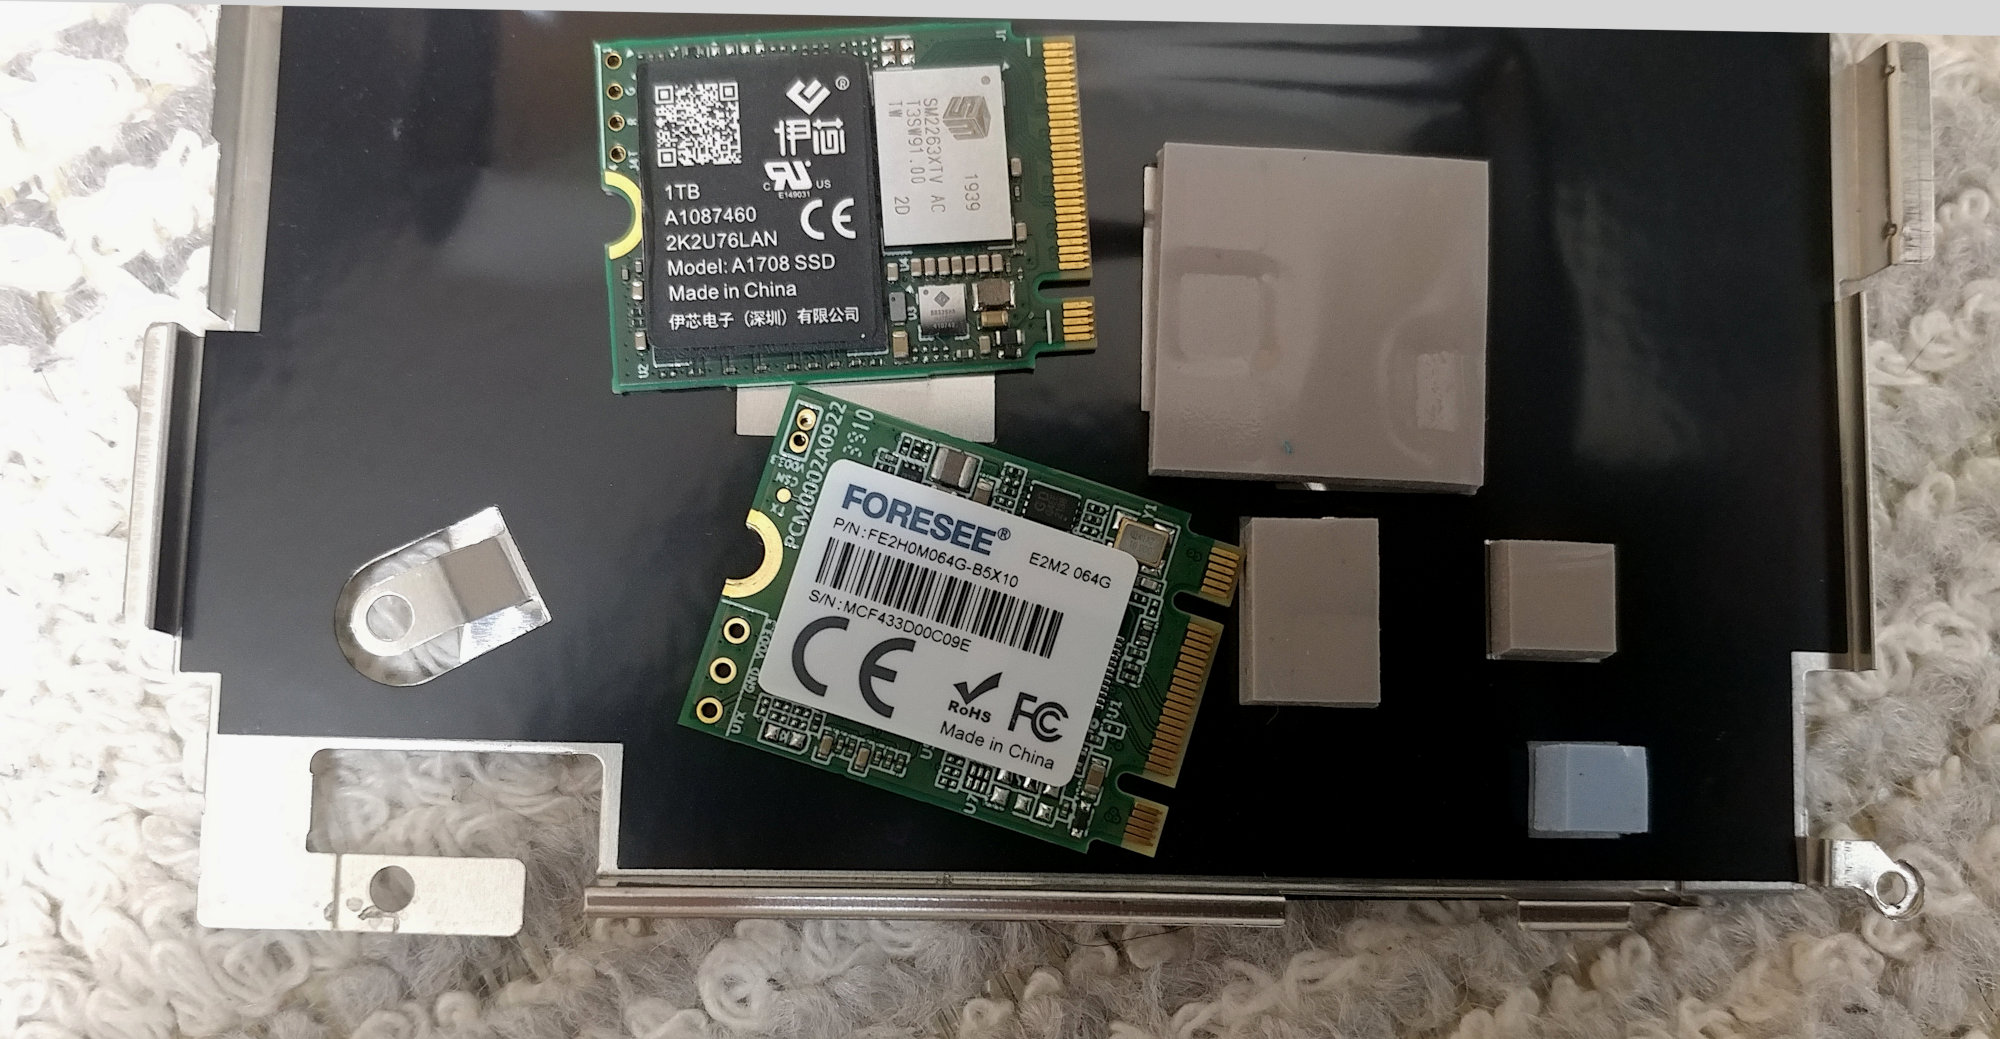
- Remove the NVME drive by removing the screw, and then pulling it away from the connector gently
- Insert the new drive and lock if with the screw you just removed
- Put back the metallic plate and the backplate of the Steam Deck.
- Before putting all the screws back, I’d suggest to then test your setup before putting back the last 7 screws.
I was planning to re-image my Steam Deck first, as I did not really care for the data on my original 64GB drive. There was nothing that I would really lose, apart from maybe a few hours of downloads.
When Things Fail
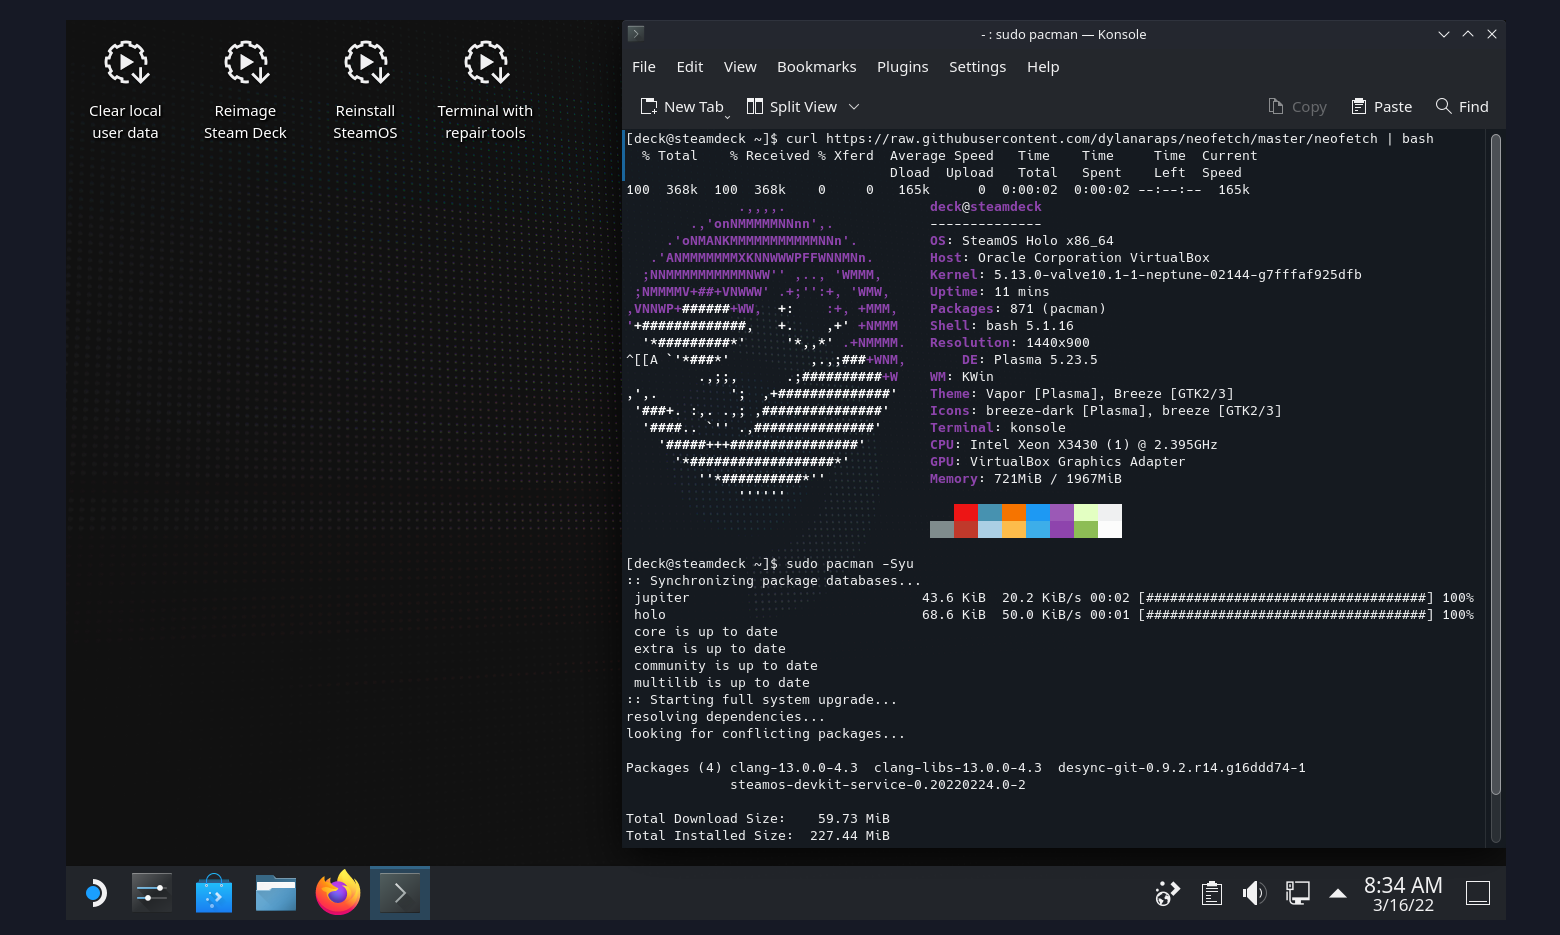
When you boot from the USB drive containing the recovery image, you end up with a desktop environment that looks like that, with 4 icons at the top left. You should choose “Re-Image” if you want to erase the drive completely, which is appropriate when installing a new drive.
 (not my image)
Turns out that when booting the recovery image, my Steam Deck decided that it should mount my new NVME drive as well for some reason. And then when I tried to trigger the re-imaging process after booting from my USB drive, it just refused to do anything. I had to connect a keyboard to find out by using the terminal commands (repair.sh is the script you need in ~/tools/) that the reason it failed was because the NVME partition were mounted. I considered trying to unmount them but the volumes were not clearly defined in lsblk and I did not want to waste hours to identify the issue.
It would have been nice for Valve to put a bit more effort to at least display the error messages, using a Zenity script or something when their tool fails. It feels very bare-bones and poorly documented.
Brute Force
It was time to change to a more drastic approach. I ended up making an image of the 64GB drive that I had originally, using the USB adapter for M2 drives, and the GNOME Disks utility to create a whole image of the disk. Once that was done, I removed the 512 GB NVME drive from the Deck, and pushed the 64GB image on it using GNOME Disks again. Here’s an example of what the interface looks like on GNOME Disks:

You first “create a disk image” of the 64GB drive, and save it to disk. Then, you “restore the disk image” from that file on the larger NVME drive, which in my case is the 512GB drive.
Following this, I re-inserted the drive in the Steam Deck (that’s why I recommend not to put the final screws until you confirm you are actually done) and it worked without a hitch at the next boot, with all my files and downloads still there as if nothing had changed… except the drive size.
Now what?
And you are done! You can now enjoy a much bigger drive (512 GB in my case) which made it possible to move most of my games that were on the second microSD card that I was previously using. The new NVME drive may also be a bit faster, but it’s hard to judge as you might see one second difference here or there, which is hardly noticeable in most cases.
It’s the cheapest way to upgrade your Steam Deck. This has cost something like 70 USD all things considered, and about 2 hours of my time because I had trouble with the re-image. If I were to do it again, I would probably be done in 45 mins tops (making an image of the original drive took 20 mins by itself).
Now that you are aware of the different failure modes with this article, this should be a breeze to do it on your end. Now the only question if whether you really want to do it or not, because, OF COURSE YOU CAN!
Addendum: The NVME Drive Found in the Steam Deck
The drive that was in my Steam Deck was the FORESEE 64GB model with a parts number described as fe2h0m064g-b5x10.
FORESEE is apparently a brand of SSD and NVME drives from LONGSYS, as you can see on their own website:
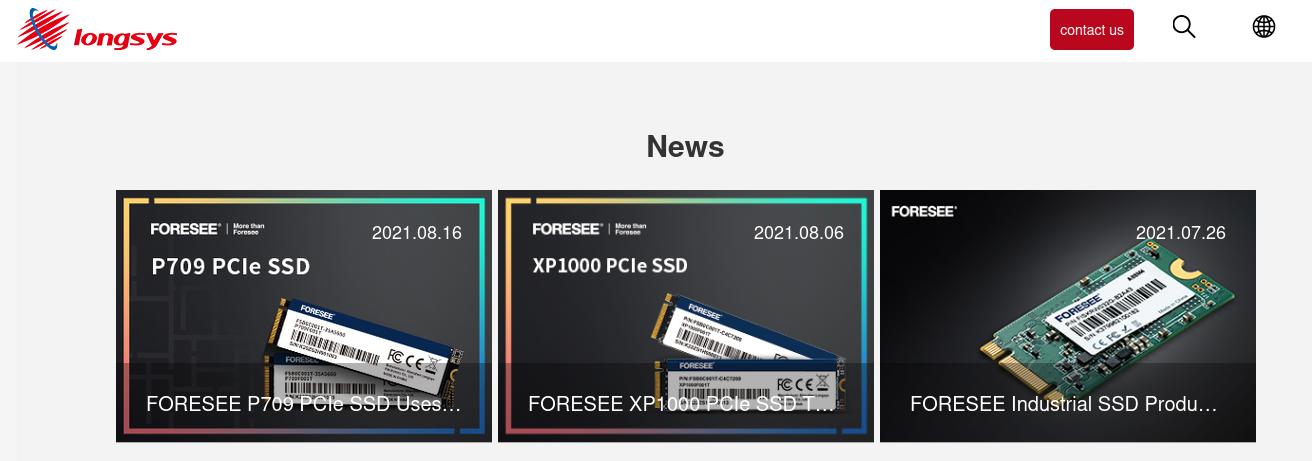
Longsys Electronics is a provider of consumer electronics products - they do embedded memory, SSD storage, memory modules, automotive storage, and more products in such categories. They have also acquired the brand Lexar back in 2017, so any drive marketed as Lexar is likely also made by Longsys. They are based in Shenzhen, as expected for most electronic parts made these days outside of Taiwan.