
Framework Laptop Review (Intel 12th Gen Laptop)
The Framework laptop comes from the new company from the same name, which is trying to disrupt the established laptop market by focusing on customization and reparaibility. Both are noble principles I highly value (which is why I typically go for Thinkpads, at least the older versions of Thinkpads as Lenovo is progressively losing its ethos).
While they do not ship their laptops directly with Linux, Framework has a pro-Linux stance by providing direct documentation on how to install the most prominent distributions on the device. I decided to take their device for a spin with Ubuntu since it was mentioned as having almost perfect compatibility. But first, let’s have a tour at the hardware.
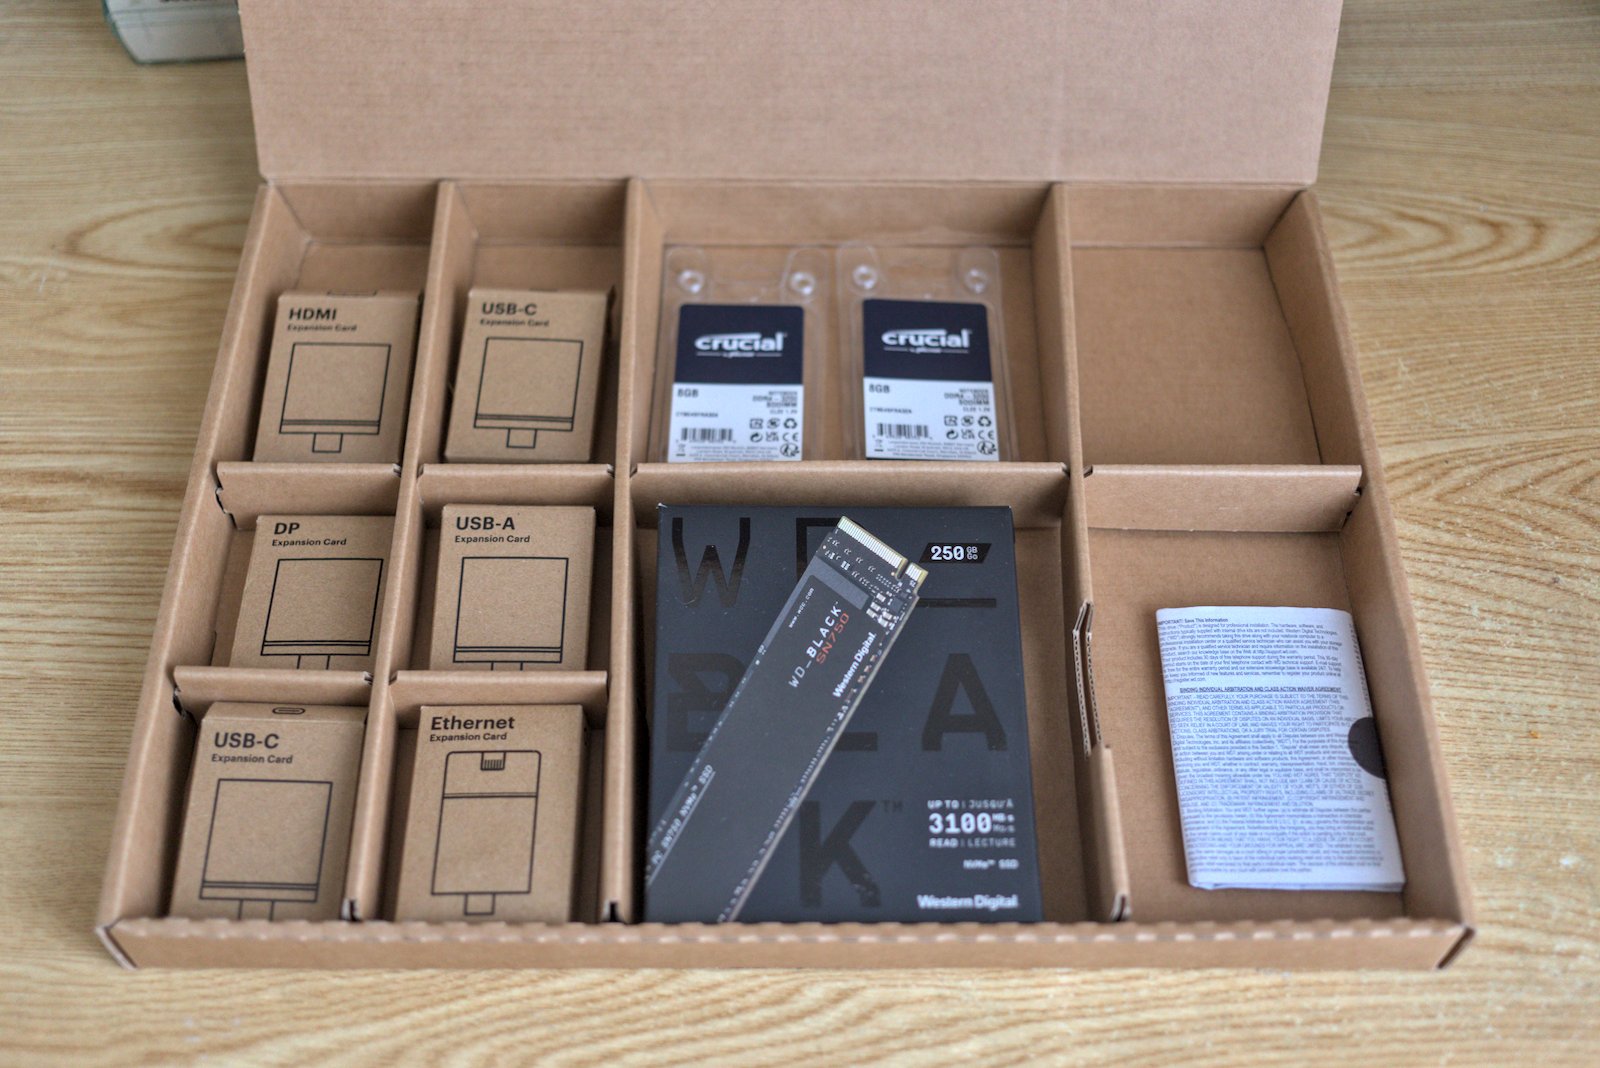
Note that I got the DIY version of the laptop, which comes with parts to assemble it yourself. Namely the RAM memory sticks, the M2 SSD, and the extension modules (you get USB-A, USB-c, ethernet, HDMI and DP ports as plug-and-play extensions).
The machine has no OS by default in this version and you can therefore install what you want.
The Hardware
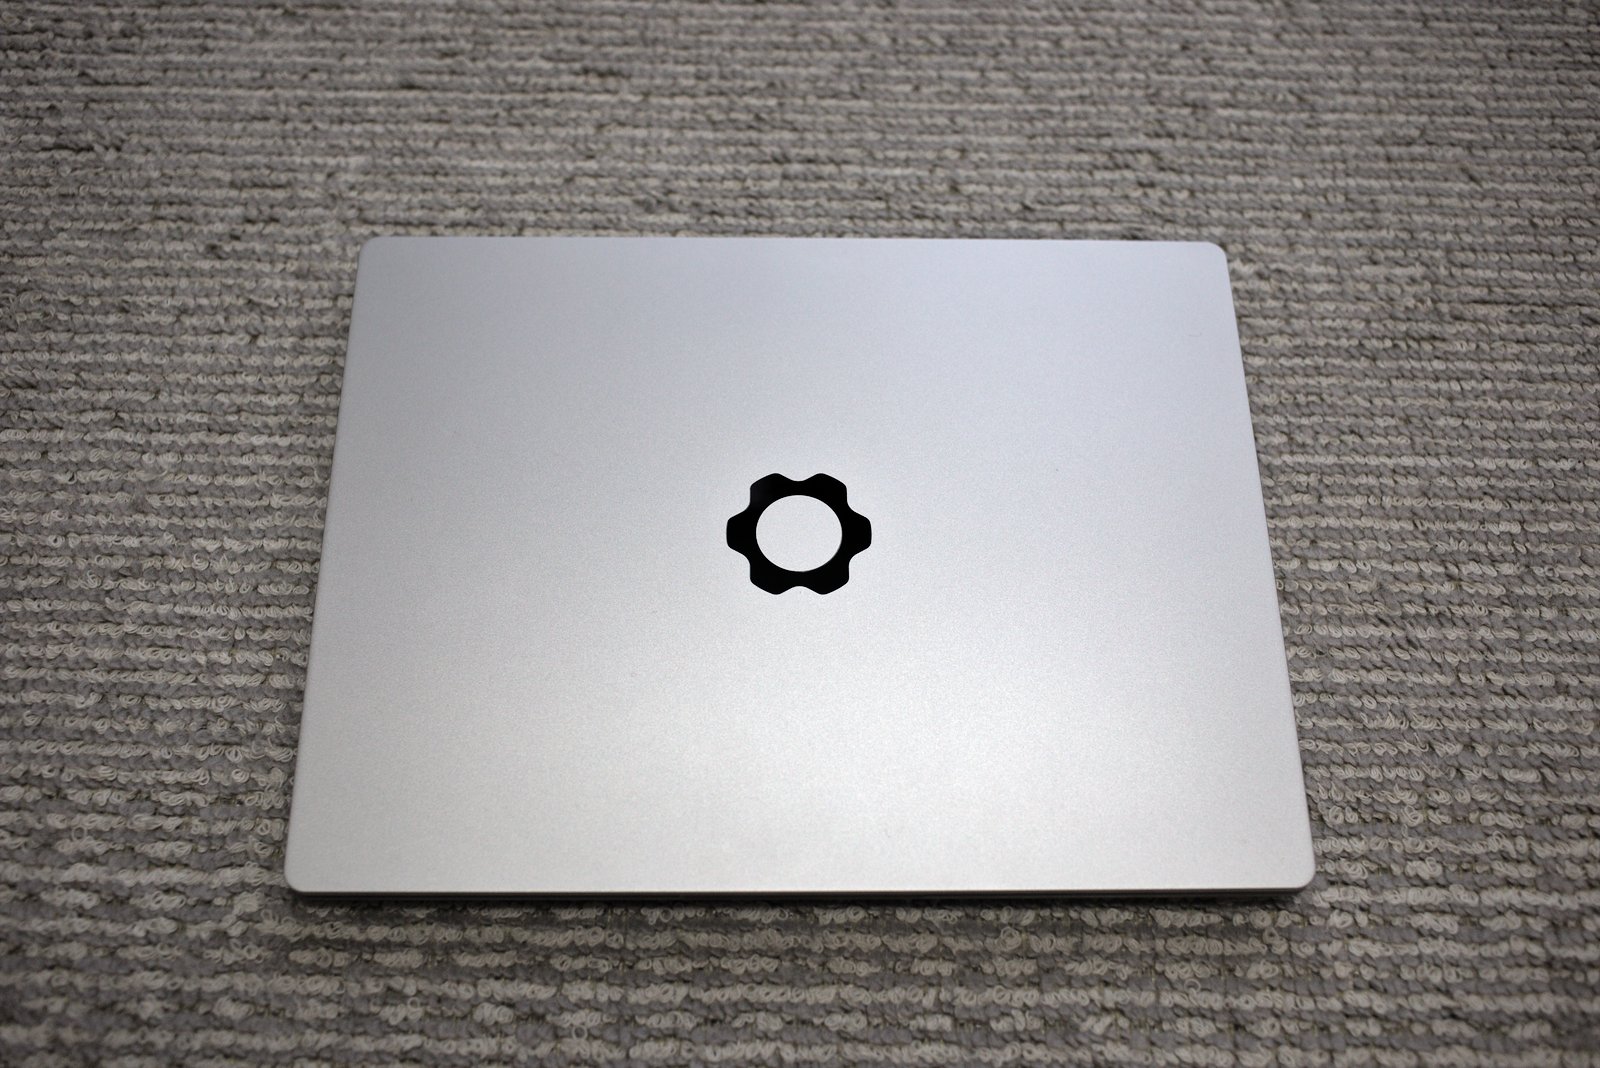
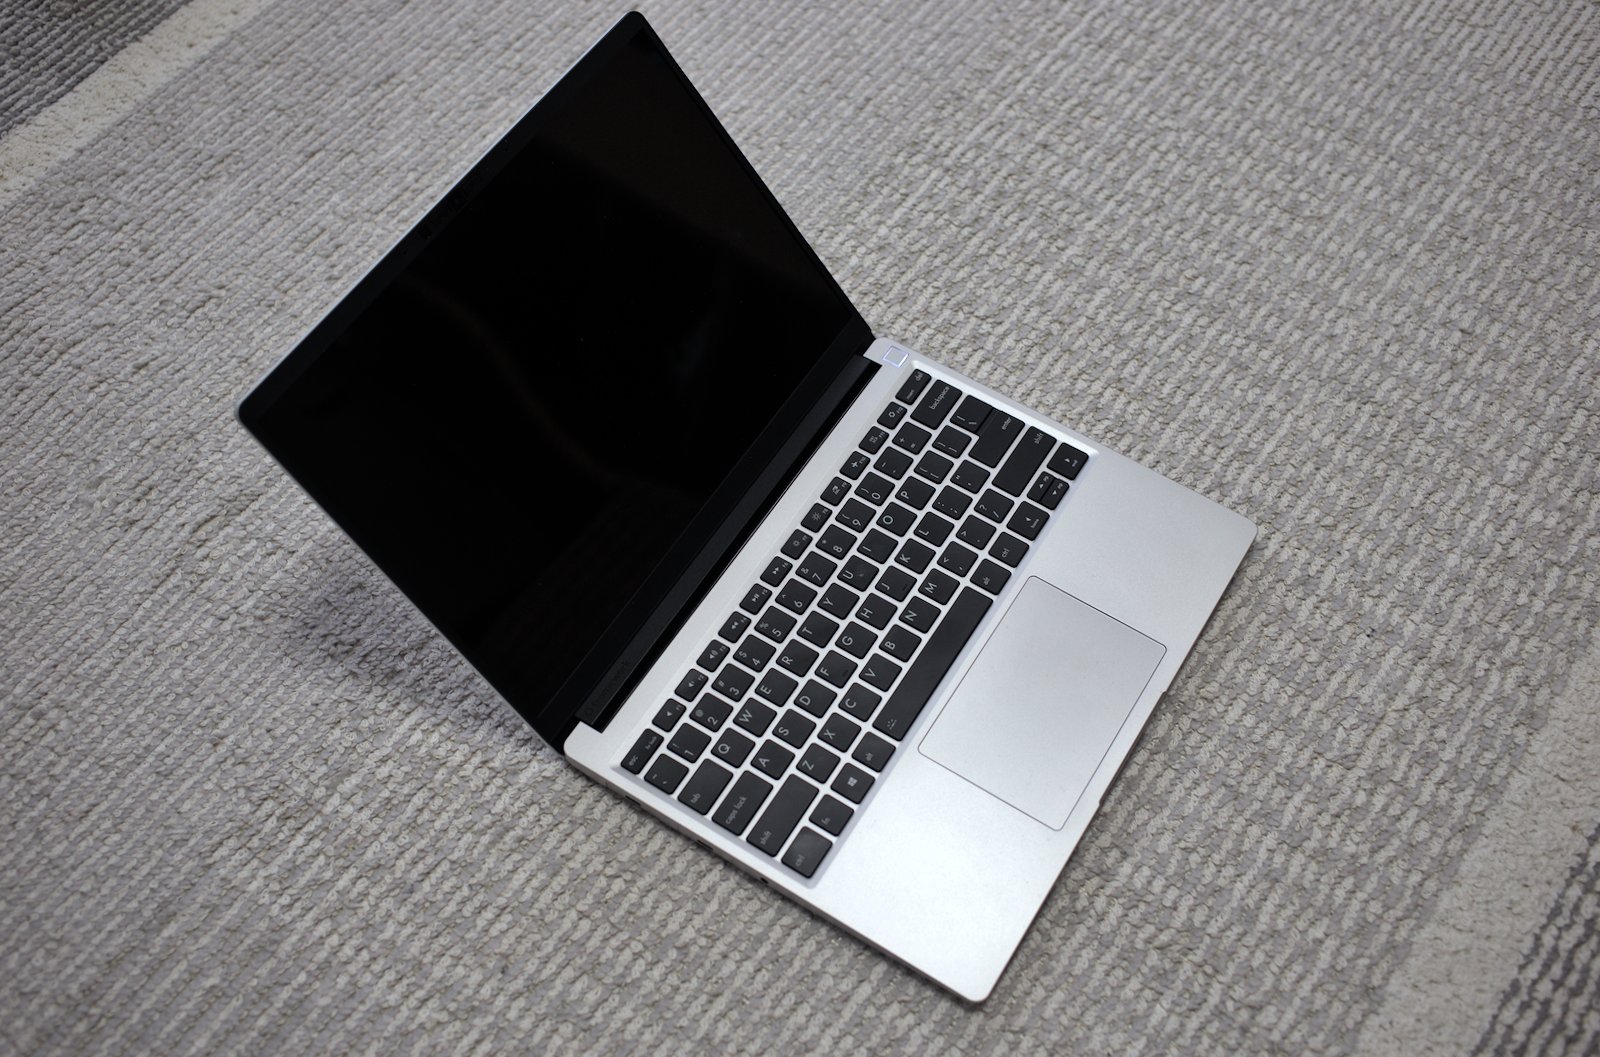
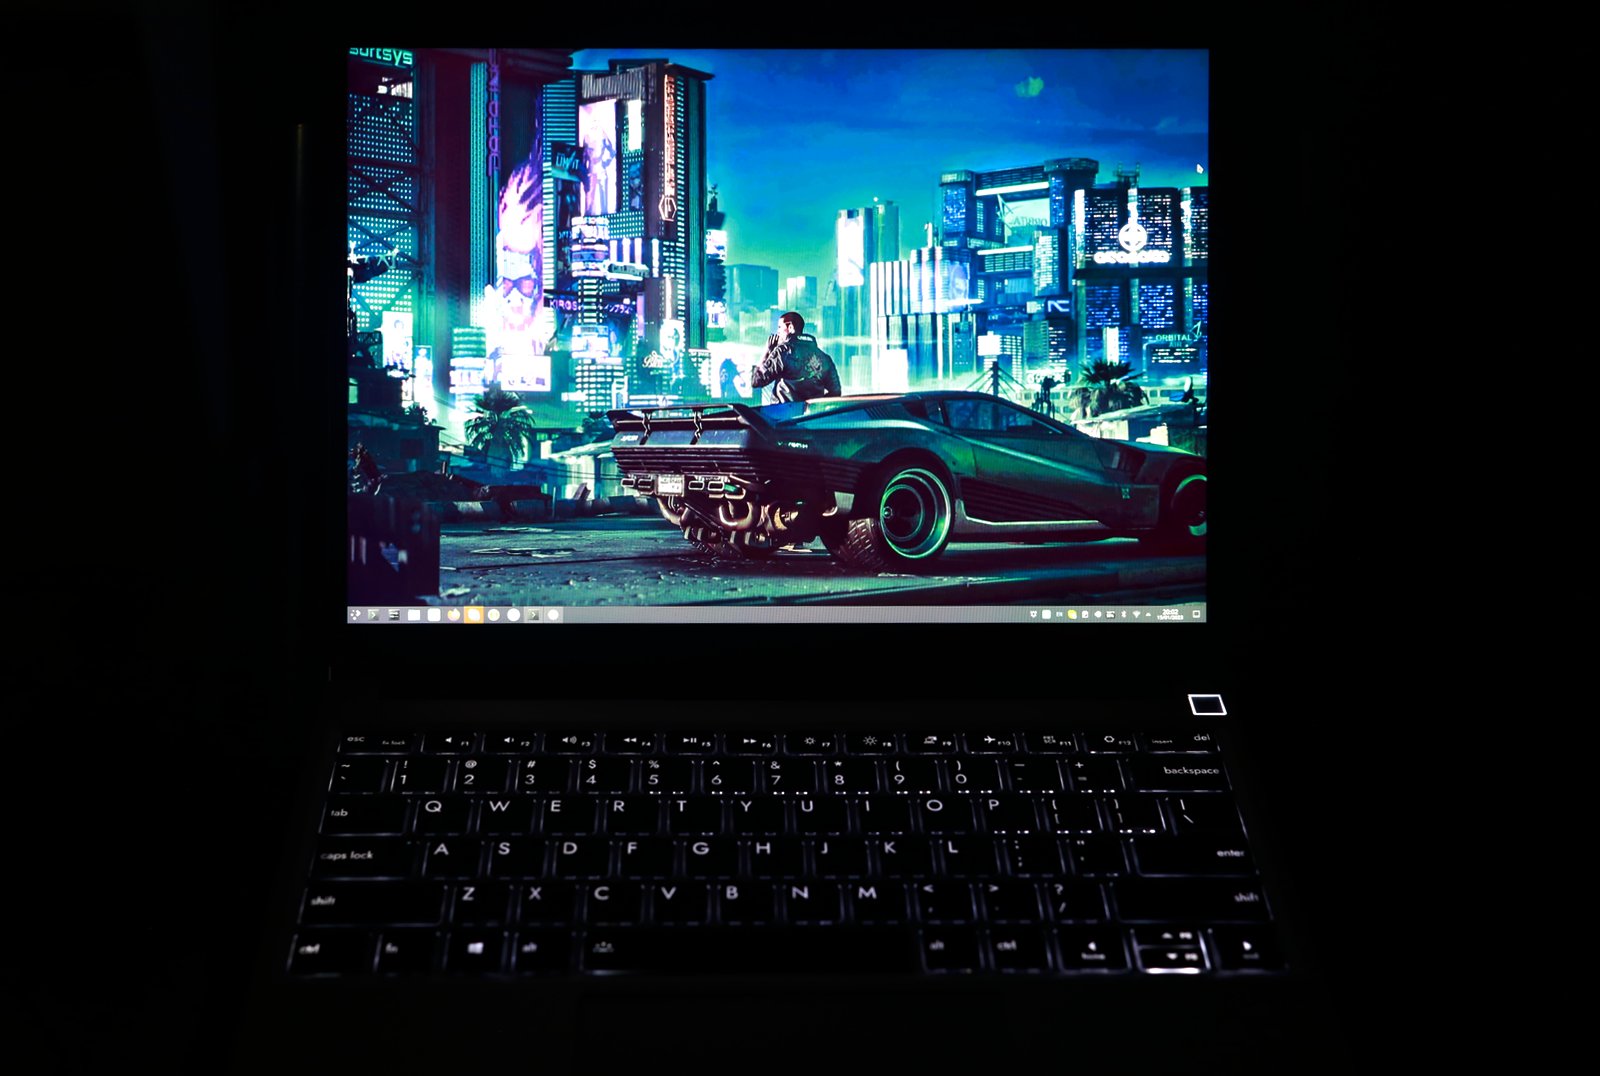
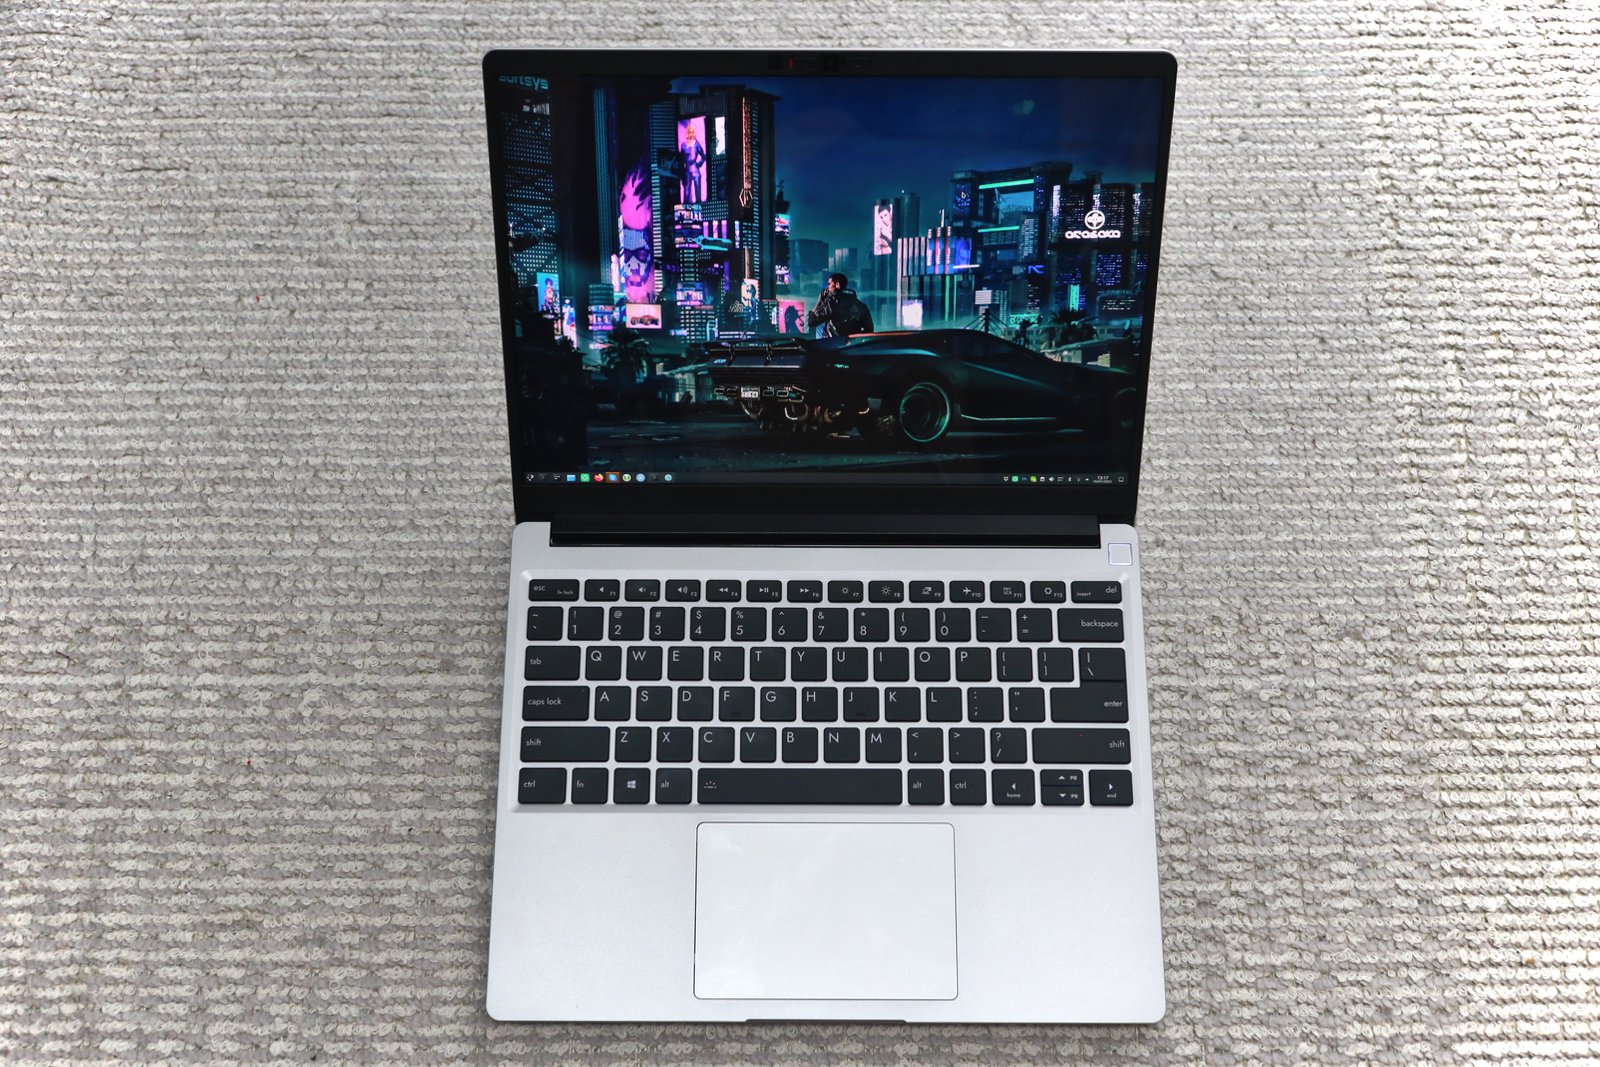
The laptop comes in a unique form factor, with a 3:2 display ratio instead of the usual 16:9, which makes it a very useful tool to display text, such as when coding. The design is highly reminiscent of the MacBooks, with a color scheme that’s eerily similar. Nothing too fancy on the hood except the Framework logo (a cog) where you would typically expect some kind of half eaten fruit. It’s stylish and I like the fact they refrained from putting any text on it.
Configurations
There are several configurations available directly on the Framework website, but for Linux users you should really consider the DIY edition, since it ships without an OS and makes it easy to focus directly on building your own Linux machine. It will ship with all parts ready to assemble in your machine, and as you will see it’s simple enough that you should not be worried to look under the hood. The Framework is made for that.
Here are the full specs of the machine:
You can choose between three types of CPUs:
- i5-1240P (Up to 4.4 GHz, 4+8 cores) $819.00 base price for the config
- i7-1260P (Up to 4.7 GHz, 4+8 cores) $1,119 base price
- i7-1280P (Up to 4.8 GHz, 6+8 cores) $1,529.00 base price
The model I received for review is equipped with the i7-1260P.
- Battery: 55Wh (claimed 80% capacity after 1000 cycles)
- Biometrics: Fingerprint Reader
- Webcam: 1080p 60fps
- Connectivity: WiFi 6E, WiFi 6E with vPro
- Display size: 13.5”
- Graphics: Iris Xe Graphics
- Weight: 1.3kg
- Thickness: 15.85mm
As for storage and RAM, with the DIY edition it’s up to you to add the parts that you need. My model came with:
- A 256GB NVME SSD drive from Western Digital
- Two sticks of 8 GB of RAM (total of 16GB)
Pricing
The pricing is very competitive, at least in the US. The HP Dev One that I tested recently sells at about ~1000 USD with 16GB of RAM, and you can get roughly the same kind of pricing with the Framework using the DIY edition and the latest 12th gen Intel processor (with the lowest CPU, the i5-1240P). As we will see later on they are fairly comparable in terms of performance with a few different metrics.
Noise profile
The laptop is completely silent under normal processing loads - most of the time the fan does not need to run to cool the internal hardware down. You will start hearing the fan when all processors start running at full load, like when you run some games or compile software, for example. But even then, the noise level remains acceptable, and fairly clean (no hiss).
Weight and Dimensions
The laptop is very light. You can even hold it with one hand without destroying your wrist. It’s a perfect companion to bring in a backpack, and it’s thin enough you will find space easily. I took it for a trip overseas and even though it was compressed a bit against another laptop, it survived without a scratch.
Keyboard
Good layout with 6 rows and no weird placement of Home/Pg UP and all on the right side of Enter key.
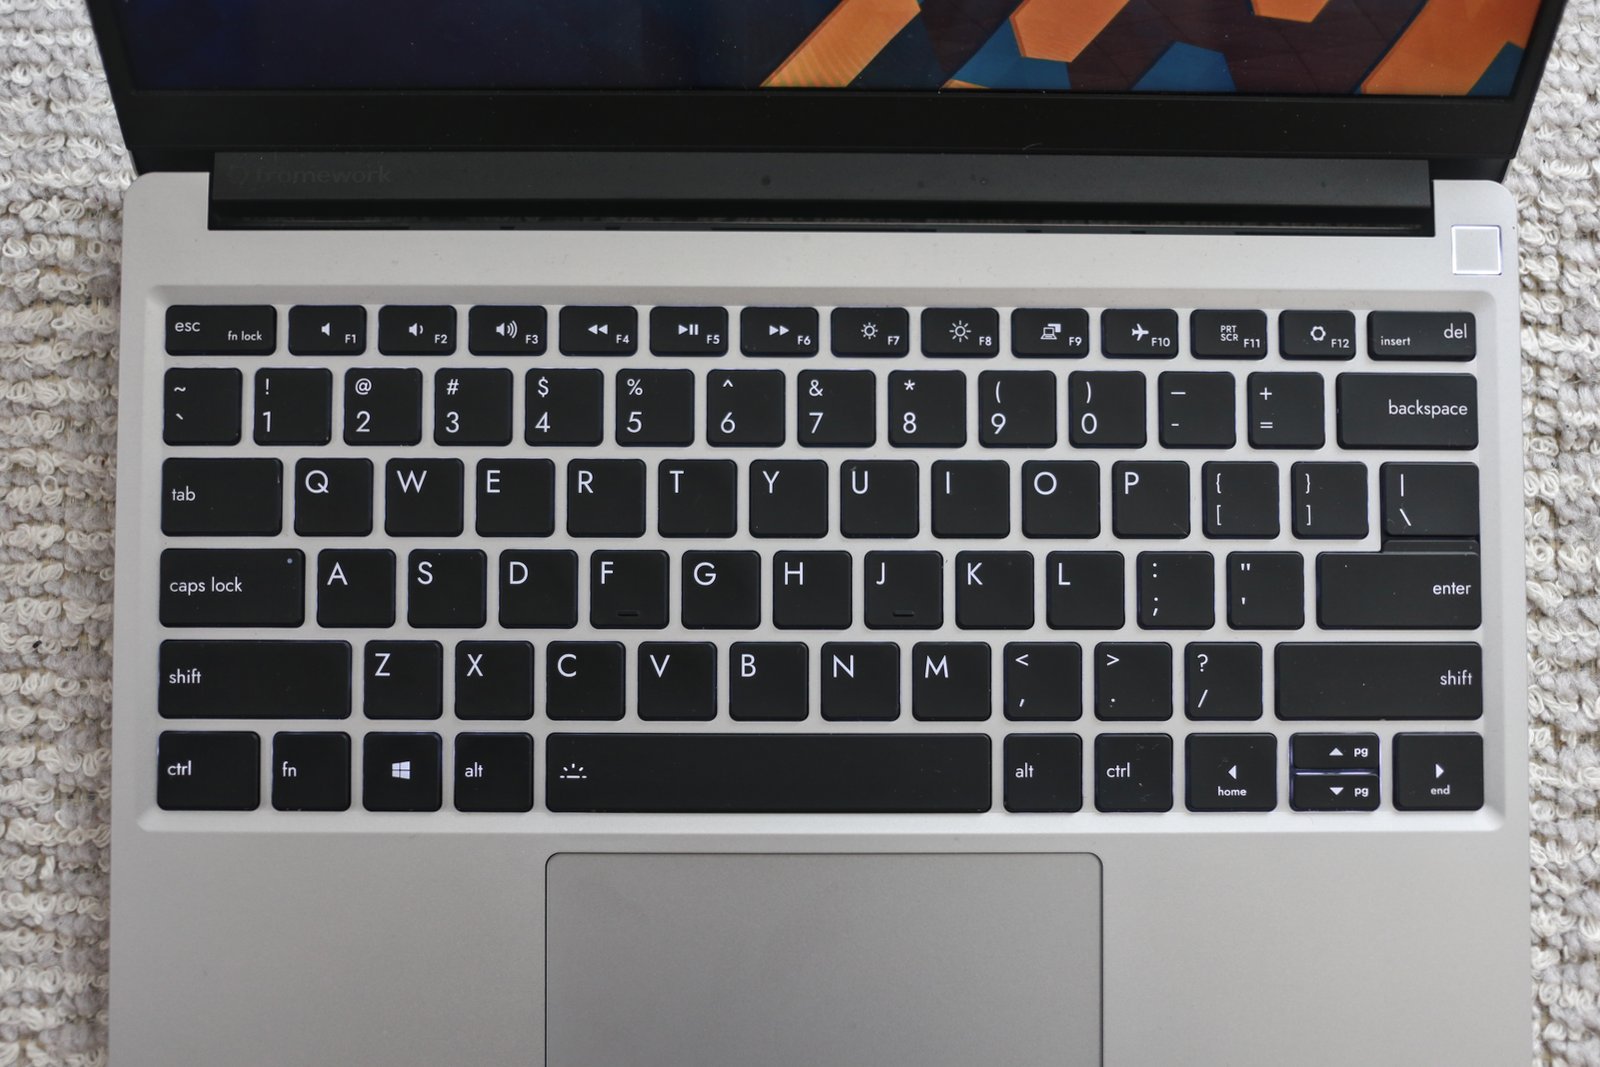
It comes with a backlight that has 3 different levels to help you work in darker places. In terms of quality, the keyboard feels very similar to my Dell Latitude, which to say very usable while a little on the cheap side of things. Here again we are far from the Thinkpad quality of keyboard, but that was expected.

One thing they did here just like on the HP Dev One is the awful arrow keys with a single key split in two for up and down arrows. Really not a fan. At least it does not feature the Page up/down and Home buttons on the extreme right side.
The keyboard has 3 levels of backlight (when activated) to enable you to work in darker environments.
The keyboard is lighted up well in all areas. Note there is a little bit of lit bleeding on the vertical arrows but that’s not a big deal when you are using it.
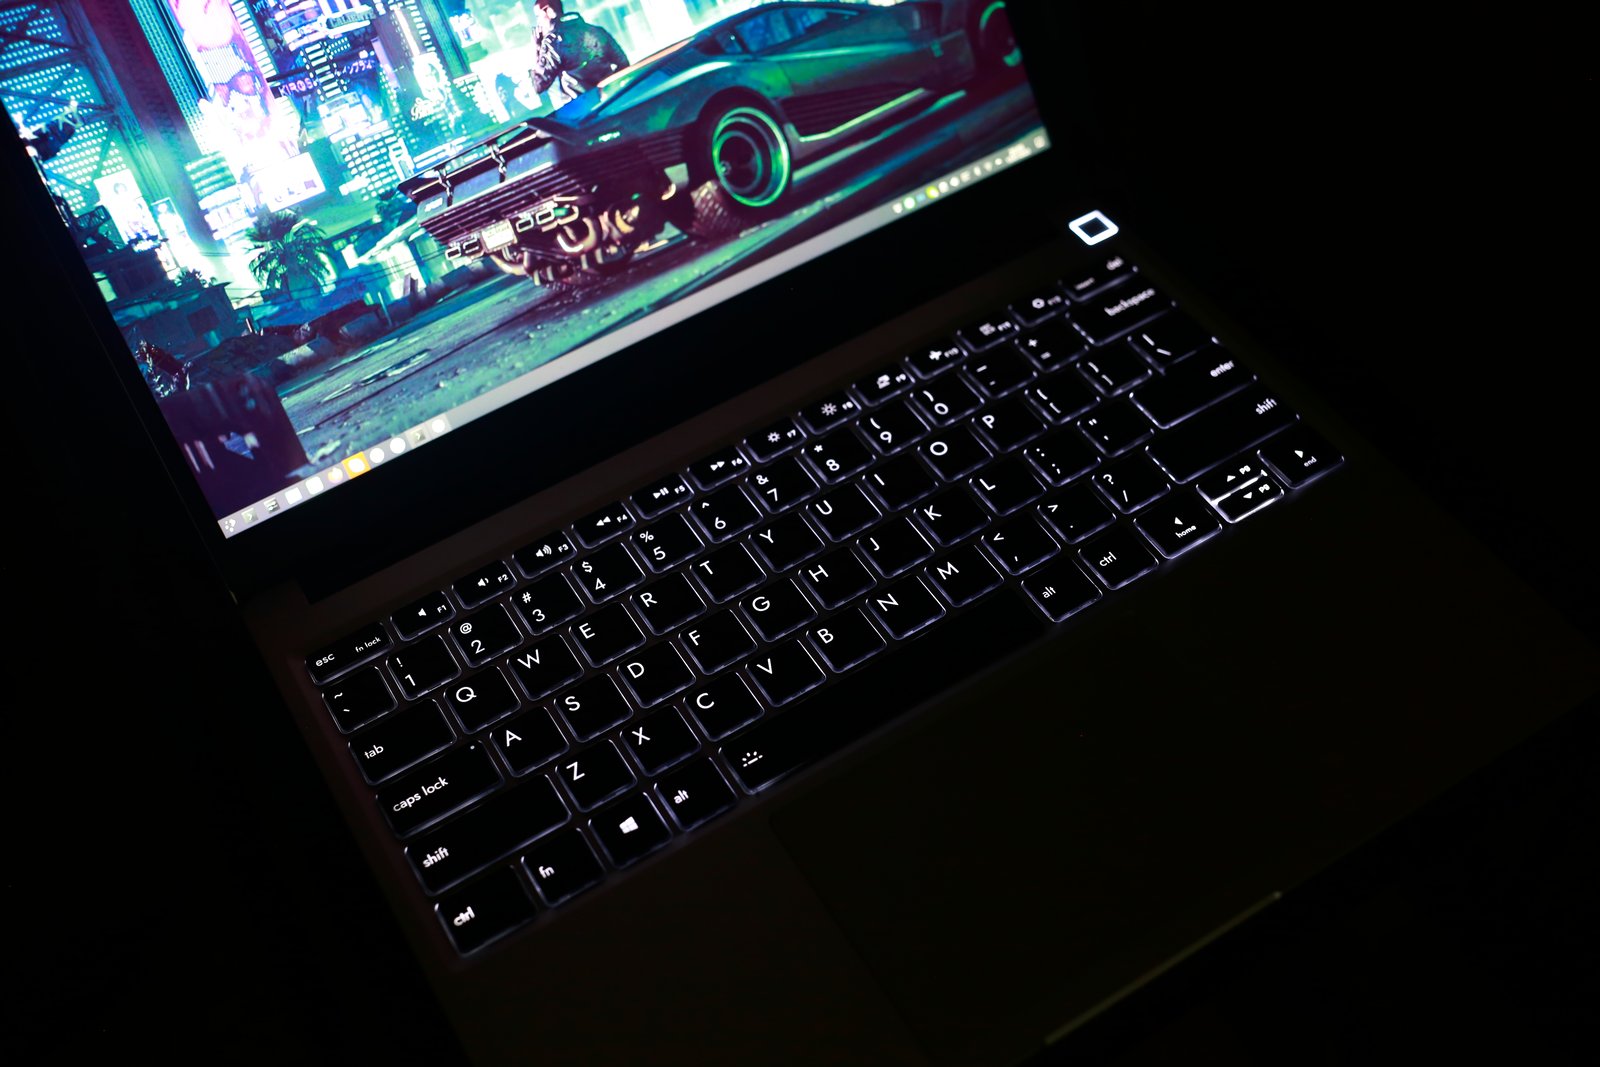
Comparing with the HP Dev One, the lighting here is a bit more subtle since the letters on the keyboard are on the upper left side, while there were at the center on the HP Dev One, and therefore received more direct light from the backlit LEDs. In any case, both are perfectly usable in darker environments thanks to this feature.
Trackpoint (or lack thereof)
There is no trackpoint on this keyboard. I can’t say I miss it here, because they usually don’t work as well as on Thinkpads when there is one (on other brands of laptops), so their usefulness is rather limited. But I thought I would mention it for people who actually prefer to have one.
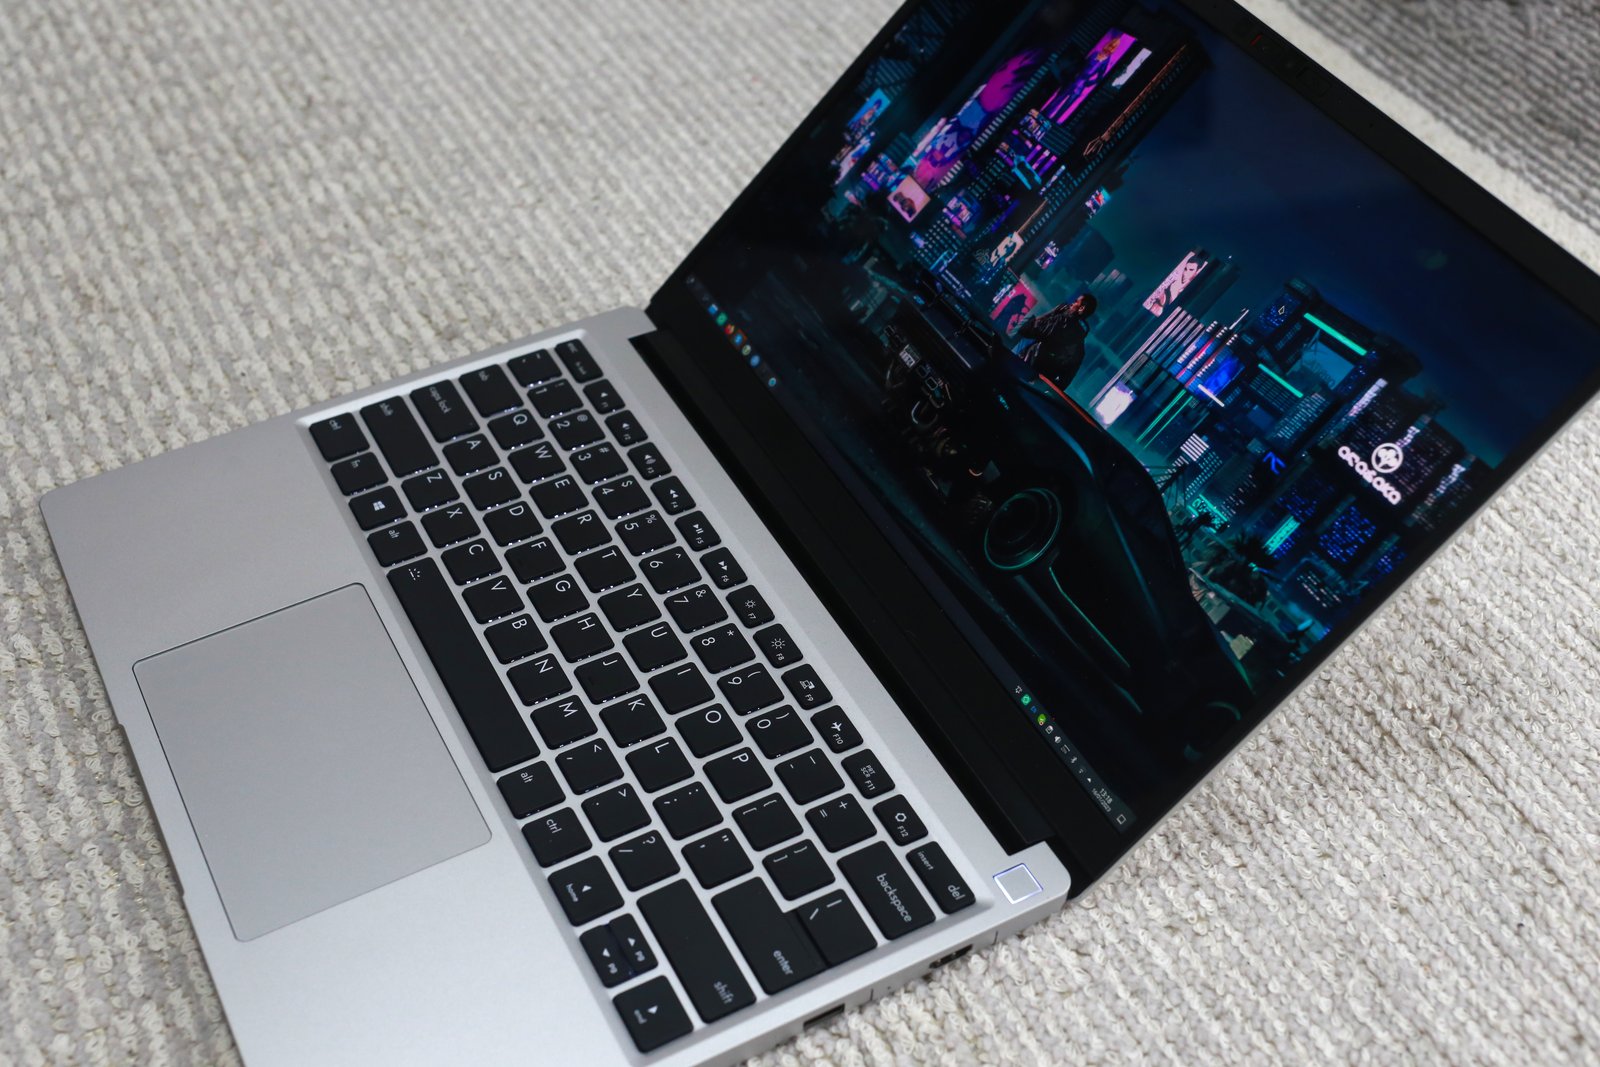
Trackpad
As expected these days, the trackpad is huge and takes a good chunk of the surface below the keyboard. It works very well to detect one’s finger’s movements on its surface and is pleasant to use. However I have one gripe about it: there are no physical buttons for click actions. Which means you have to resort to a double-tap to simulate a mouse left button, or use the bottom of the trackpad which is clickable left and right - the left bottom side giving you a left mouse button click and the right side… you know. This is something that Lenovo did as well when they introduced their X240, T440 series, and very few people liked it. This led to Lenovo re-introducing the physical buttons in their next series with the X250, T450, etc. This is where Framework should be ideally positioned to make a difference, since their laptop prides itself in being user-customizable. They could provide an option to have a trackpad with physical buttons and let end users decide for themselves what they actually prefer.
Right now, such an option does not exist, but one can hope.
Palmrest: a different size.
Since the screen is 3:2 format what happens here is that the screen is less wide than usual, resulting in a smaller space for resting your hands on the side. It’s not bad, but you will definitely see a difference if you are used to larger screens and therefore larger laptops.
Fingerprint reader
Interesting choice here to combine the power button and the fingerprint reader in one (apparently this is something that you also see on Macs). By default you can register your fingerprints in GNOME in the Users screen to help unlock your device using your finger(s), and if you want to use it for sudo operations that’s also possible as long as you change the PAM settings. In any case, it works very well and completely out of the box with Ubuntu 22.04, which is great. The fingerprint detection is fairly fast and precise, you usually don’t need to put your finger more than twice for it to unlock the login screen.

I tried KDE as well, and while the fingerprints are properly stored just like on GNOME in the Users menu, it does not look like the fingerprint is activated by default for any action. So, KDE users, know that you will probably have to do some additional steps in order to configure the behavior of the fingerprint reader (while it is properly detected).
Display
Linux users rejoice, as you can get better than 1080p on this laptop! In effect the screen has a bastard/unusual resolution of 2256x1504, and runs at 60 Hz. When you install Ubuntu it defaults to 200% scaling for the UI which is way too big to my taste. After enabling fractional scaling, I settled on 125% and this works well enough. Your mileage will depend on how good your eyes are. 100% is borderline usable but the UI elements and text become quite small by default.
The display is glossy (oh no!) but has great angles (oh yes!) which fixes half of the problems I had with the HP Dev One, for example. I’d much prefer a matte display, and this is where I am looking at Framework to make good on the customization at some point to make this kind of things possible. In any case it’s supposed to have full sRGB coverage so you may be able to use it for serious photographic edition and graphic work.
Note that the issues I mentioned before with the HP Dev One and its glossy screen resulting in rainbow effects does not occur here, so it’s a much better screen for most situations.
Since it’s 3:2 format I expected it to be an akward screen to watch movies or videos, but it’s actually not that bad. You get some black bars at the top and bottom of your screen, but it’s definitely usable.
The hinge problem
One of the main problems of the display is linked to the hinge. The display unit does not hold very firmly to the base of the laptop, and this causes a slight wobbling of the screen everytime there is a vibration on your work surface. This happens for example when you type - you will see some slight vibration of your display if you are not a very soft typer. This is a lot more obvious if you have a light behind you reflecting on the glossy screen: it will make the vibrations even more visible.
The hinge has some very desirable properties that probably cause this problem. For example, the friction is the hinge is soft: you can open the lid of the unit with a single hand in a very nice and smooth movement. But this behavior means the hinge does not have enough friction to absorb every small vibration out there, probably causing the wobbling.
(video of display wobbling)
Not a huge deal, but this is not something you see on established laptop manufacturers. HP, Leveno and Co have displays that hold very firmly.
Speakers
The speakers are NOT very loud, and not very clear either. They sound kind of muffled and are way worse than what you get on the HP Dev One when you compare them next to each other’s. They also tend to saturate badly when you go at full volume. This is probably one of the weakest points of the desktop. You won’t notice if you only use the laptop to do work or code, but if there’s any music playing involved, you will find it subpar if you have any hearing left.
I made the following comparison on a classical music piece between the sound you get from the HP Dev One speakers and the Framework laptop’s ones, as captured in the same position (about 10 cm above the middle of the keyboard) using a TASCAM PCM sound recorder.
It should speak for itself!
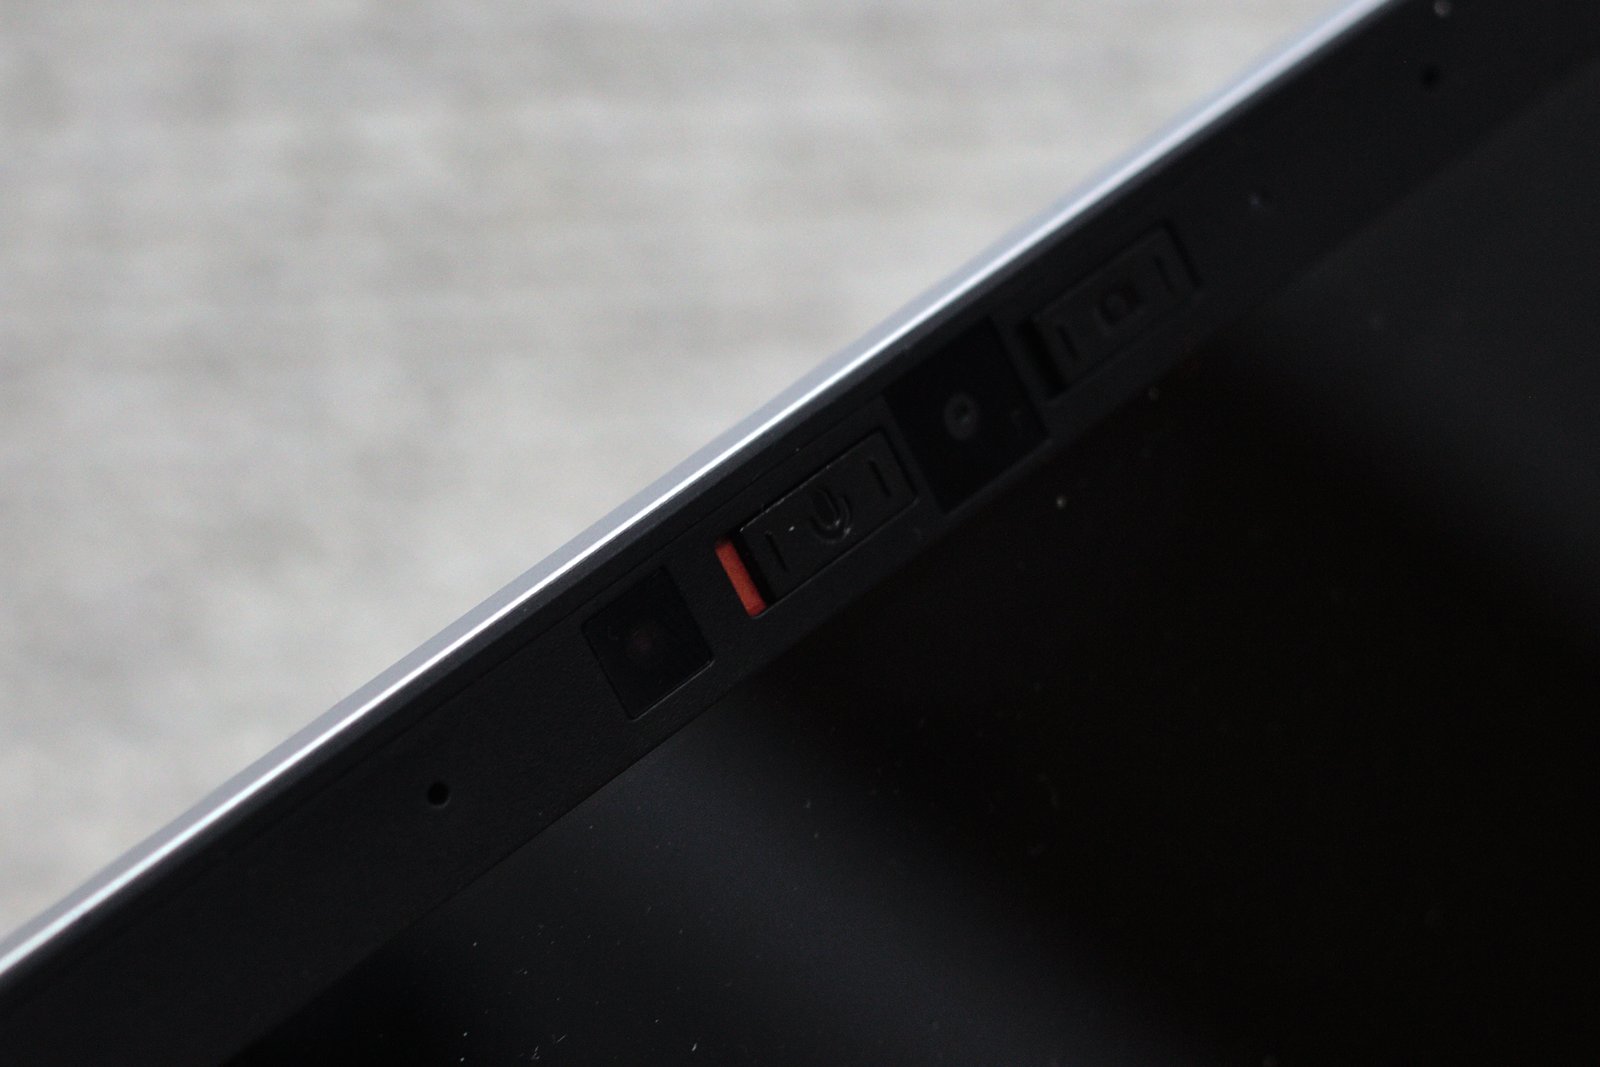
Webcam
The webcam has higher resolution than the usual 720p webcams, with 1080p resolution… but there’s a trick to benefiting from this added resolution: if you use the famous webcam capture tool, Cheese, you won’t be able to capture high resolution video at 60 fps. For some reason it looks bad and not more than 5FPS. At this stage I was wondering if the webcam was properly supported on Linux.
Then I tried OBS, and this is where the webcam shines. You get clear, 1080p video at 60fps without any issue in OBS. The exposure and contrast are good too, and this is definitely a much better video quality than you get in 90% of laptops out there.
The webcam does not have a physical cover but has a switch to disconnect it completely, hardware wise. when you do so, the webcam is not detected by your OS anymore. When it’s in the disconnected position, it had a red background so you can easily see if your webcam is available or not.

Here is what it looks like when both the microphone and webcam are blocked and deactivated.
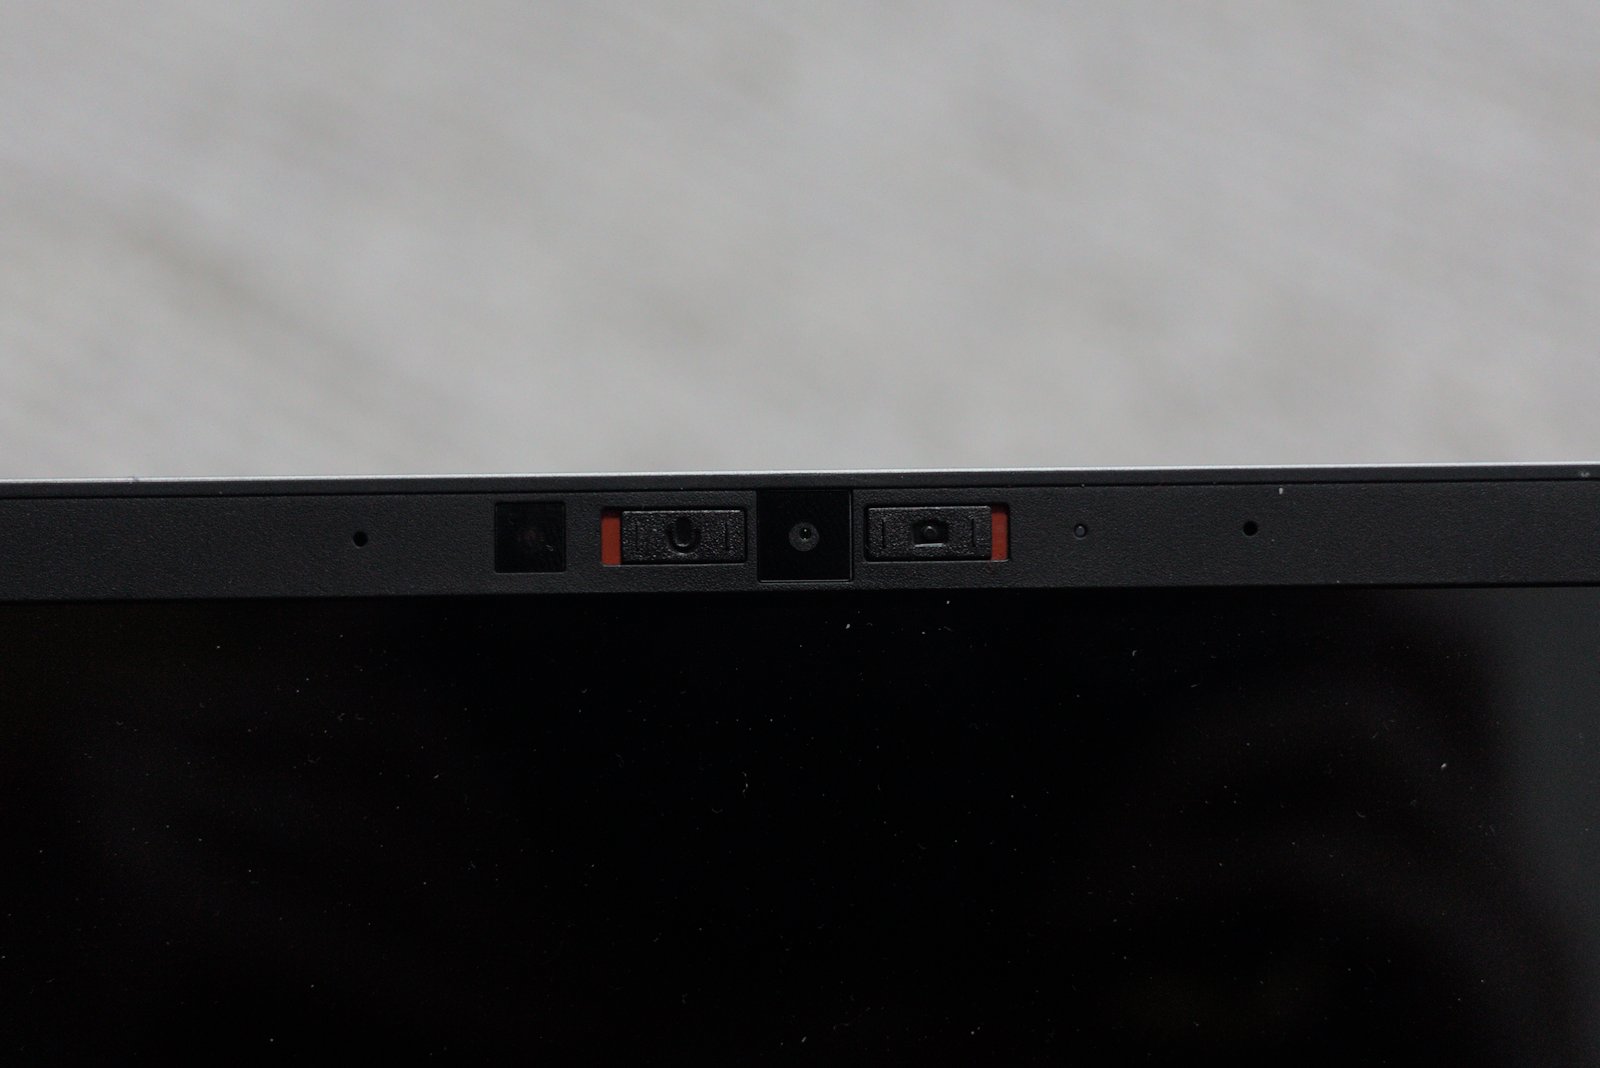
Microphone
The microphone also benefits from a switch to disconnect it completely for better privacy. Once again it shows a red background on the plastic switch when disconnected. As for recording, by default it’s a bit soft on Audacity but it works well.
BIOS
You can enter the BIOS screen by using F2 at bootup. There is quite a lot of information and numerous settings available. There’s an interesting and quite unique one about setting the maximum charge levels for the battery, to prevent the battery from going full cycles if you mostly keep your unit connected to the power cable. You can see in the below screenhost some of the BIOS options captured in a large image (click to see details).
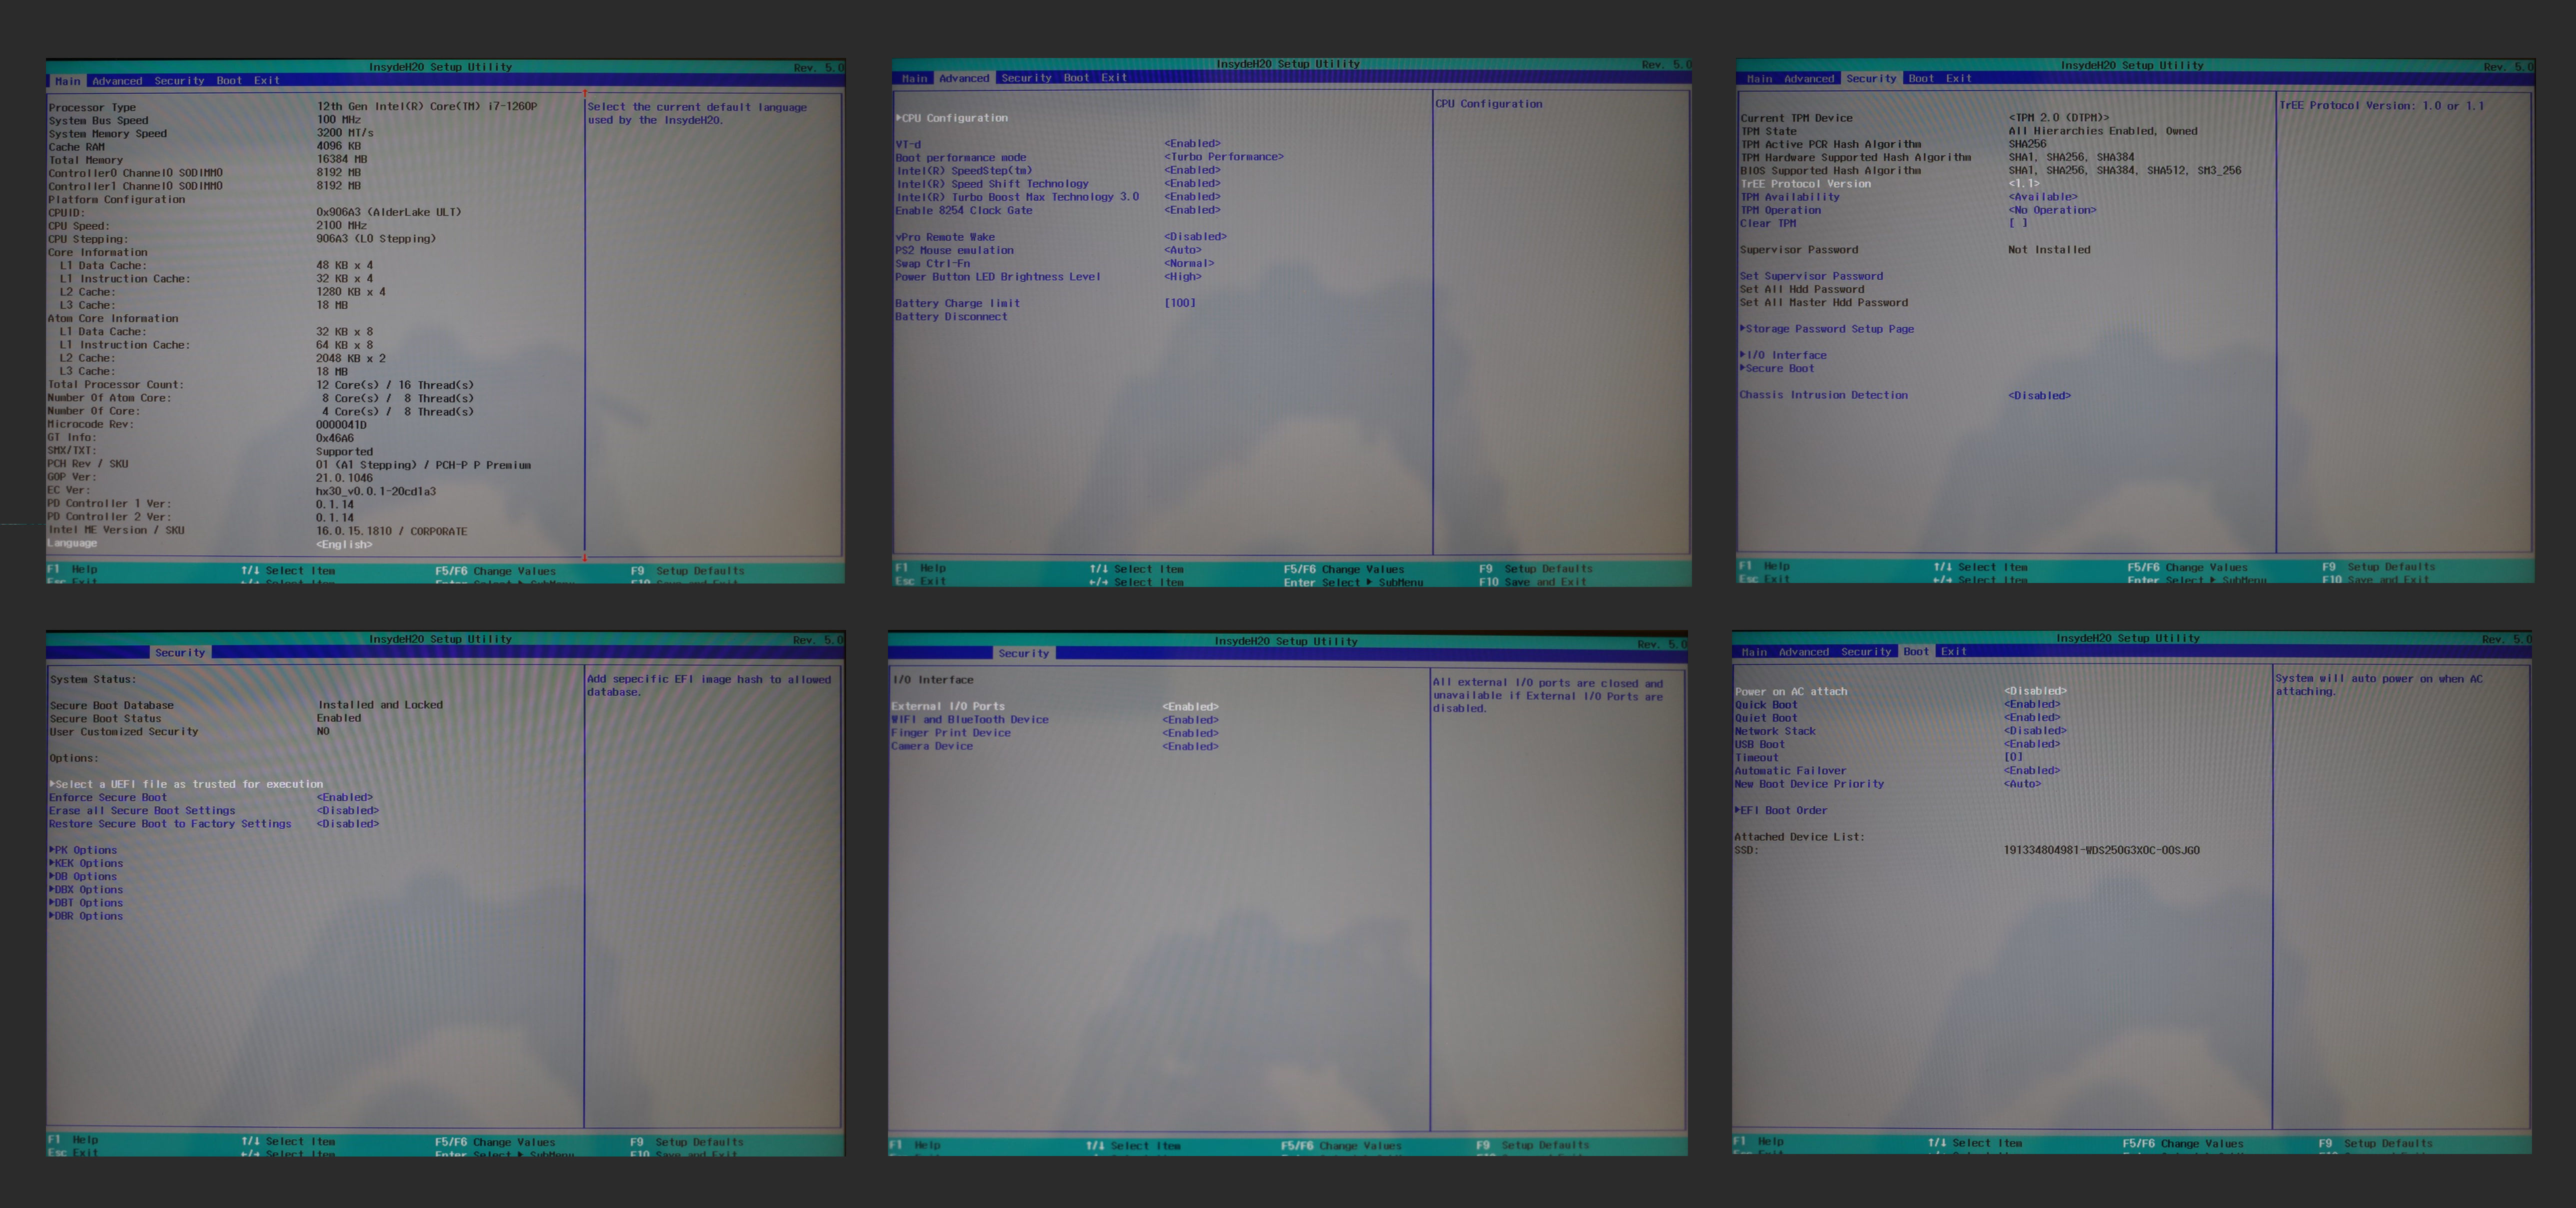
You can apparently also deactivate some of the performance cores and some of the efficient cores - this may provide some additional battery life benefits (I did not test that).
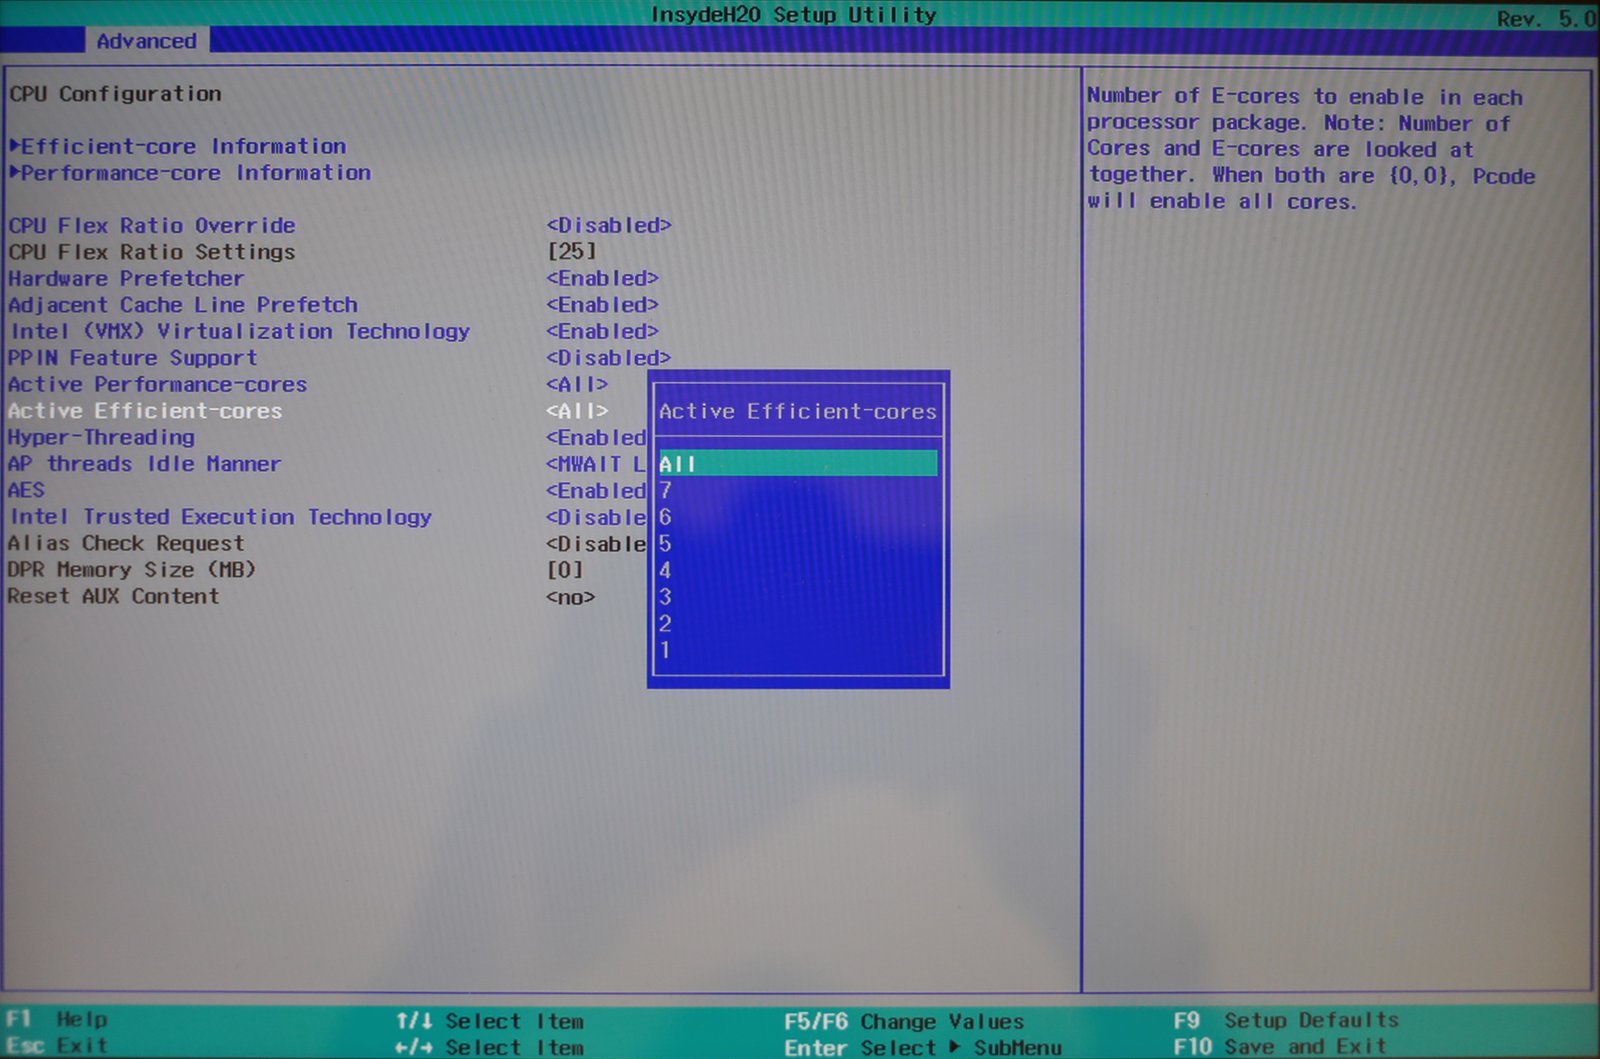
Pretty cool in terms of granularity of options. There’s even one option to detect if the chassis was opened without you knowning (intrusion detection). That’s something you usually see on servers! But It makes sense. Since it’s fairly easy to access the internals of the Framework - and someone with malicious intent could potentially put a spying device in it, without too much effort - you could at least know your system is compromised in this way.
Charger
The default charger uses a USB-c cable to charge the unit. It is very very small and very practical to carry. It features the same branding as the laptop with the framework logo. It charges the unit to full power in less than an hour. I like it. And since it’s a USB-C charger it can be used to charge other devices too.
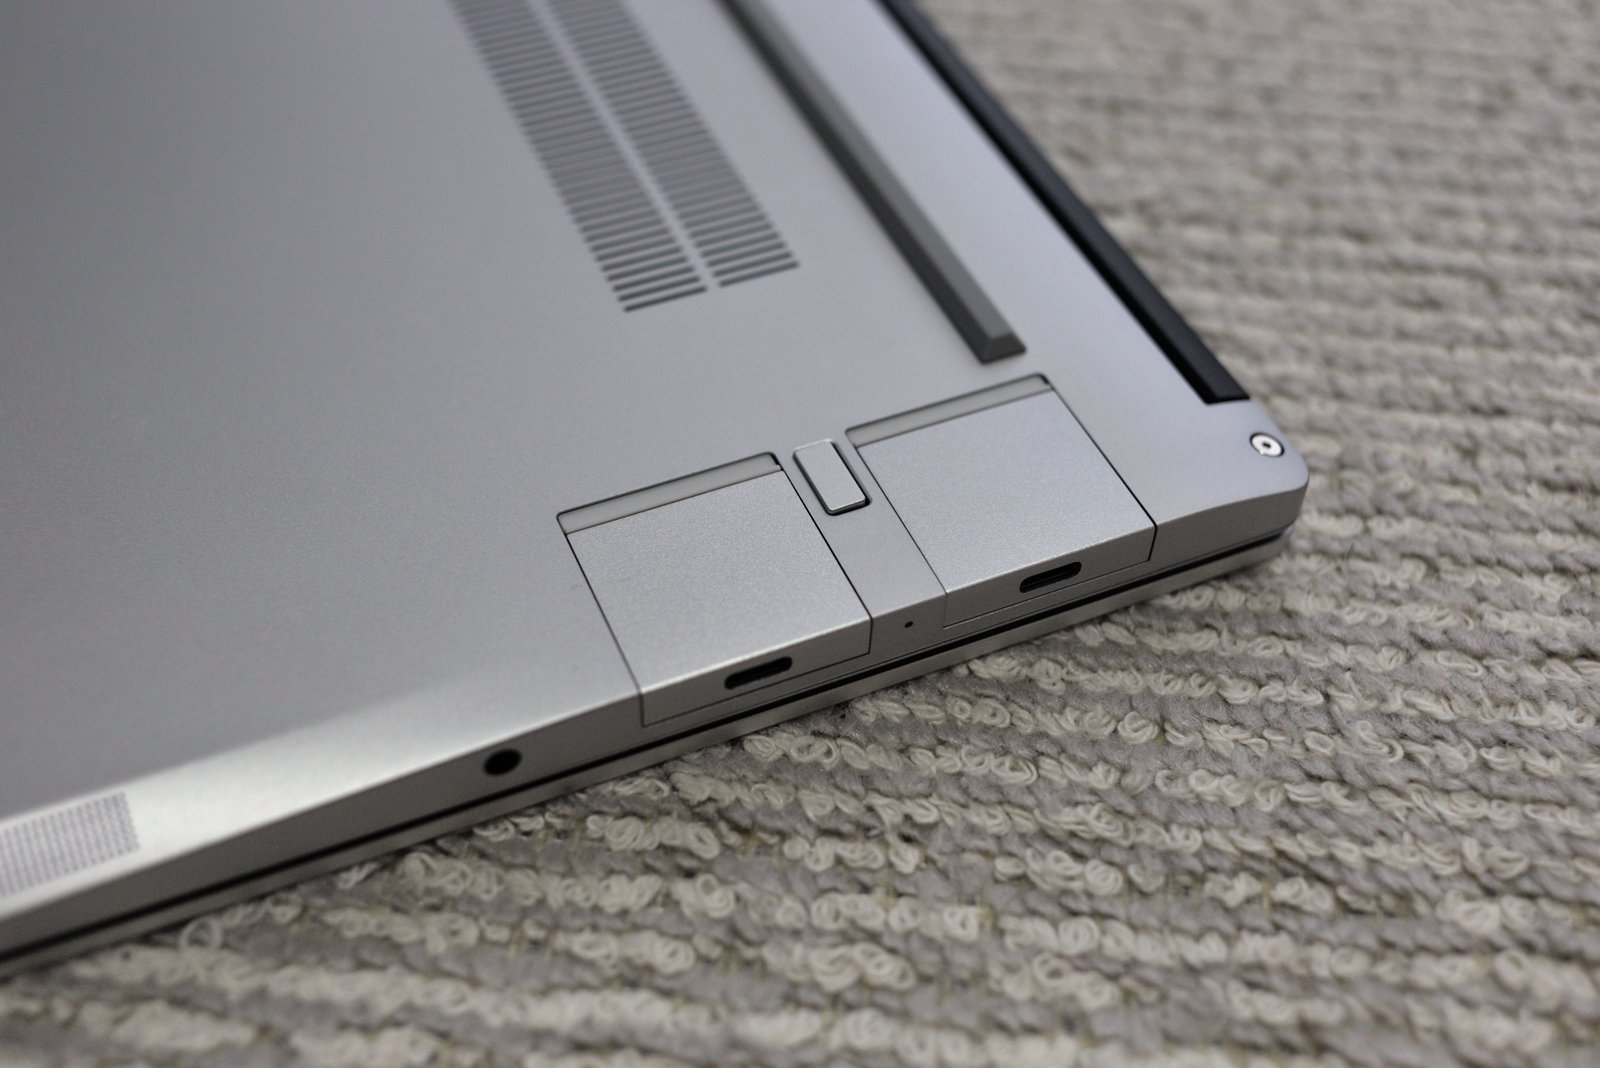
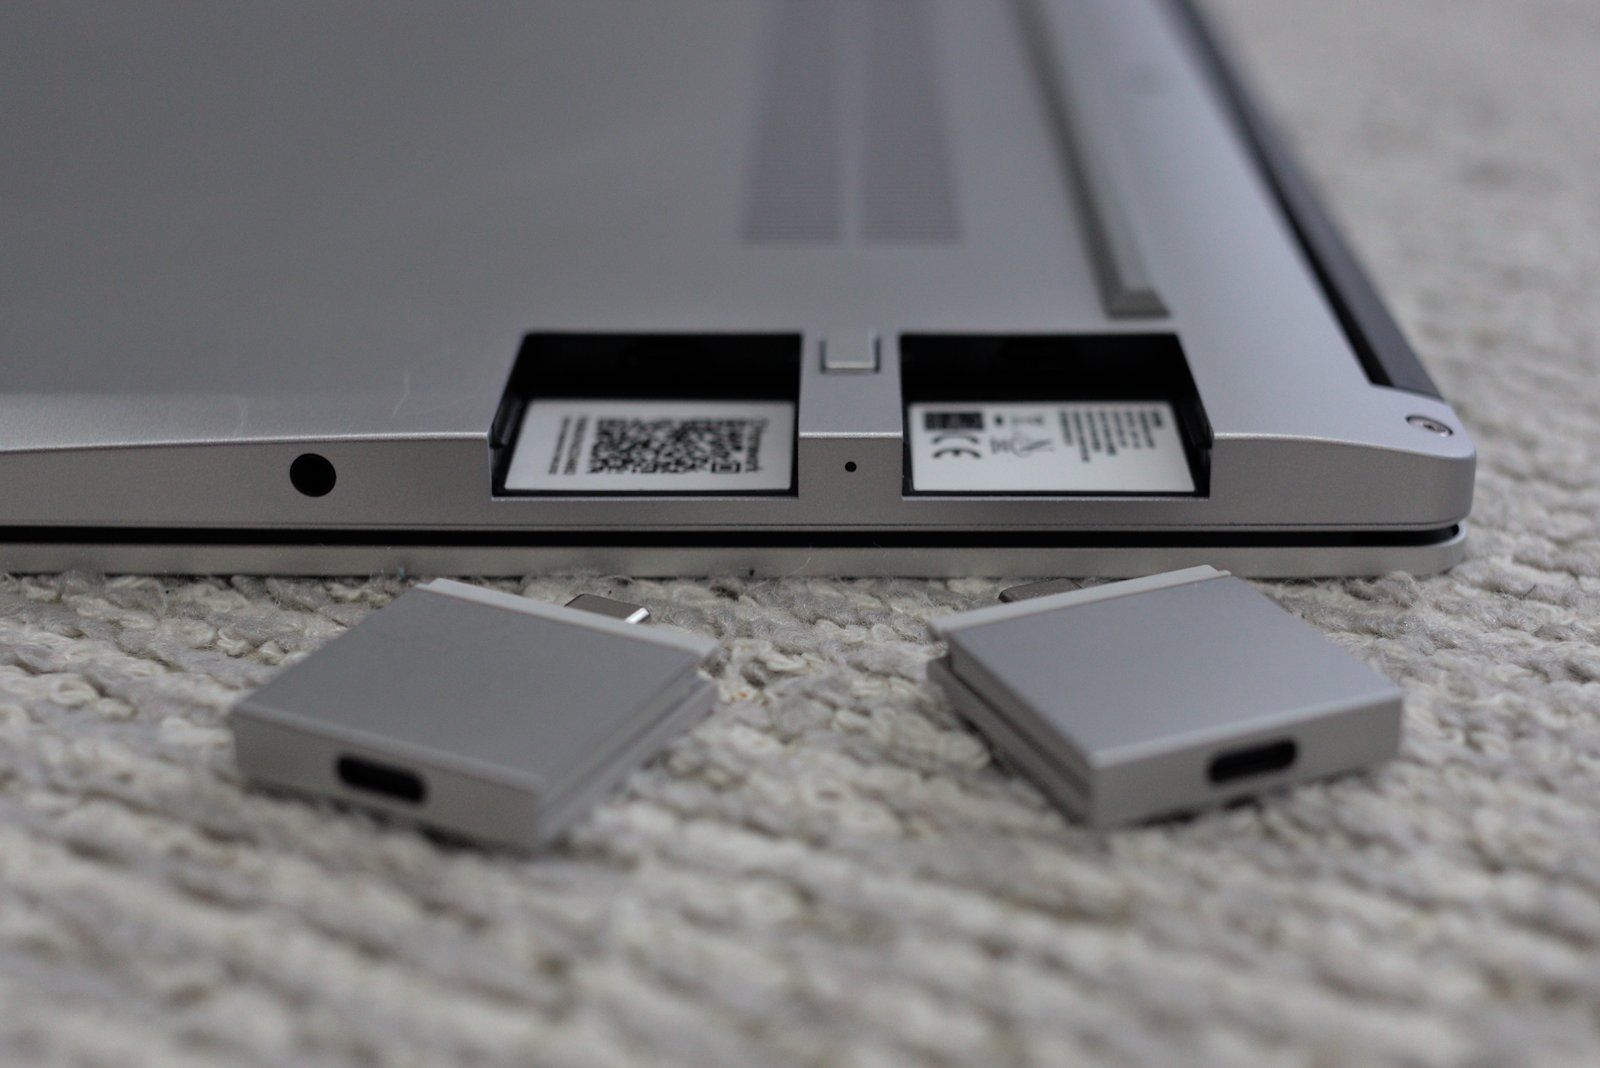
Expansion modules
The whole concept of Framework relies on expansion modules that can be used to customize your laptop to meet your needs.
This is a great idea on the paper, but so far there’s only a few types of modules available.
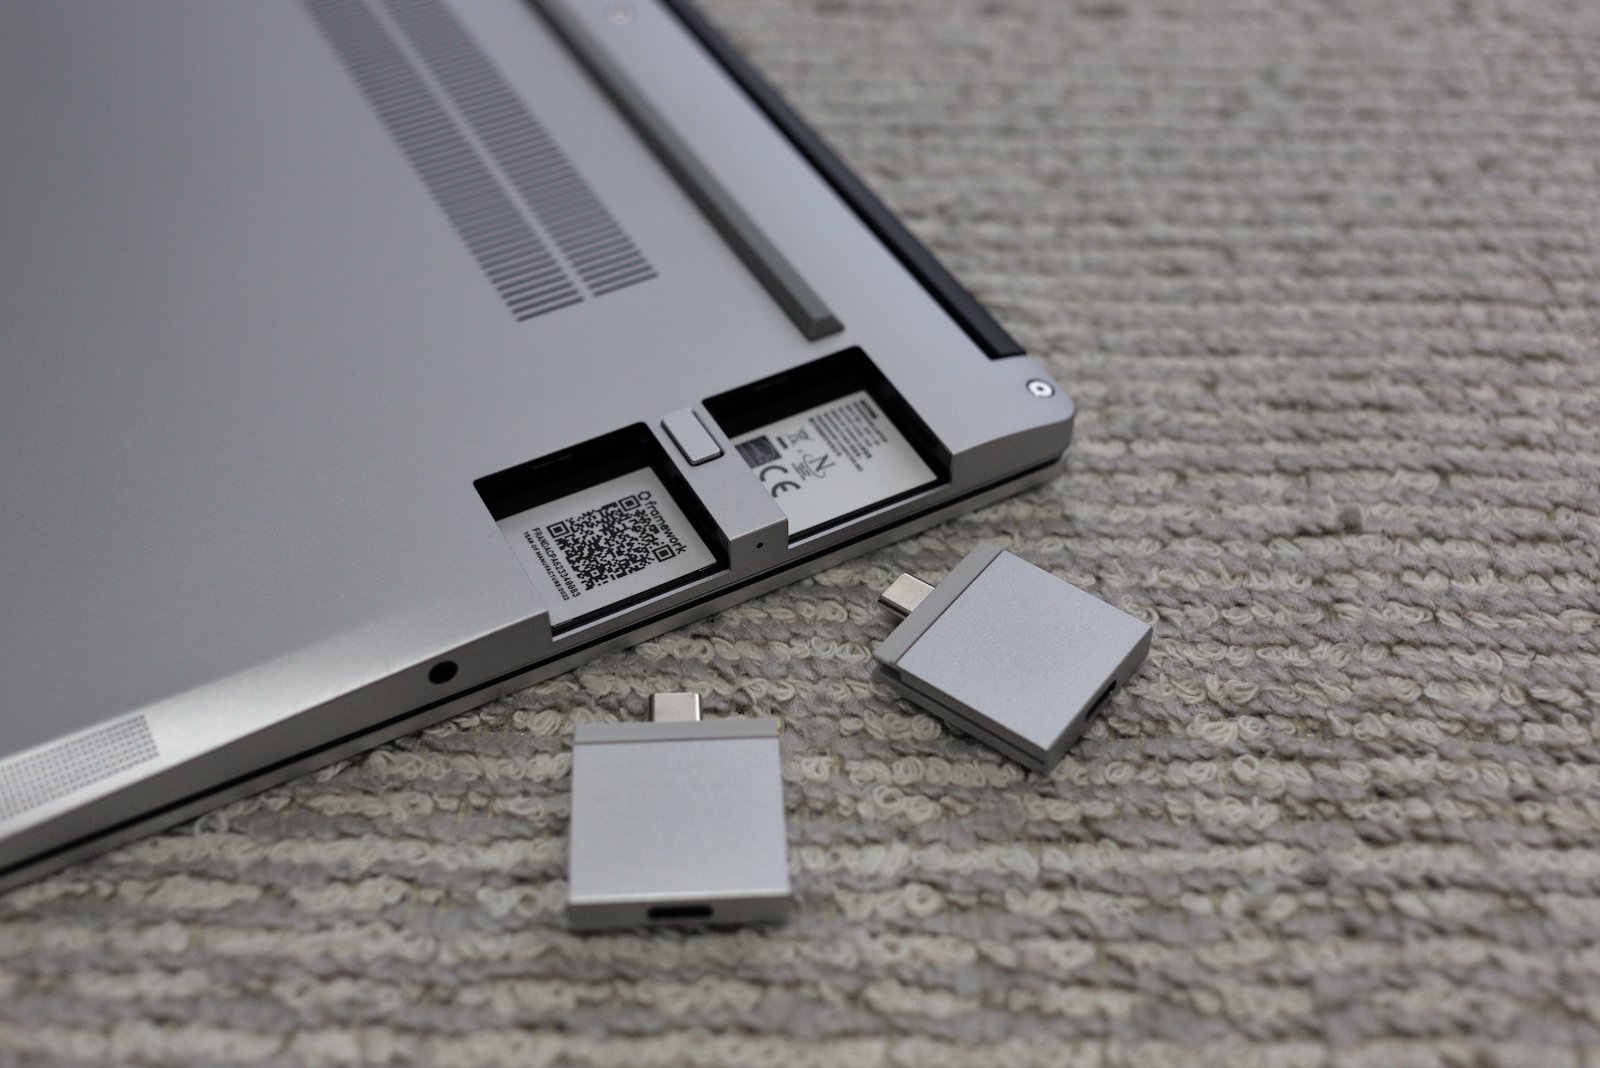
The DIY unit I received comes with 6 different expansion modules that you can use and insert in the laptop (you have 4 slots available):
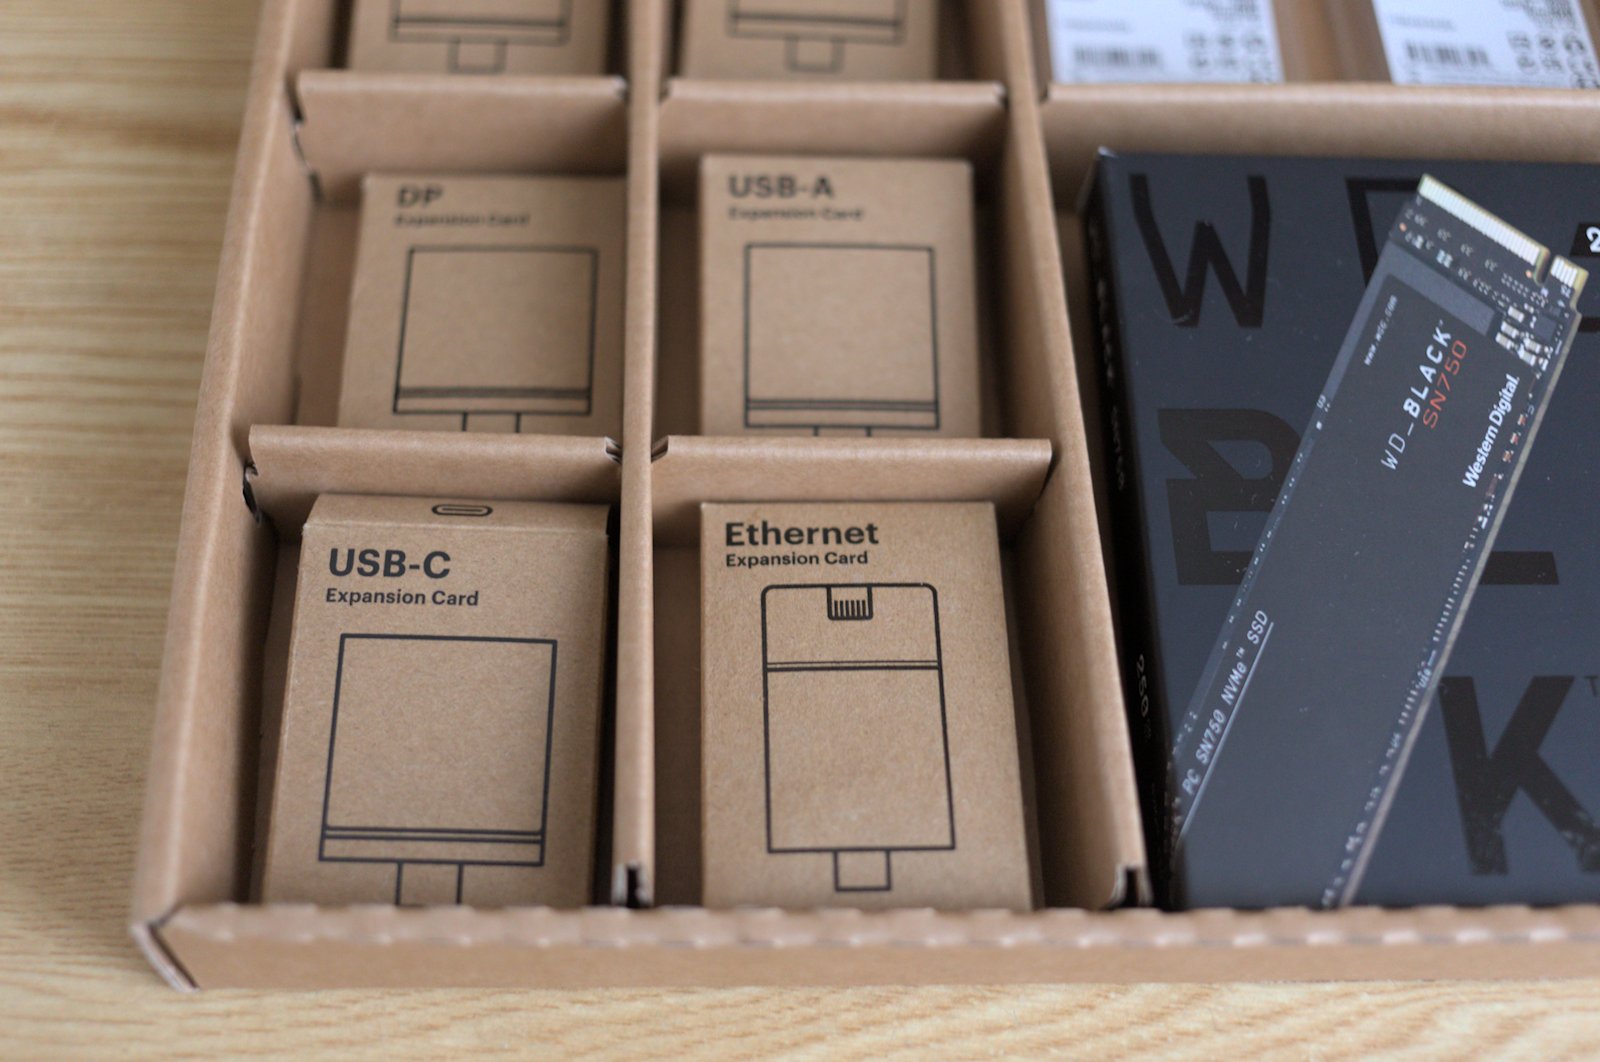
- USB-c (2x) - you need to connect at least one of them to be able to charge the battery, by the way.
- USB-A (full size USB)
- DisplayPort
- Ethernet
- HDMI
For photographers it would be great to have a SD-card port as module, but currently there’s only a micro-SD card version that you can purchase. This is a little bit of a shame, since the possibilities are virtually endless (RS-232 port? VGA port?). Time will tell if such modules come to see the light of day.
Repairability
Since this is one of the main features advertised for this hardware, we need to properly check things out here. Removing the screws from the back cover is the first step, They are once again star-shaped ones (ugh, I hate those) but at least Framework ships a screwdriver in the box to remove them - and since there’s a single type of screws that’s all you need. One less thing to worry about. Once again just like for the HP Dev One laptop that uses the same type of screws, I got one issue here where one screw would not let go for some reason, making it very hard to remove. I was unable to properly insert it afterwards, and my Framework unit is now holding on tight with 5 screws instead of 6.
While you would expect to remove the back cover to access the internals, Framework made things more simple by letting you remove the upper keyboard part to modify the internals - the keyboard part is held by the screws we just removed as well as magnets. It’s very easy to lift it up once the screws are out.
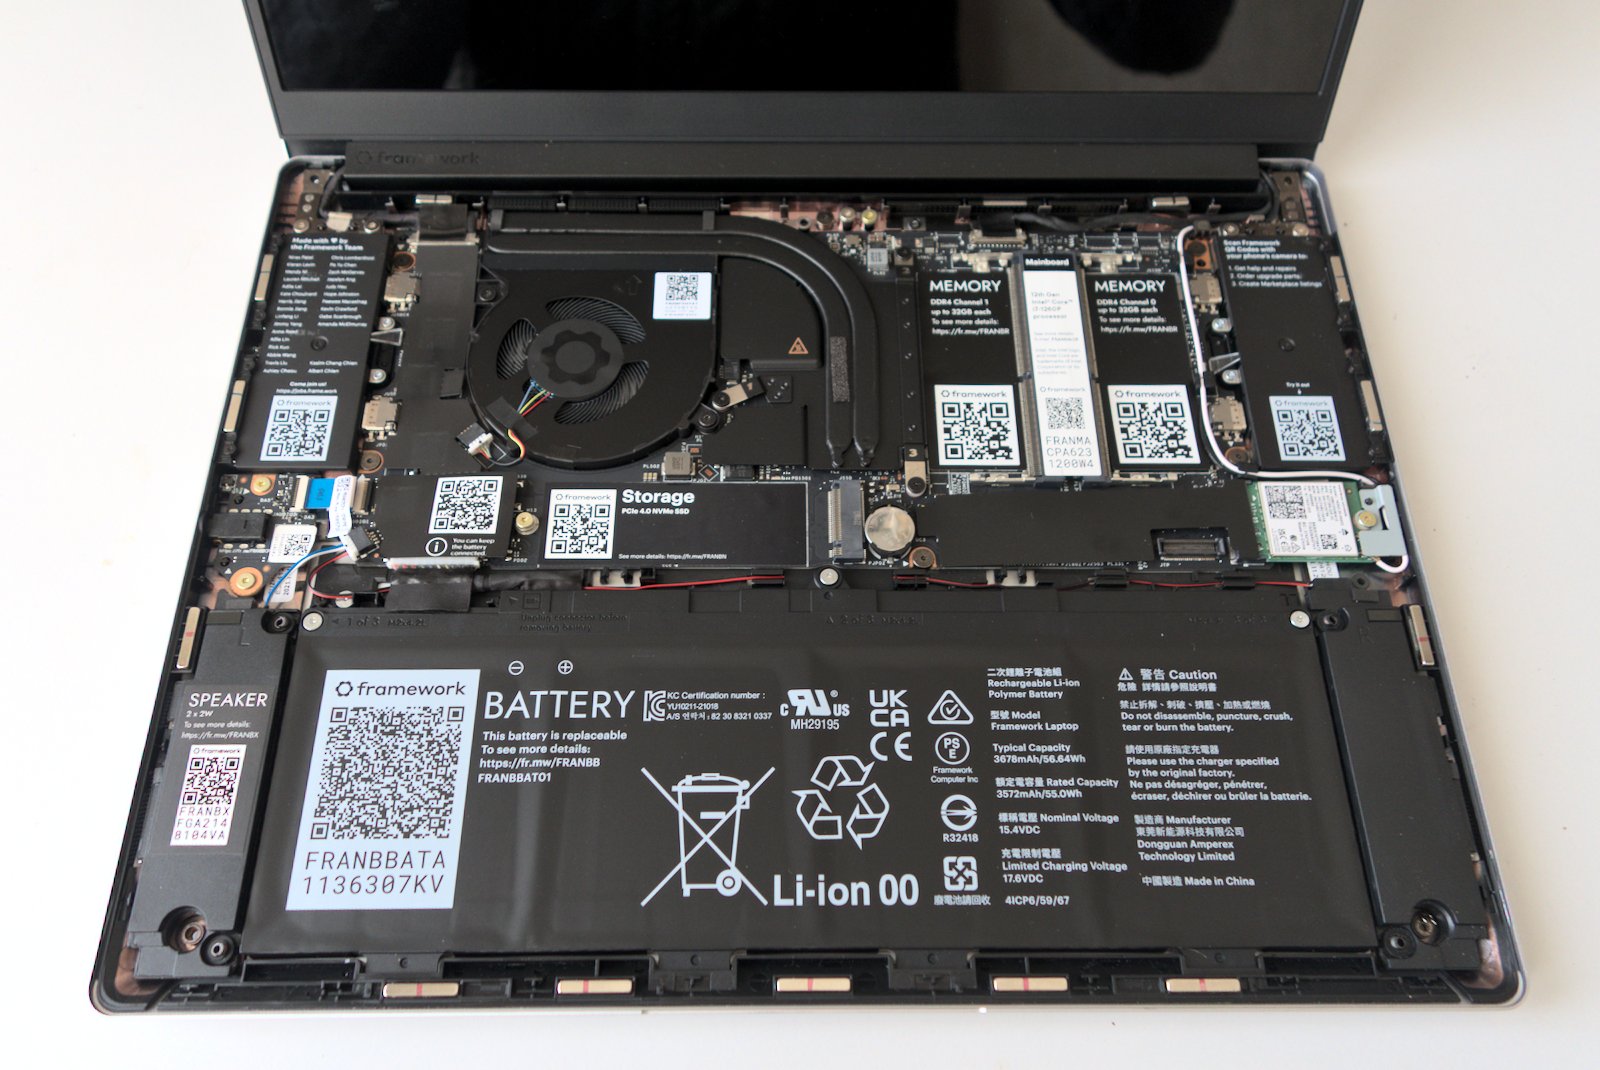
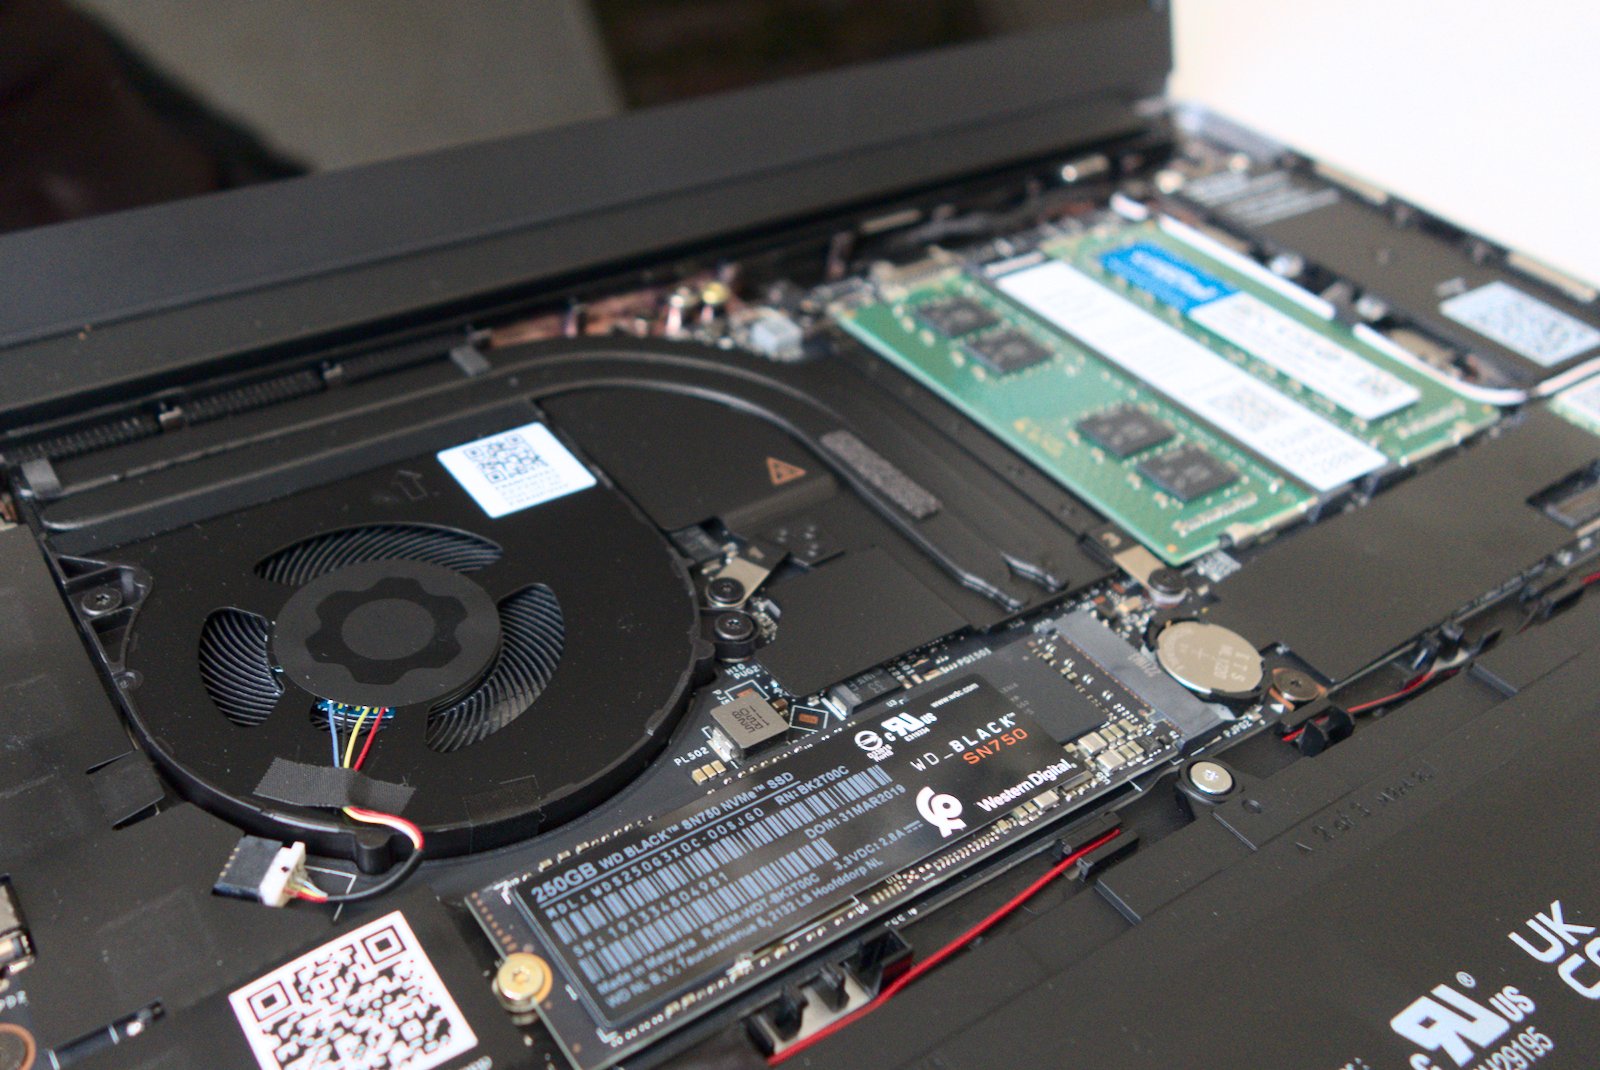
The way it’s organized is a breeze of fresh air. Not only are all the elements easily accessible, they are also well labelled so that you don’t have to search for youtube videos in order to take care of the business yourself. Everything is pretty much self-explanatory. This is for example where you have to put the RAM sticks:
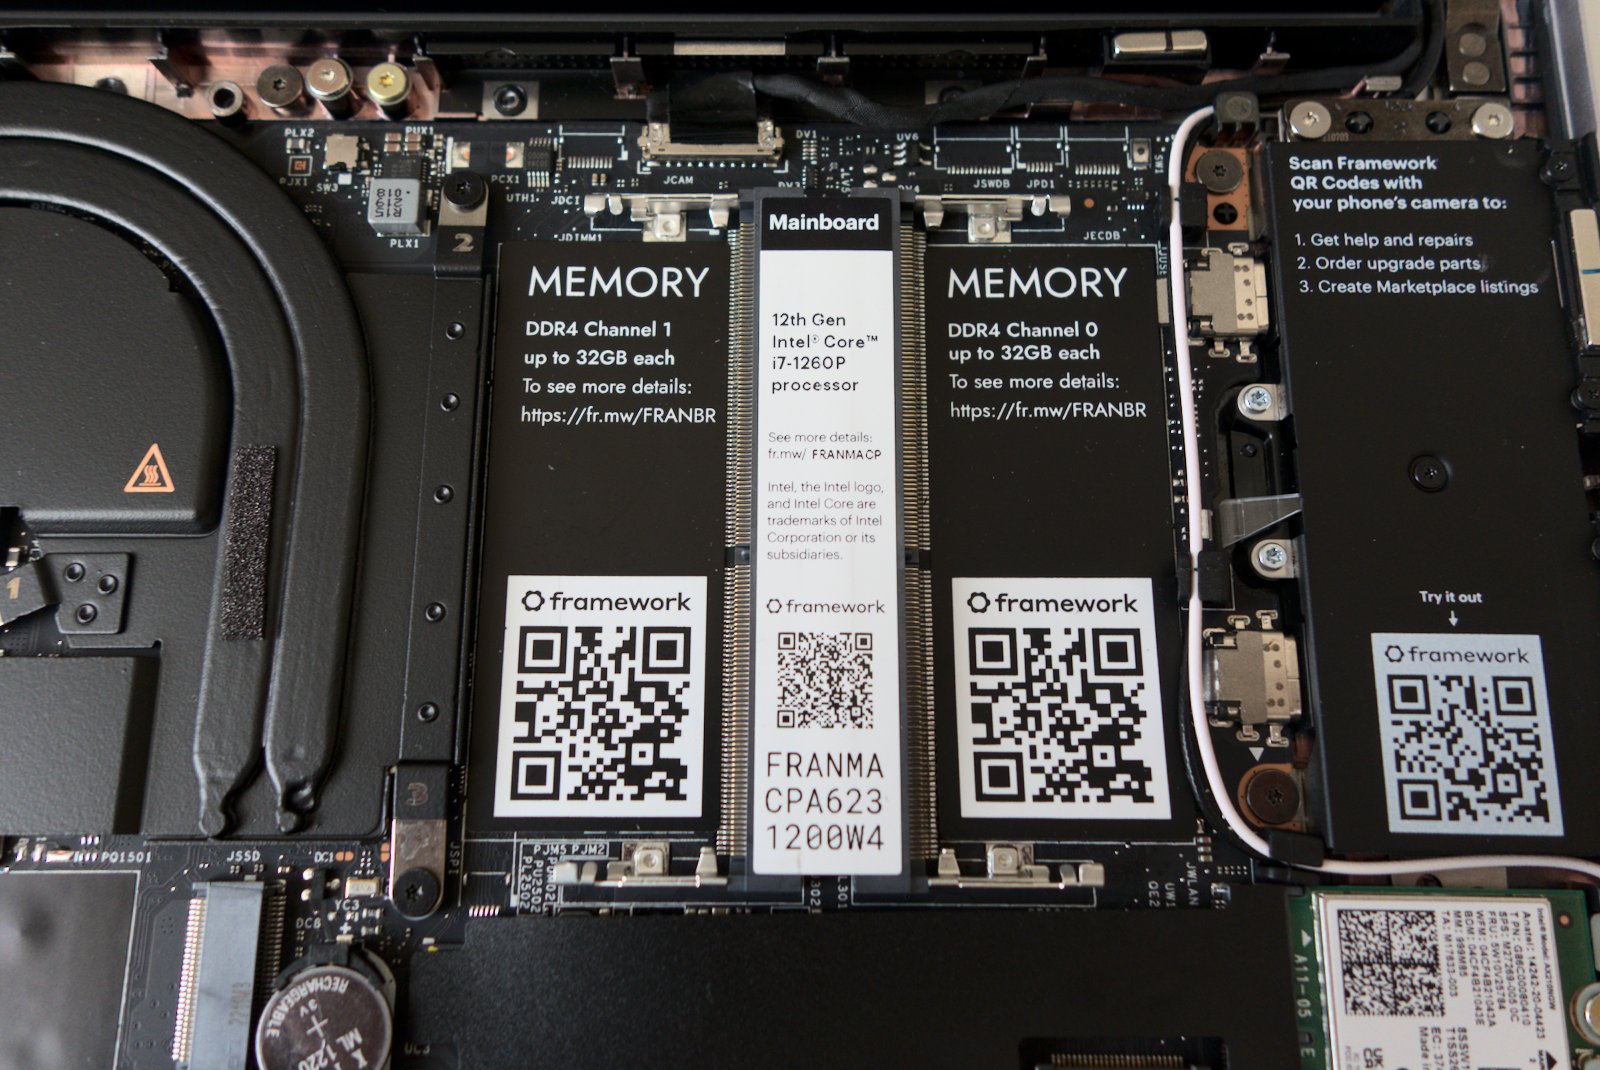
And zap! In a few minutes your RAM is properly placed and operational:
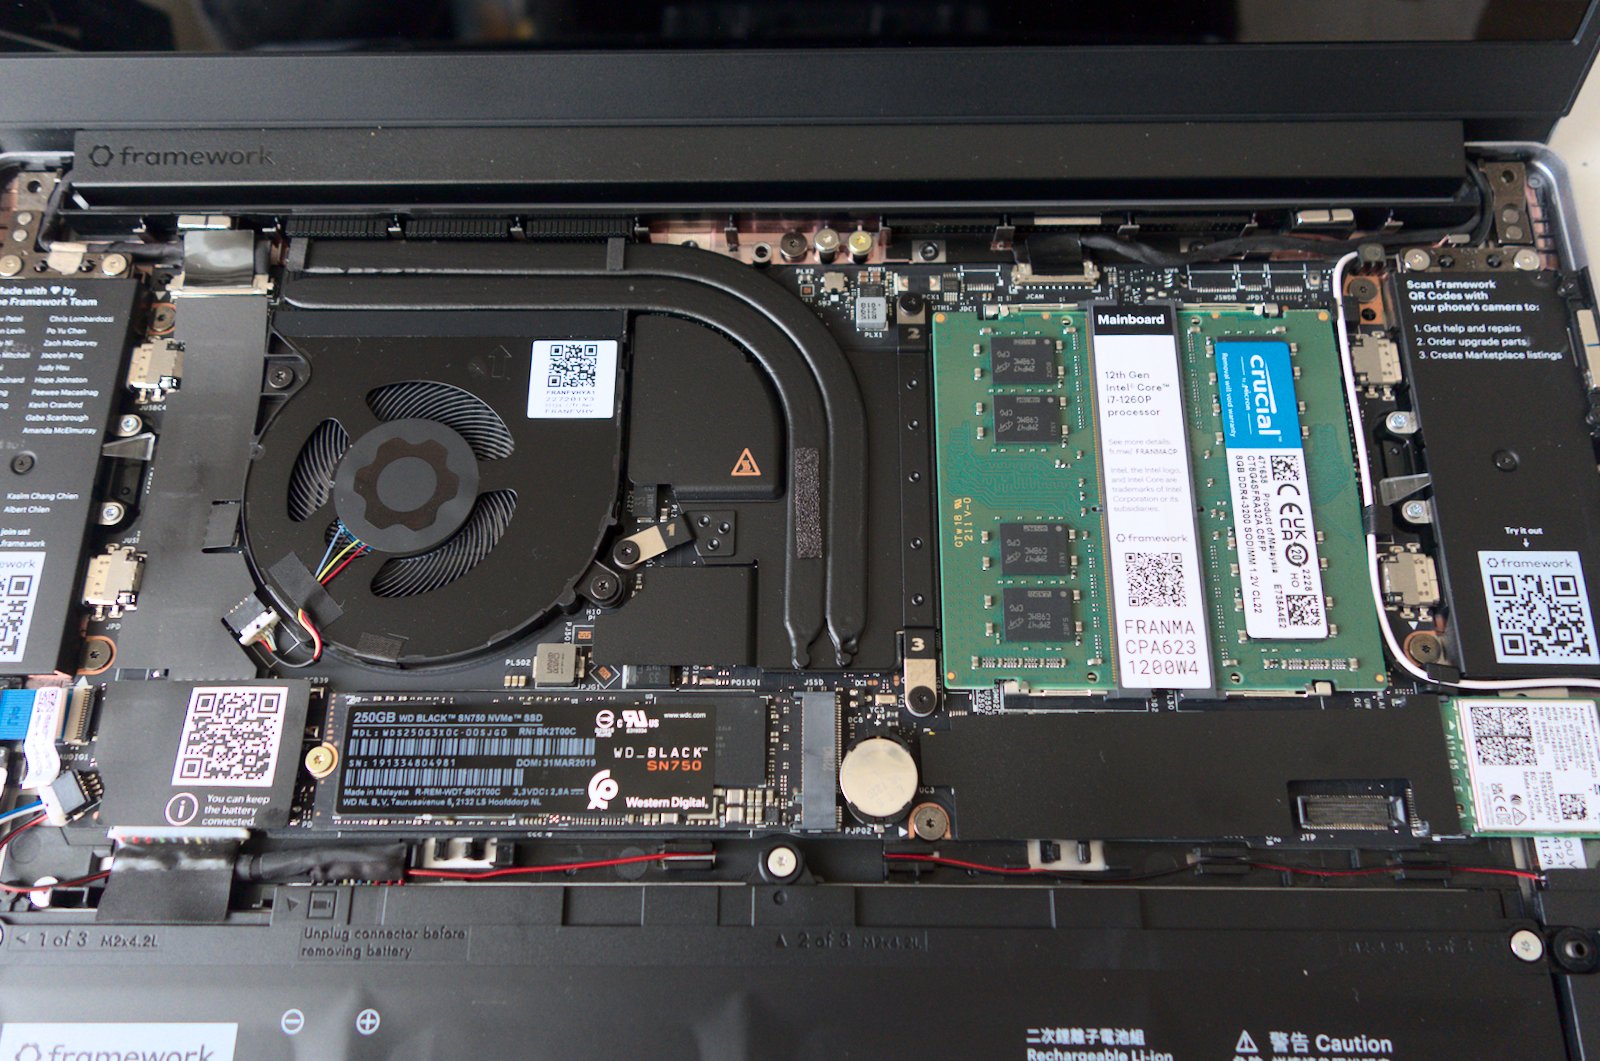
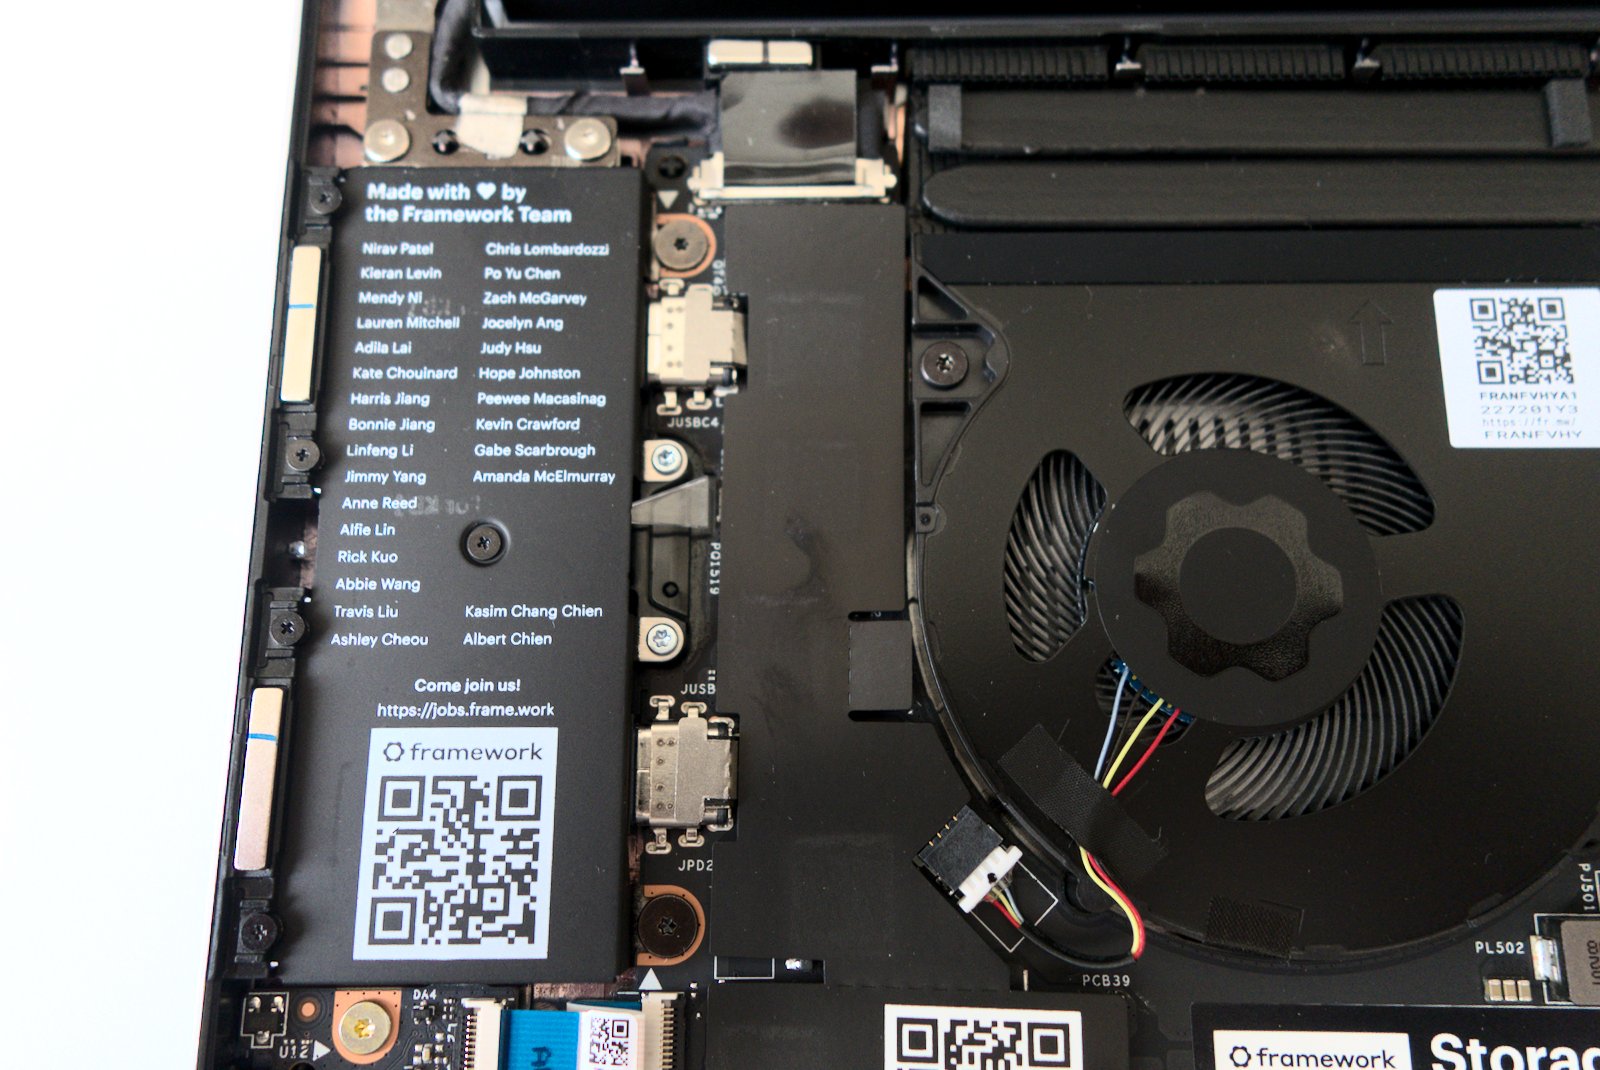
They added a nice touch with a message from the team behind the Framework, too.
And this is what the internals look like once you have added the nvme and the RAM, before closing it for a while:
You can get parts for replacement in their market place.
What I like in what Framework is doing here is:
- the large variety of parts available, from motherboards to screen, hinges and expansion ports
- the pricing which is reasonable; they could have gone crazy but they did not
- expansion cards to bring much more storage (1TB for example)
Where things need to be improved:
- expansion cards that don’t exist yet: such as SD-Card readers (not just micro-ones) for photographers, for example
- upgrades that bring better displays (such as matte screens)
- licensed parts would be great, so that there would be a greater marketplace for the Framework platform from other manufacturers as well
OS
Distro support
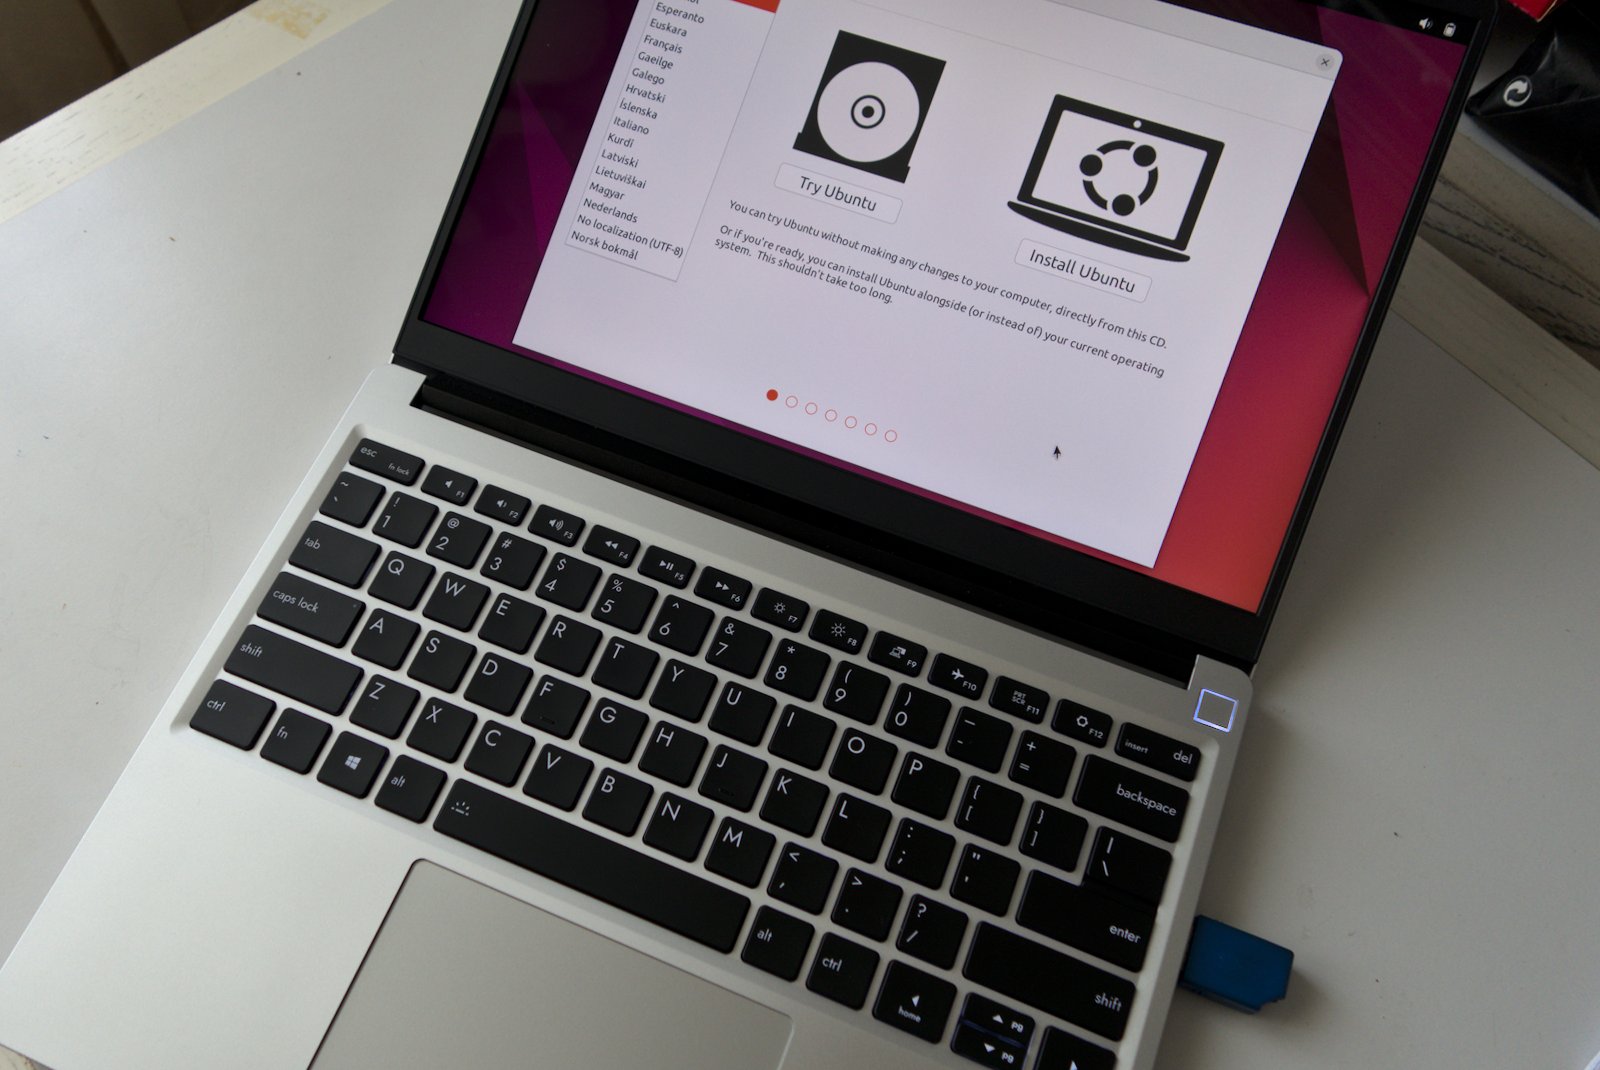
I went for the easiest distro to install in terms of support, which was Ubuntu 22.04, as recommended by the Linux compatibility page on Framework. The setup was flawless from the get go and you end up with a bootable system in virtually no time.
You can also install:
- PopOS and LinuxMint easily (since they are based on Ubuntu anyway)
- Fedora is a bit more involved, and they mention the stability could be a little on the riskier side
- Manjaro installs easily but requires a few more steps after install, too
Arch is not mentioned directly, since you can customize it to use pretty much anything under the sun there’s less of a guide/tutorial to give. In any case since there is widespread support for all the above distros, it’s reasonable to expect it should work with a few tweaks under many other distros out there too.
Things to do after install
There are three things you need to fix after install in Ubuntu:
- The ALS (automatic light system?) conflicts with the brightness buttons, and if you want to be able to change the brightness using the brightness buttons you need to disable the ALS.
- Suspend/Sleep does not work well at all by default. This is a potentially killer issue, as most people who purchase a laptop rely on such a function to avoid charging their unit the whole time.
- You will also want to upgrade to the latest kernel possible to take in account the features of the Intel 12th generation hardware.
Battery Life
This is the burning question that every Linux user is always eager to consider. Can you actually use the hardware for a full day of work on the go? No, we are still not there yet. In Ubuntu 22.04 you have access to several settings for power consumption, and with the balanced power mode, you’d get between 3 and 4 hours of continuous battery life for regular work. Don’t expect to do remotely as long as that if you are planning to play games with it, as you are more likely to get between 1 and 2 hours maximum depending on how demanding the game is. But that’s usually not the focus of such a machine.
How about the Power Saving mode? It does seem to make a significant difference, with maybe between 5 to 6 hours of battery life if you can accept some tradeoffs (lower processor speeds). Totally worth it for non-critical work. I noticed that the responsivity of the laptop is actually still pretty great in Power Saving mode for regular desktop work. This is better than with the HP Dev One for example (using an AMD CPU) where the Power Saving mode made things much more sluggish. You would not use this mode if you do compilation or rendering, as we will see in benchmarks in a bit.
Sleep and Suspend
Upon install, the suspend/deep sleep function does not work very well. When you close the lid it seems to go by default in a sleep state that keeps consuming a lot of power (like 10 to 20% of battery every hour). I modified the GRUB config file to add a deep sleep parameter that was not there by default, and it did some marginal improvements. What I found is that some of the extension modules are causing more power draw that they should, at least on Linux. For example, by removing the HDMI module, I was able to come down to only a few percents of battery used every hour. Still not idea for deep sleep if you want to leave the machine sleeping overnight, but acceptable during the day.
The trick to ensure a proper suspend behavior is to configure a suspend to disk feature. This way, after 30 mins of inactivity in sleep mode, the machine will write its state to disk and turn off, making power consumption close to nil until you turn it on again. This requires extra work:
- First, in the GRUB config file, you have to enable the deep sleep, and you do that by adding the following parameters in the line starting by GRUB_CMDLINE_LINUX_DEFAULT:
mem_sleep_default=deep nvme.noacpi=1 - Second, to make the suspend-to-hibernate work, you need to run the following steps.
- Erase the current swap file use by Ubuntu
- Re-create a new one with dd in the terminal (at least as big as your RAM size to avoid any problem)
- Mount the new swapfile in /etc/fstab by using the UUID of the drive and a specific resume_offset figure that you can get from the filefrag -v command. This is the part of the drive that will be used for hibernation.
- Add the change to the grub boot sequence by adding a resume parameter in the /etc/default/grub file.
- Update GRUB.
- After a reboot, edit the /etc/systemd/sleep.conf to make the system go into hibernation after 30 mins of sleep by changing the value of HibernateDelaySec to 30min (it’s commented by default)
- Finally, edit the /etc/systemd/logind.conf file to make it work after you close the lid, by changing the HandleLidSwitch value to suspend-then-hibernate
- Final reboot, and you are done.
The above takes about 10 minutes and is quite easy to follow. It seems that Framework is still working to make things easier for Linux users (and have an official guide for the above) so the situation may improve down the road.
What I end up with is still not 100% perfect, but you can now expect to leave the machine on overnight and not find out that it has run out of battery. In the current state, I lose about 10% of battery between the evening and the next morning. Could be better, but it’s something I can work with.
Benchmarks
So let’s see what the Intel 12th generation delivers in terms of performance.
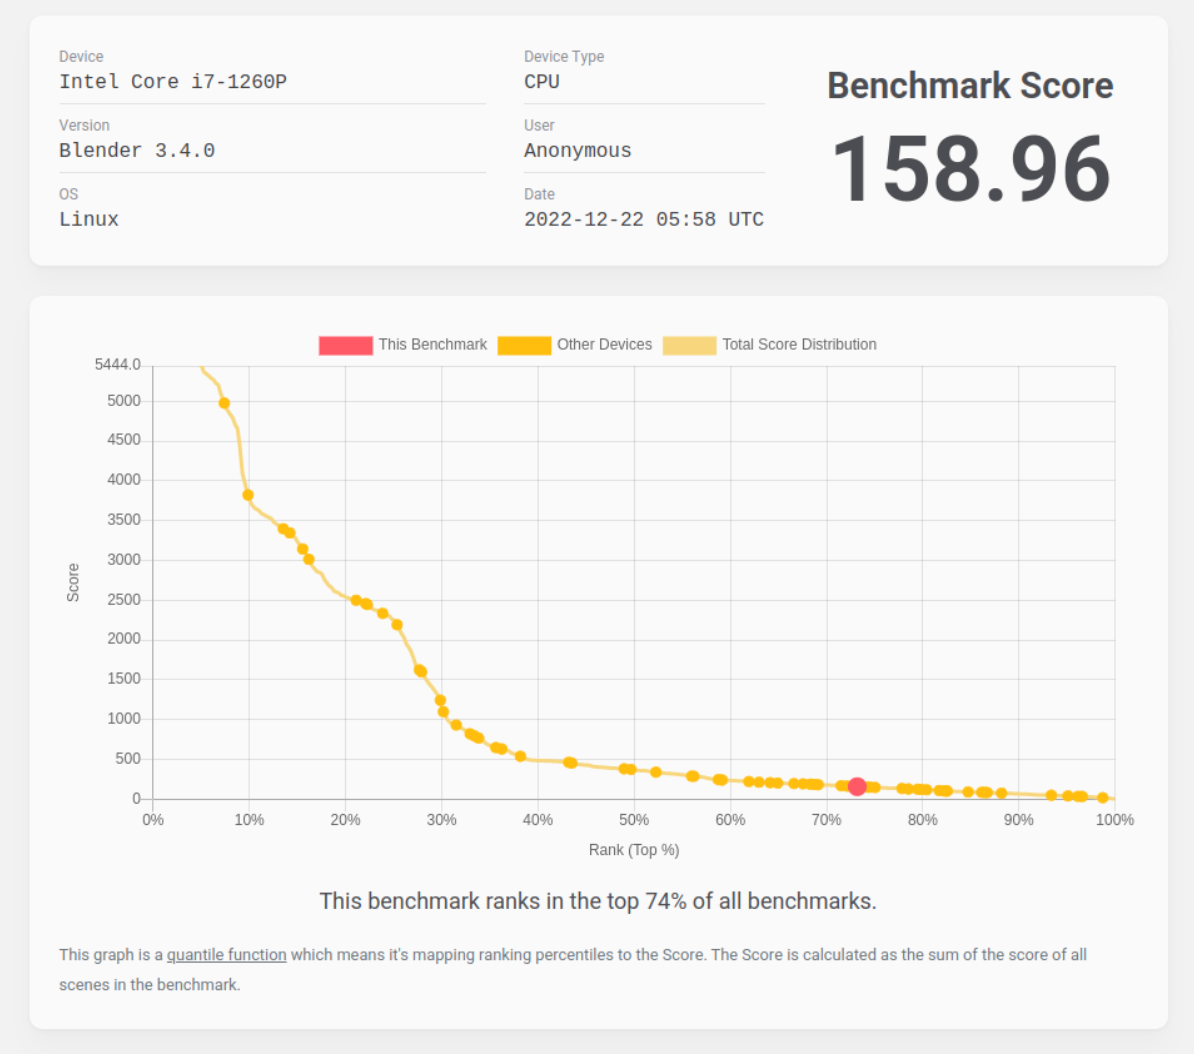
Blender
Performance on Blender (in balanced performance, on power) leads to something fairly similar to what we saw on the HP Dev one.
Kernel compilation
Using the Phoronix Suite, we can estimate how long it takes to compile the Linux kernel (6.1) on this machine. I tested three different power profiles, and only one actually made a difference (power saver):
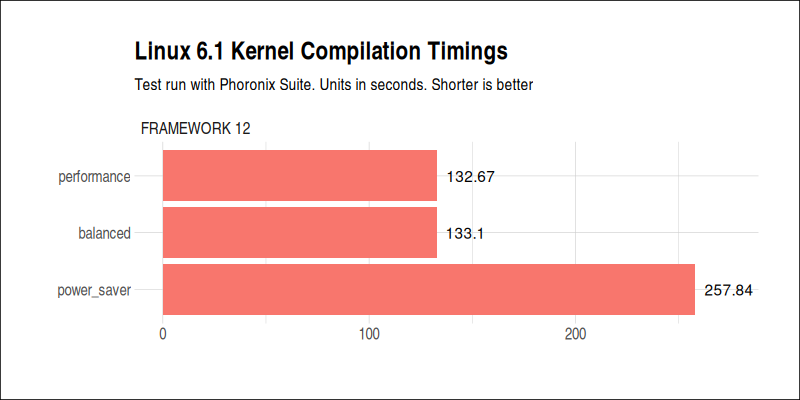
- Power Saver: 257.84s
- Balanced: 133.10s
- Performance: 132.67s
The Balanced mode works as expected here, since it will give full performance when needed and scale back when idle. The Power Saver mode is roughly giving you twice worse performance in this case, but will of course improve battery life.
I updated my benchmark with the HP Dev One as well since the Kernel sources were updated in the meantime to 6.1. Turns out that the Framework with i7-1260P is significantly faster in this test:
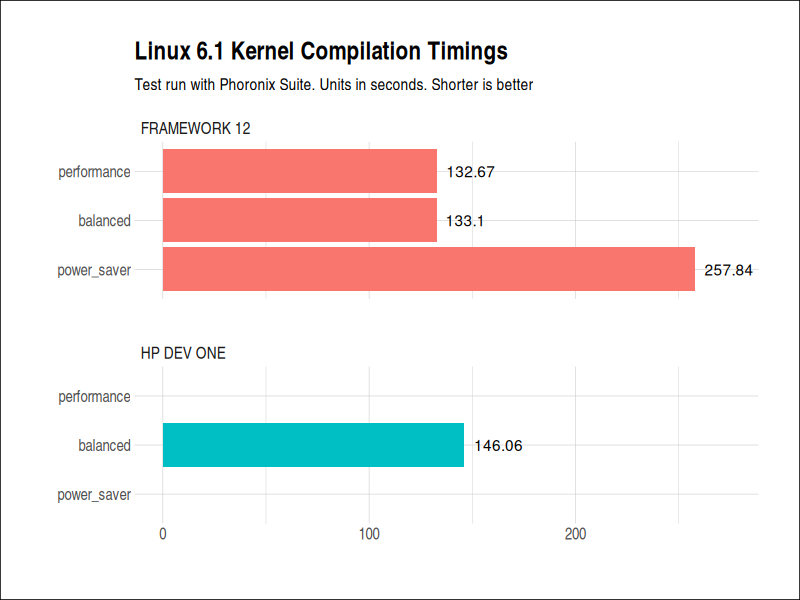
- HP Dev One: 146.06 s
- Framework with i7-1260P: 133.10 s
For fun, I also tested my old Thinkpad T530 from Lenovo (equiped with an i5-3320M CPU) to see how it fared in terms of speed compared to more modern laptops. For info, the T530 is still a joy to use to this day for productivity purposes, and you would not guess how slow it has become if you limit yourself to regular tasks. Turns out there’s a huge difference in compilation speed for the same 6.1 kernel.
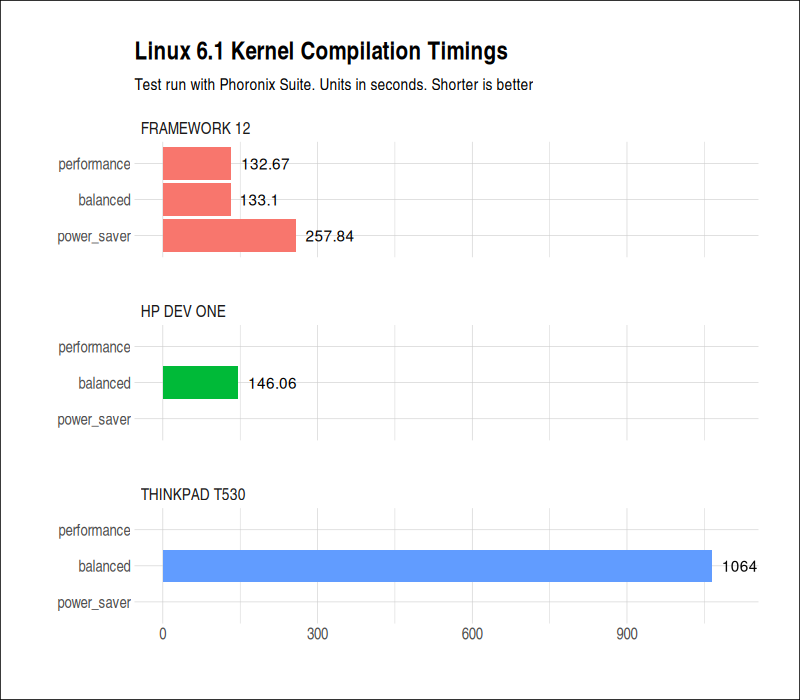
- HP Dev One with RYZEN 7 PRO 5850U: 146.06 s
- Framework with i7-1260P: 133.10 s
- ThinkPad T530 with i5-3320M: 1064.90 s
So while older hardware still works fine, there’s clearly a point in moving to newer processors every now and then to catch up in terms of performance.
FFMPEG
Another type of test around video compression using FFMPEG with x264 compression using the software implementation libx264. I have also run the same test with the HP Dev One for comparison:
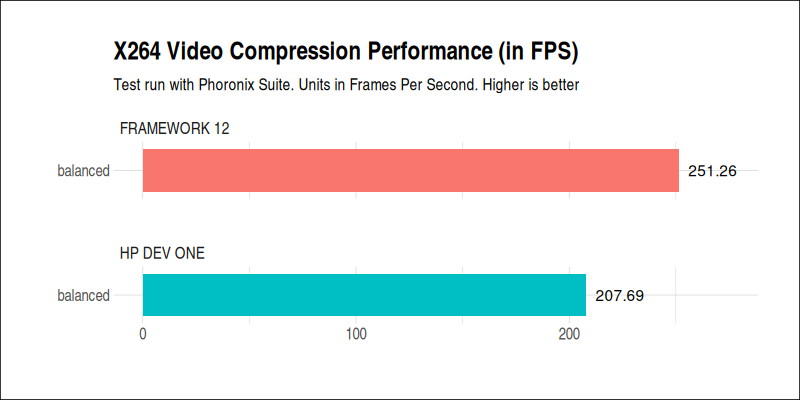
- HP Dev One: 207.69 FPS
- Framework with i7-1260P: 251.26 FPS
Here’s another test using x265 compression:
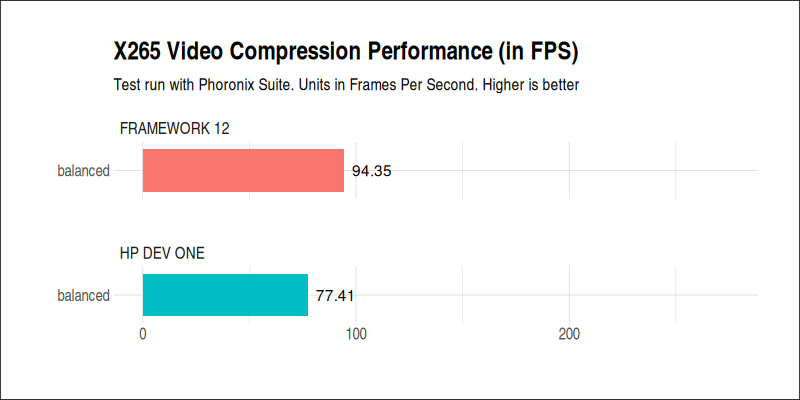
- HP Dev One: 77.41 FPS
- Framework with i7-1260P: 94.35 FPS
Once again the Framework is showing much better results compared to the HP Dev One. The same test also showed that the i7-1260P was faster than the Apple M2 processor (not sure how reliable the test is across different architectures, though).
We could run a ton of other tests, but it’s fairly clear that the 12th generation of Intel chips is very, very fast. If your work involves rendering, compilation, compression, you will probably benefit from having this kind of processor.
Gaming
Since it fared so well at productivity, let’s look now and how well this machine fares when it comes to gaming. Here, the picture is not as rosy as we could expect.
NeoDash
NeoDash is my go-to game these days to test something slightly demanding and where having 60 fps is actually important for gameplay. The Framework can achieve 60 fps at full resolution as long as you compromise with the overall settings and go to Medium (Overall graphics settings) - which actually lowers the in-game resolution to 62%. It plays great and it still very pretty to look at, especially on its beautiful screen.
Kena Bridge of Spirits
Did not run at all! This is actually a fairly interesting point in itself, as it ran without issues on the HP Dev One that has a AMD CPU (with integrated graphics). While I am not exactly sure what is causing the issue, I suspect that the maturity of Intel’s Vulkan drivers might not be there yet to support certain titles, while AMD may be ahead of the curve at the moment. Note that I tried with different versions of Proton: 7.0.5. 7.0.6 (Proton Next) as well as Proton Experimental, with the exact same results.
Resident Evil 2 Remake
Another game I wanted to try for benchmarking purposes - it appeared to run since I could hear the intro sounds, but all I got visually was a black screen.
Fall Guys
During the Christmas holidays I had to organize some party games and Fall Guys was a good candidate to have some multiplayer fun (with different machines, including the Steam Deck and a Switch). Using HeroicLauncher and the usual 4 minutes install process, I could easily make Fall Guys run on this hardware.
And it ran very, very well. Not that Fall Guys is a very demanding game, but interestingly enough, with the exact same settings it would crash within 30 minutes on the HP Dev One in a very reproducible way - on the Framework equipped with the 12th Gen Intel CPU, I could play several hours before encountering a freeze. So in both cases, the game would end up crashing at some point, but on Intel 12th gen, it was stable for a longer time for some reason.
Rocket League
Starts just fine. At the display’s full resolution, the game will struggle to maintain 30 FPS at high or even medium details. You need to go down to lower resolutions to make it work well enough (1440*960 was the sweet spot to avoid low graphics and still maintain 60 fps). With ProtonGE and FSR activated, you can manage to make the game less blurry - so overall it works. There seems to be some problem with Vsync in this game, but I am not sure if it’s related to the game or the drivers.
Vulkan drivers, Mesa and more
The Mesa currently used on my Ubuntu 22.04 install is Mesa 22.0.5. Using vulkaninfo, it seems like it’s using the Vulkan Instance Version: 1.3.204.
Based on the feedback from Patola, it’s likely that the Vulkan drivers on 12th Gen Intel do not support all Vulkan extensions so far. A quick verification on how many extensions are supported can be done by:
vulkaninfo | grep VK_ | grep revision | wc -l
The result is 202 on this Framework Laptop 12th Gen with the i7-1260P processor. Nothing unusual in that number (the Steam Deck supports 173 extensions) so it’s probably the nature of the drivers rather than the number of extensions that may be the problem in compatibility.
Overall Impressions
The Framework is a new entrant on the crowded laptop PC market. Frankly, the machine I had in my hands was excellent, and it does get many things right:
- The 3:2 ratio, great for productivity
- The excellent screen quality (albeit glossy!)
- A very decent keyboard
- Very easy to customize and upgrade internals
- Excellent webcam video capabilities
- The privacy switches (for the webcam and the microphone)
- Very good performance (top of the line) and good price point
- A marketplace where you can order replacement parts easily at reasonable pricing
It’s impressive that a newcomer nails so many critical aspects at once. It’s already a very pleasant machine to work with, and there’s really no deal breaker at this stage.
As nothing is perfect in this world, I’d like to mention where things could be improved in this particular model:
- Better support of deep sleep and suspend for Linux distributions. As you could see from my review, you can work things out fairly quickly, but no additional work would be ideal.
- Slightly more friction on the hinge to prevent wobbling.
- Physical buttons on the trackpad. I’d be happy if they provided a replacable part in their marketplace.
- Better speakers. They do NOT sound good. This may be more tricky than you’d think, as getting speakers to sound good depend on the structure of the frame, how they are positioned, how they are attached, and many other factors. They apparently have a different set of speaker parts in their store, but from the description they seem to be just louder, not necessarily better. Not sure. The default ones deserve an upgrade, in any case.
- Not related to Framework per se, but the integrated GPU support seems to be lacking on Intel, resulting in many games not even launching or running. If you rely on this machine to do casual gaming, you may be sometimes dissapointed unless things improve on the drivers front. If you want to play games seriously, you’d be better off with a laptop with AMD hardware at this stage. The 3:2 display makes things a bit more difficult too in games where this kind of resolution is not properly supported.
- More ports. As much as I love the fact that you customize the ports for your own needs, 4 ports is still on the lower side. The HP Dev one has 5 ports by default (HDMI, 2 USC-c ports, 2 full-sized USB ports) and a port for charging. On the Framework, 1 one of your 4 ports will be used for charging in any case, so that leaves you with 3 ports for the rest, which is a bit on the low side. One idea would be to allow for extension modules that double the ports (instead of one USB-c port per module, have a module that splits it in two). You would lose some bandwidth but would also gain in flexibility.
- A matte display, at least as an option from their market place.
The Future
I am not sure how big Framework is at the moment, and what their ambitions are. But there are very clear opportunities to look at, if they make business sense:
- A laptop with a replacable, discrete GPU. This is the holy grail of DIY adepts out there. A laptop where you would simply insert a new GPU to upgrade its capabilities would be a huge deal, while very complex to execute because of thermal profiles varying from one GPU to the next. I don’t expect they would be able to deliver any time soon on such a concept, but on paper they are the most likely company to execute on the idea, if ever.
- Customized ports that can’t be easily found on the competition. The advantage of expansion modules is that they could fulfill very small niches and be priced accordingly while not impacting the pricing of the base model.
- A upgrade path from one generation to the next. I think they are already doing that right now, by providing the possibility of upgrading your 11th Gen Intel motherboard to the 12th one while keeping the shell as is. This is great! I wonder how long they will be able to keep such upgrade paths (will you be able to jump from a 11th gen model to a 14th gen model 2 years down the road with the same shell?) but it’s been a very long time such things were not seen anymore on the market. My trusty Lenovo Thinkpad T440p had a user-replacable CPU that made it possible to switch from an i5 to a much more powerful i7 with twice as many cores if you were so inclined.
More importantly, I hope that Framework can act as a beacon in the current industry. Other manufacturers must take note and consider what they can do to make their laptops easier to upgrade and maintain. No more soldered RAM. No more glued batteries. Easier access to internals. Even if it only matters for 1% of your consumers, it’s still significant in terms of image. It’s easy to notice that things went down as soon as Apple started to make strides in the ultrabook market. PC-manufacturers took all the wrong lessons from their success, making their models harder to open and customize while this was traditionally the strength of the PC concept.
Framework is there to remind everyone: “This is what a PC should look like,” and so far, it’s a very convincing message.