
Supercharge Steam With Steamtinkerlaunch Stl
Linux users and gamers often want to make tweaks, whether it is to squeeze the last bit of performance out of a machine, mod it, or just play around to see what you can do (or see how it breaks). You might say we are tinkerers. And with a wealth of tools at our disposal for Linux gaming, from Lutris, WINE, Steam, Proton, mods…there’s a lot to do and keep track of.
Enter SteamTinkerLaunch (aka stl), a tool that does nearly everything you can think of, and then more. We recently interviewed the creator, frostworx, all about it. While the Readme and wiki have everything and is quite detailed, one look at the wiki pages will tell you there is a lot.
So I present to you a quick getting started guide for SteamTinkerLaunch. I’ll walk you through getting set up and the basics, along with some examples of what you can do with stl. Recently I’ve been using stl to enable gamemode for my games, play with post-processing effects, and even to try out regular flat games in VR, all of which I’ll go through below.
This guide is geared a bit more towards beginner Linux gamers and/or those just hearing about stl, but I hope that more experienced users who may be overwhelmed by stl will also find this useful. (I also helped sort the giant Readme into wiki form over on GitHub, yet still learn something every time I open stl.)
What can you do with stl?
SteamTinkerLaunch, as the name suggests, is for controlling everything related to launching Steam games, especially ones using Proton/Wine, though it can work more broadly. Some highlights that stl makes easy:
- Proton/Wine tweaking to help games work better
- Play regular (flat) games in VR
- Shader post-processing injection for enhancing visuals of games (i.e. ReShade)
- Work with external tools like various HUDs, instant replays, performance enhancements
- Debug any problems more easily


In short, the goal of stl is to let you play more games, set up the way you want to play them. See more details in the Readme and main wiki page.
Installation
Installing stl is rather easy, as essentially it is a giant Bash script and configuration files. It does rely on some external dependencies, as well as optionally lots of tools that it interfaces with (see Requirements in the Readme).
To install:
- Download stl: either from the releases on GitHub, or by using
git clone https://github.com/frostworx/steamtinkerlaunch.git - Simply run
make install(from a terminal) in the folder you downloaded stl to
Or, if you are on Arch Linux, just install the AUR package (e.g. yay -S steamtinkerlaunch or whatever your AUR helper is, if not yay)
Here is a list of optional programs from the AUR package (Arch Linux) to give you an idea what stl can do that you might want to install as well:
strace: write a strace log of the launched game
gamemode: for using GameMode per game
mangohud: for using MangoHUD per game
vkbasalt: for using vkBasalt per game
winetricks: winetricks support
vr-video-player: for playing regular games side-by-side in VR
nyrna: for using Nyrna per game
replay-sorcery: for using Replay-Sorcery per game
net-tools: for optional network monitoring
boxtron: for optional Boxtron support
scummvm: for optional ScummVM support via Roberta
wine: for optional Vortex Mod Manager support
gameconqueror: for optional cheating
gamescope: for optional GameScope support
libnotify: for optional Notifier
cabextract: optional for extracting the wmp10 setup archive
innoextract: optional for extracting the Cheat Engine setup archive
usbutils: optional for a quick VR HMD presence check
jq: optional for extracting game names from the steam api and for sorting available Lutris Wine Versions
rsync: optional for backing up steamuser files from proton games
openssl: optional for generating a random hex string for Non-Steam games
If you are on Arch and wanted to install all of these as optional dependencies (so they will be removed if you remove stl), you could do this neat one liner: yay -S --asdeps --needed JB((yay -Si steamtinkerlaunch | sed -n ‘/^Opt/,/^Conf/p’ | sed ’)JBd' | sed 's/^Opt.*://g' | sed 's/^\s*//g' | tr '\n' ' ')
Lastly, while you can use stl directly as a command (more detail below), I think it is best to add stl directly to Steam as a Steam Compatibility Tool. This just means that it will show up as an option when you click on Properties for a game and go the Compatibility tab, where you can select different Proton versions, for instance. Also, you can then set it as a default for all non-native games in the main Steam settings under Steam Play. Note that for any game set to use a compatibility tool, Steam will download the Windows version. So for a native game you’ll want to run it directly with stl (see this wiki page).
To install stl as a Compatibility Tool, just run stl compat add from a terminal (as always, see the related wiki page).
Basics
Now that you’ve got stl installed, how do you use it? First, you want to enable it for a game, either by using the Compatibility Tool option above (and set for an individual game or all Steam Play games) or setting it as the launch option in a game’s properties. The General tab has a launch option box you set to stl %command%. You can see both of these demonstrated below.
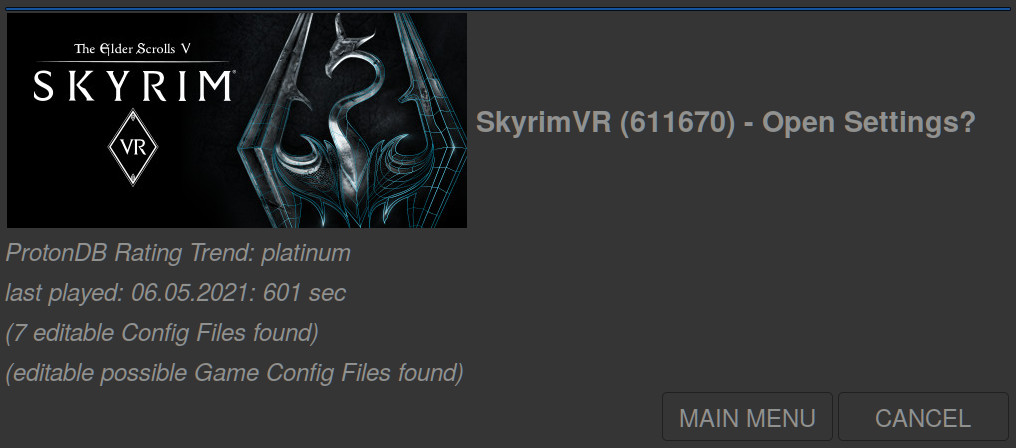
When a game is launched by stl, by default a window will pop up first (called by stl the wait requester) giving you the chance to dive into stl’s settings. Just press the spacebar or click the “Main Menu” button before it times out to go into settings, otherwise the game will launch. This timeout is configurable, of course.
This will bring up the Main Menu dialog, which has already a lot of settings you can configure from here, or buttons along the bottom for further settings dialogs. Hovering over many options will bring up helpful tooltips, too.

Some things you can do with stl
Use gamemode and MangoHud for all games in Steam
In this first example, let’s go through the steps to have gamemode and MangoHud be used for all games in Steam. While you could do this per game (e.g. using gamemoderun %command% in a game’s launch options) this is tedious to set up. So let’s take advantage of having stl installed as a compatibility tool and enable it by default for all non-native games in Steam’s Steam Play settings. (Note: for native games you’ll need to do this manually, with either gamemoderun %command% or stl %command% since compatibility tools won’t be used.)

- Open up stl: either start a game or from a terminal with
stl settings(opens up the last game) - Click on the “Default” button on the bottom
- Under “Tools options” check the box for GameMode and MangoHud
- (Under “Misc options” you can check the box for “Toggle steamwebhelper” to pause that process, if you’re like me and find Steam likes to eat up CPU.)
- All set!
Bonus: start/end scripts
Gamemode can be used to run custom scripts before a game runs and after it exits. This is handy for anything you might normally quit or do before you run a game and then want restored. In my case, I have simple scripts to stop my compositor, picom, and run it after. This could also be done from stl directly, under “Misc Options” and “User start command”. In my case, I also often have xscreensaver enabled, and gamemode automatically disables that when a game is running so I don’t need to have it in my custom script.
In my gamemode configuration file, which is ~/.config/gamemode.ini I have (with comments from the default settings):
[custom]
; Custom scripts (executed using the shell) when gamemode starts and ends
;start=notify-send "GameMode started"
;    /home/me/bin/stop_ethmining.sh
start=~/gamestart.sh

;end=notify-send "GameMode ended"
;    /home/me/bin/start_ethmining.sh
end=~/gameend.sh

; Timeout for scripts (seconds). Scripts will be killed if they do not complete within this time.
;script_timeout=10
And the scripts are simply:
gamestart.sh
#!/bin/sh
pkill picom
gameend.sh
#!/bin/sh
picom --experimental-backends -b
Proton and Wine versions, tweaks, debugging
Stl is helpful for setting Proton options and making easier to get logs when something isn’t working.
- In the Game Menu (or Default, if you want for all games) look at “Proton options”
- Here you can set the Proton version you want and easily set some options that you may find needed (e.g. from ProtonDB reports)
- The option “Proton log” will make sure the debug log ends up somewhere useful, like in your home folder, i.e.
~/steam-######.lograther than having to dig it out from one of Steam’s folders - “Wine options” are also here, and see the Main Menu of stl to run winetricks for a game (as well as downloading custom Proton or Wine versions)
- You can also use the stl’s game configuration file to set options manually, or options not yet in the interface like setting
WINEDLLOVERRIDESthat can be needed for some games or mods

Using ReShade
ReShade setup is easy with stl, and various shader repositories are also included. Many visual enhancement mods for games use shaders that ReShade then applies to the game. Note that on Linux (I think) you can only use ReShade for DirectX (Windows) games; for native games that use Vulkan you can use vkBasalt which can use ReShade shaders as well.


- Go to the Game Menu and check the boxes for options under “Shader options”; enabling should install ReShade if it hasn’t been already, while later you may want to update
- Optionally, you can check the box for “Shader menu” which will show a dialog before the game launches to download shaders you can use (this is also accessible from “Shader” button in the Main Menu)
- Run the game! A notice should appear in the upper left that ReShade is enabled and will tell you what key to press for its menus and tutorial (by default it is the Home key)
If this doesn’t work, you may need to check that the correct game executable is detected for ReShade. In “Shader options” you can change what folder ReShade is installed into (needs to be where the main game executable is, not a launcher) and which file is the game executable.


Flat games in VR
Stl has a great feature for VR users: easy enabling of side-by-side VR. This supports both games that have a builtin stereoscopic mode (like Trine) or for any game using shaders to give it some depth. What you end up either way is seeing your normally flat game on a big virtual screen in your VR headset. Elements of the game will stick out of this virtual screen, like watching 3D movies. You will need vr-video-player installed, and see the compatibility list where you want to make sure the game has depth buffer access for effective 3D. (It is called “side-by-side” because the game will output the left and right eye views next to each other, as you will see in 3D/VR videos on YouTube, too. So for a head-mounted display these two views need to be mapped to the corresponding displays for your eyes.)
- In the Game Menu find “VR options”
- Check the box “Stereo3D VR” for a game with built-in side-by-side mode, or else the “ReShade” (more features than vkBasalt) or “vkBasalt” options
- There are other options like the zoom level of the virtual screen or the height of the screen in VR, but you can adjust this in game
- Start your game (ignore Steam telling you about Theater Mode or that it will run on your headset; SteamVR doesn’t do this for Linux currently), which may need you to look through options to enable its side-by-side mode
- For games where you are using ReShade, make sure to enable the “SuperDepth3D” shader in ReShade. By default, press the Home button to pull up the ReShade menu, which has a tutorial to walk you through how to use it. If things don’t look right, make sure for the shader settings you have side-by-side mode enabled and ReShade activated.
- If you are not seeing your game in your headset, try pressing the trigger button on your VR controller, that should recenter the window. If you focus on the vr-video-player window, you can use ‘W’ to center and ‘Q’ and ‘E’ to adjust the zoom as well. See more on the vr-video-player website.
Conclusion
There you have it, a quick tour of the very powerful SteamTinkerLaunch. There’s tons you can do and I hope this guide helps make the tool more approachable and easier to understand.
Here are just a few things you might want to look at next (and you can read our interview with stl’s creator for more ideas and to learn more about the project):
- Run something (like a Windows utility) with Proton standalone
- Explore automatic tweaks for games
- If you are using something like ReShade, stl can manage your shaders
- Backup your games, especially handy to keep older versions (I’m looking at you, Beat Saber)
- Use your favorite tools, or discover new ones, through stl
- And yes, add non-Steam games
There’s a lot going on, but if you ever need to tweak something for a Steam game, I hope you’ll find it is easily done in stl. Explore the many menus and the wiki and you’ll probably find what you need. And if it doesn’t have what you want? Feel free to ask or contribute over on the GitHub.