
Odroid-GO Advance: Best Emulation Device of 2020?
I remember getting my Gameboy Advance as a kid nearly twenty years ago. It brings back some good memories – games like Metroid Fusion, Sonic Advance, The Legend of Zelda: The Minish Cap, among others, that were a blast to play.
Now, some of you from the older generations might go back to the Gameboy/Gameboy Color. The original Odroid-GO might have brought those moments back to you. But personally, I like the Odroid-GO Advance (OGA) better, since it can emulate newer consoles like the Gameboy Advance, Dreamcast, PlayStation, and even PSP.
There’s a ton of handheld emulation devices out there nowadays – some of which may be powered by the Raspberry Pi, others, a custom chipset. But there was something about the OGA that stood out to me from the rest of the crowd, aside from the cheap price. It reminded me so much of the time I had a GBA. Reliving those childhood memories was something I wanted to do.
The Hardware
The OGA – produced by Hardkernel – is currently $55, but won’t be in stock until May. I can’t exactly remember how much shipping was (I haven’t been able to find the email), but it wasn’t cheap. I think it was $10-$15 and took about a week to deliver.
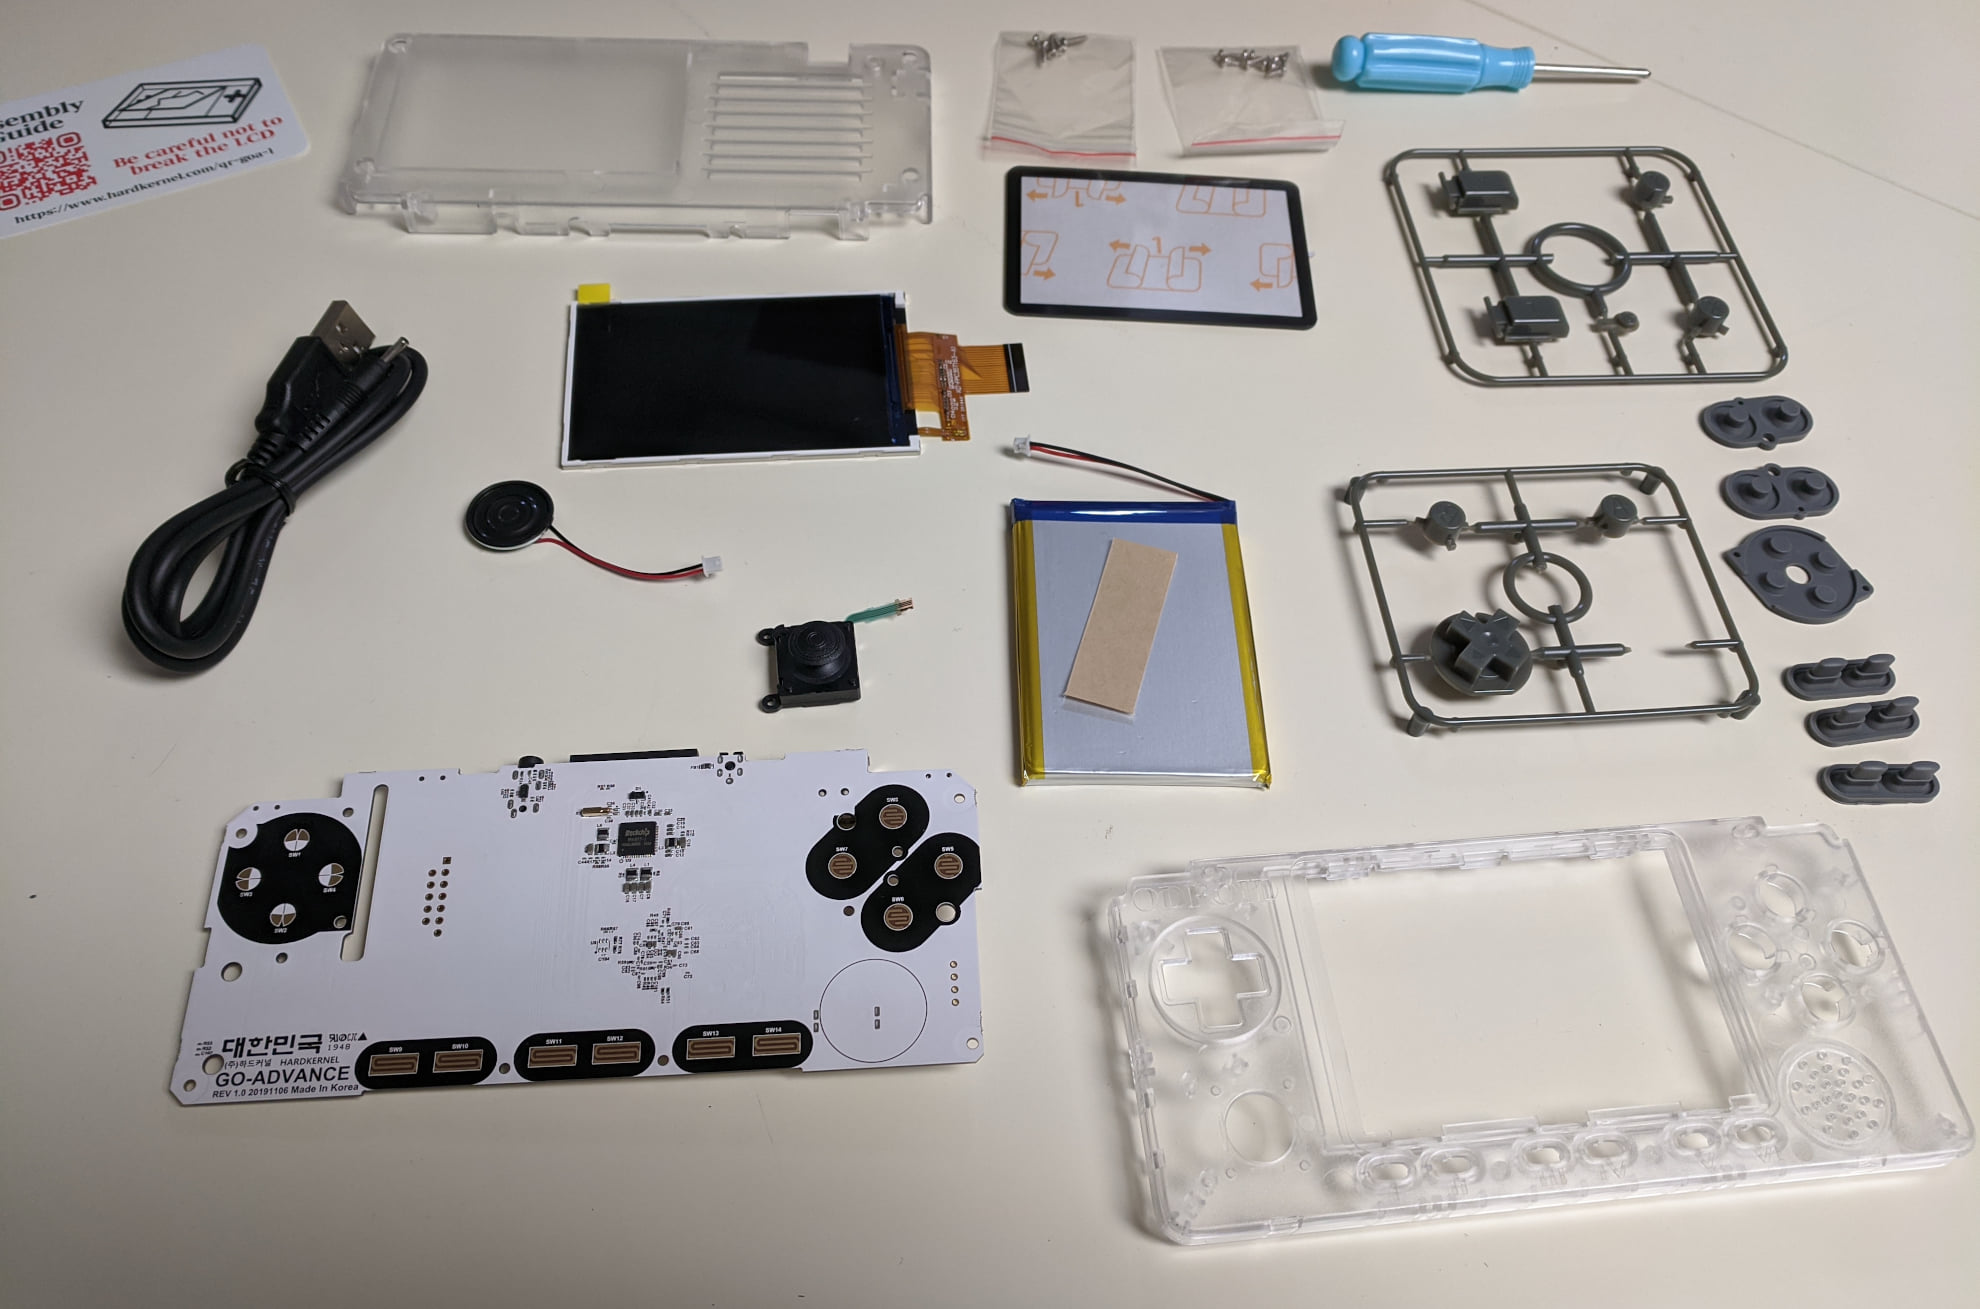
This part may sound like a plus to some people, others, not so much, but the OGA comes in the mail disassembled. You have to put the parts together – the circuit board, the battery, the buttons, the screen, you name it – with the screws and the tiny Philips screwdriver included in the package.
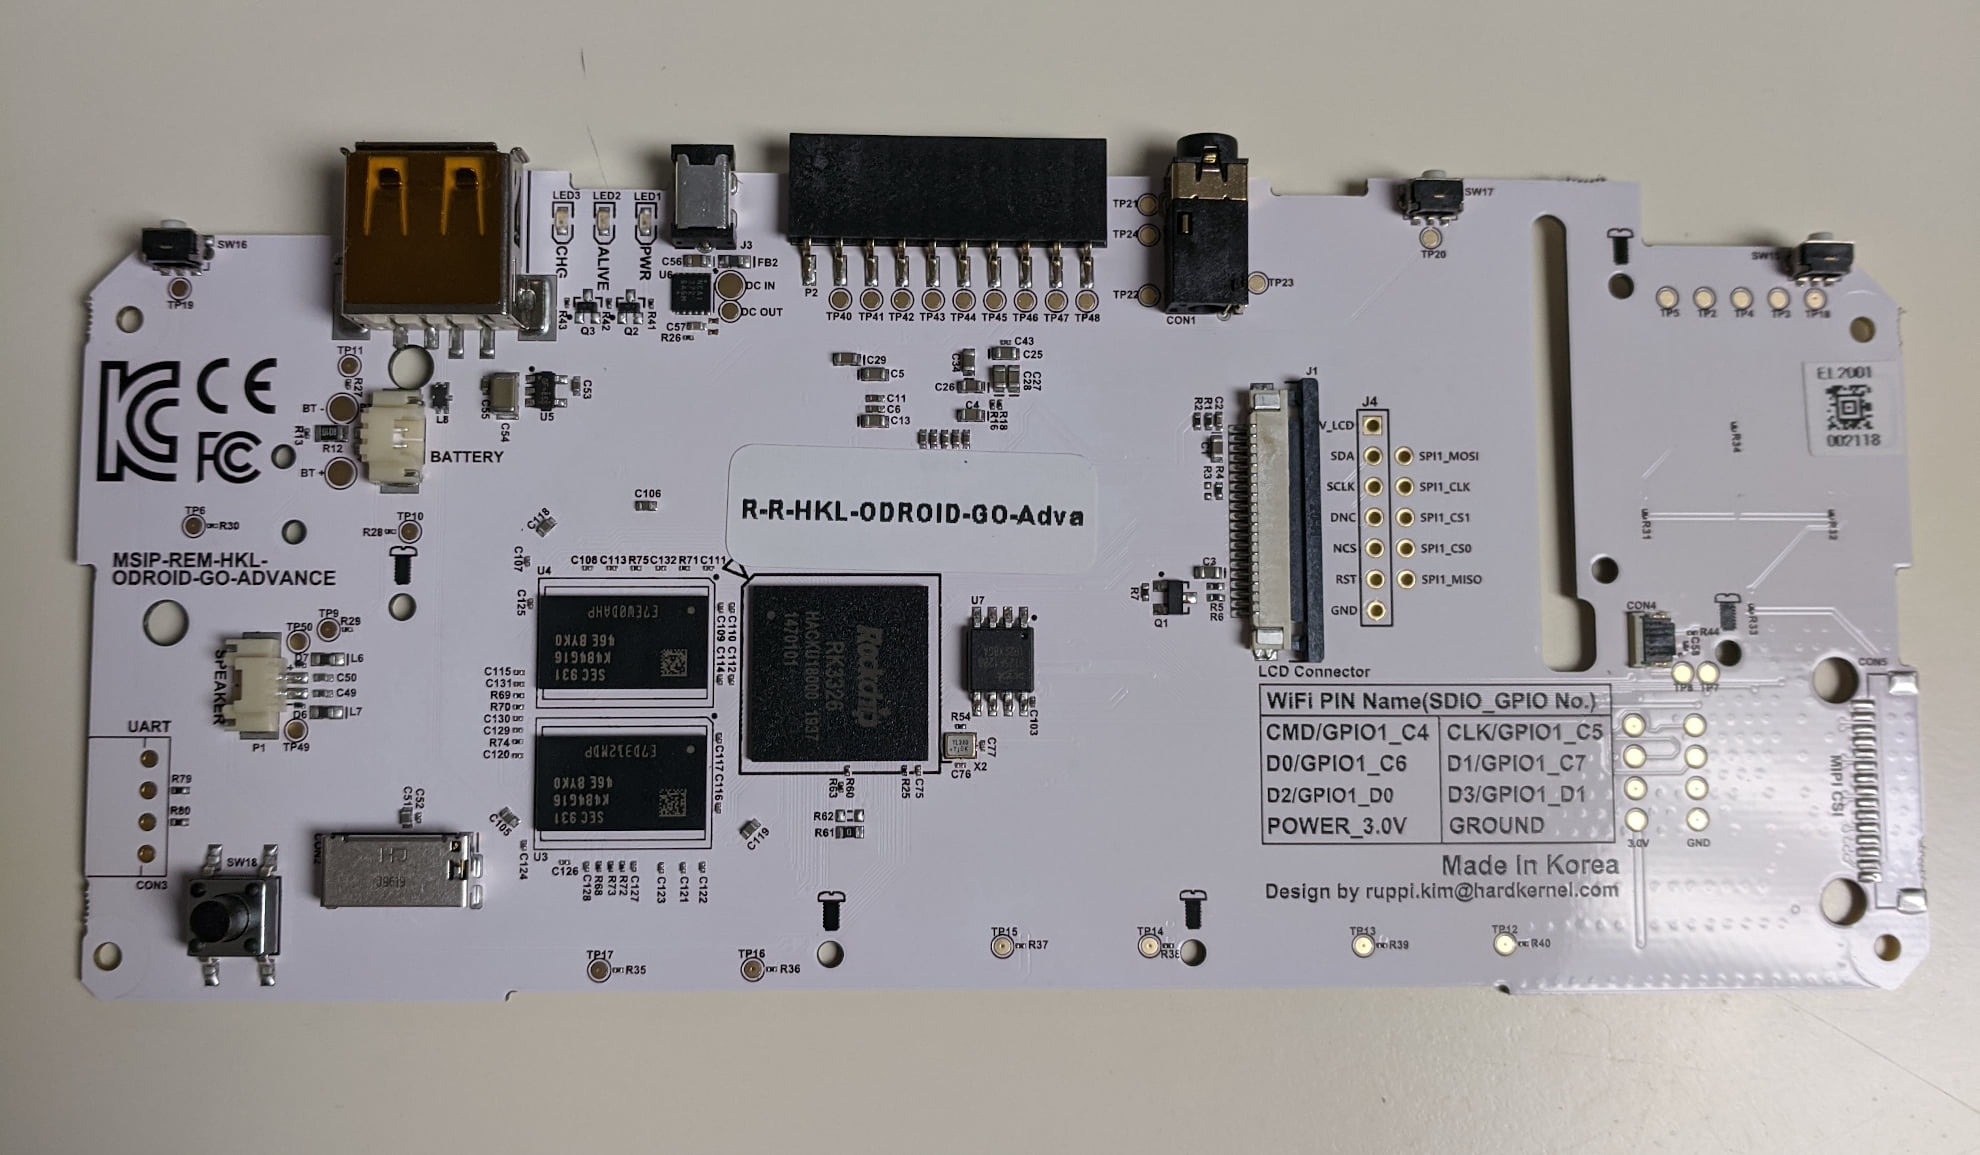
The printed circuit board (PCB) has the following components:
- 1.3GHz ARM quad-core Cortex-A35 dubbed the RockChip RK3326
- Mali-G31 Dvalin GPU
- 1GB DDR3L RAM, clocked at 786Mhz
- headphone jack
- 2.5mm DC jack for charging (USB cable included in box)
- USB 2.0 port
- MicroSD card slot
- Three LEDs on the back that indicate various activity, flashed in a red or blue color
According to the Store page for the OGA, it’s capable of emulating the following consoles:
- atari2600
- atari5200
- atari7800
- atarilynx
- gamegear
- gb
- gba
- gbc
- mastersystem
- megadrive
- nes
- pcengine
- pcenginecd
- psx
- segacd
- snes
- psp
And more. Technically the OGA can even run Dreamcast games, albeit some titles won’t be playing at the maximum framerate.
You might have noticed that the Nintendo 64 isn’t on that list. The Nintendo 64 seems to be quite a horse to emulate, because even my Raspberry Pi 3 can’t handle N64 games. I was sad that the original Super Smash Bros. was slow as hell. You might be able to overclock the board and tweak some of the Retroarch settings to achieve better results, however.
The LCD screen measures 320x480 pixels and measures 3.5 inches. A 0.5W mono speaker is included that connects to the PCB via a tiny socket.
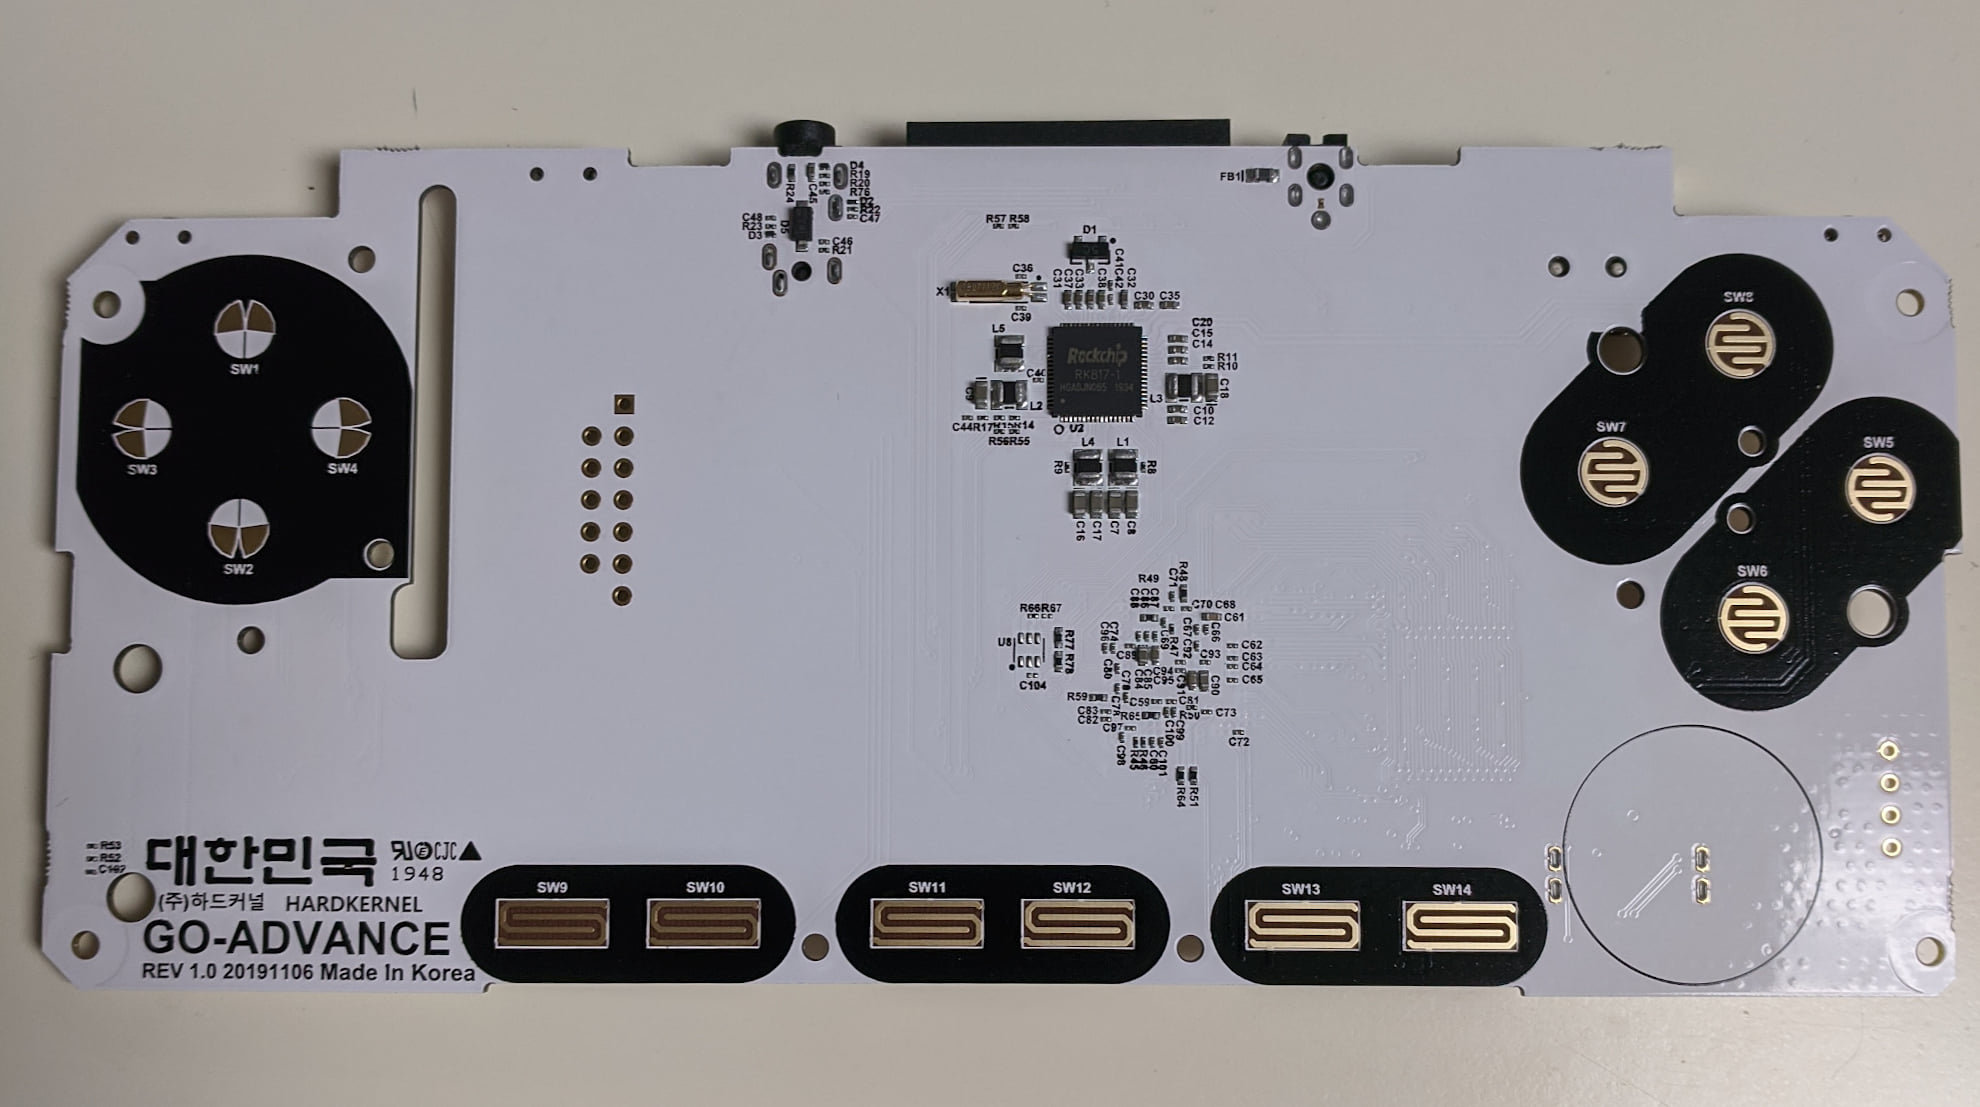
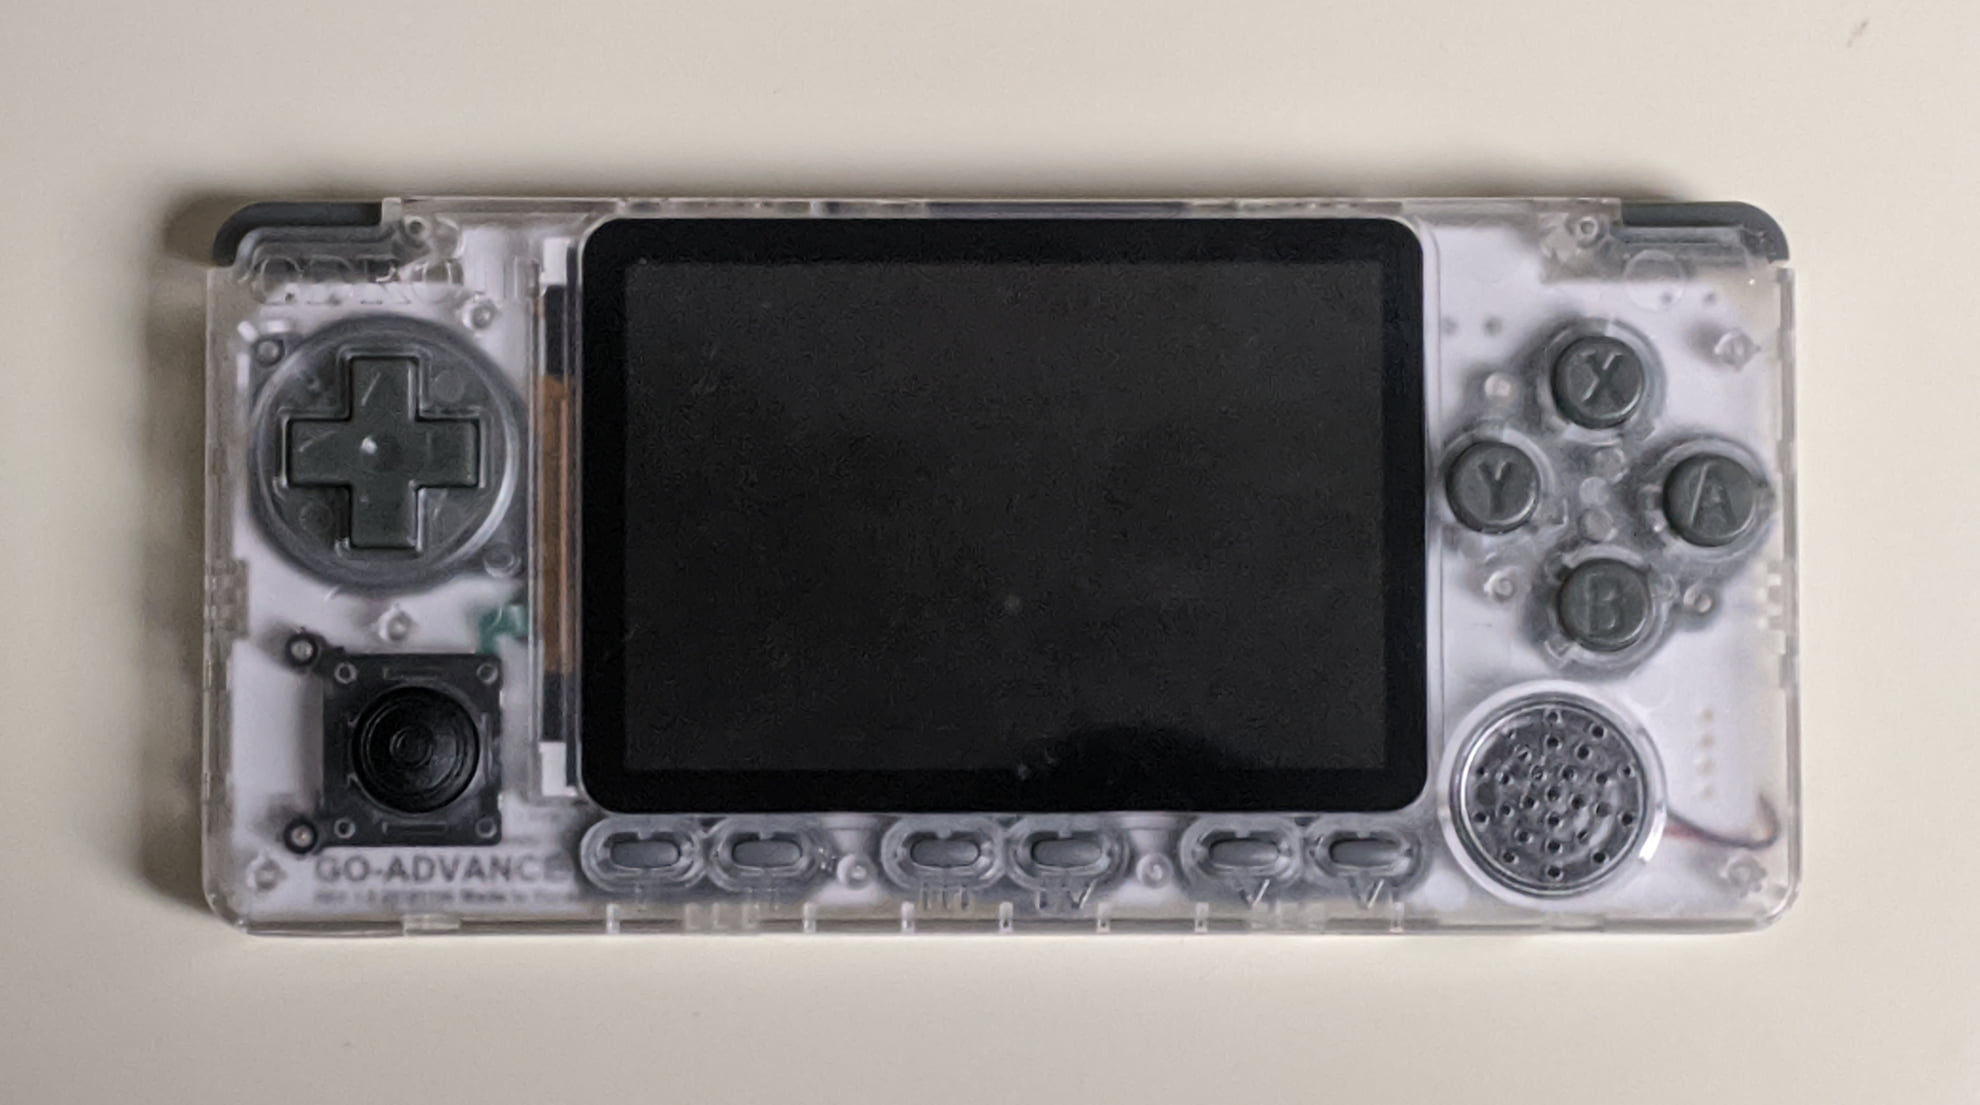
For buttons, the OGA includes four face buttons (A, B, X, and Y), a D-Pad, Left and Right shoulder buttons, an analog stick that sits to the left side of the device, and six buttons that go across the bottom, below the LCD, all gray in color.
All of these components stick inside a transparent, plastic, rectangular shell, its size no larger than an extra-large smartphone. A couple of slits were made in the back of the shell to give the PCB room to breathe. I cannot emphasize enough how adorable it looks when you put it all together.
The battery packs a whopping 3,000mAh – I have to say, I’m really impressed with this. Discharge time while playing is advertised as 10 hours. And I found that during my time testing the unit, at least while emulating the GBA, this is true. It’s not like your smartphone that you have to charge everyday. You could use the OGA two hours a day, five days a week, then charge for three or four hours and get another week out of it. Amazing to think this battery could be packed into such a tiny unit.
Wi-Fi is not integrated into the PCB. Fortunately, I have a USB-to-Ethernet adapter so I could have a wired connection. If you don’t have one of these, you can get one of Hardkernel’s USB Wi-Fi adapters on the cheap. Connecting the OGA to the Internet will be useful – this way, you can download themes for EmulationStation (ES), download artwork for your games, and SSH into the device from your desktop.
One thing that you will need besides the kit itself, is a MicroSD card that’s 8GB or larger in size. Then, you will need to flash an operating system onto the card. Otherwise, turning on the OGA will not produce any results. More on that in the Software section.
An optional component that can be soldered onto the PCB is a 2x4 pin connector that will allow serial connection to your computer for development and debugging purposes. You will then need the USB-UART module kit and a USB cable. The pin connector and module kit will together cost $10.90, excluding shipping.
I’m personally not a fan of the blandness of the transparent shell, so I took some polycarbonate spray paint and painted it black. Here’s the result:
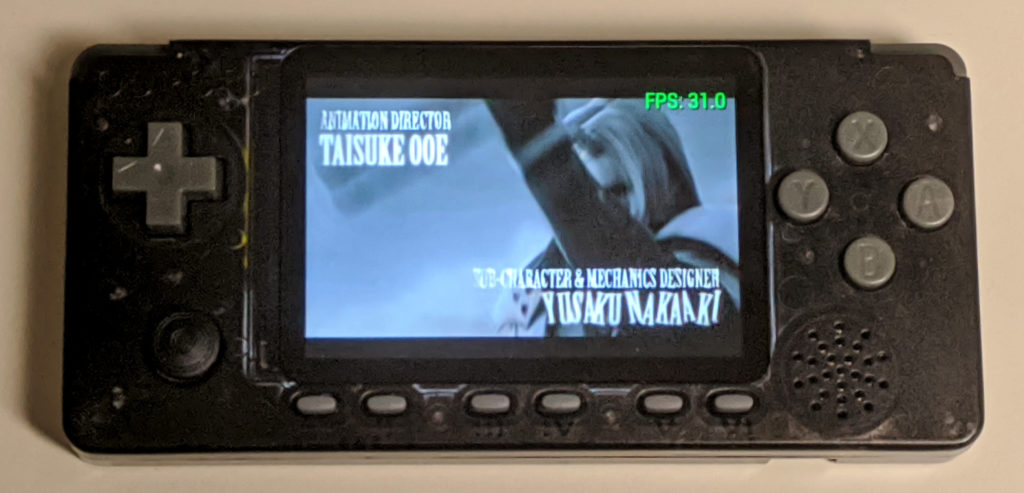
Looks much better to me. I wanted to go a step further and replace the buttons with red DS Lite buttons, since the D-pad doesn’t exactly feel comfortable on my thumb, but discovered they were too small to fit inside the case. If I had a PS Vita thumbstick, I would put that in the unit as well since the default feels cheap.
The Software
Right now, the OGA mostly serves as an emulation handheld. In addition to the image Hardkernel provides on the Odroid Wiki, if we go to the Odroid Forums, we’ll see that there are a few different ports of existing operating systems that are available for the OGA:
The Debian version will turn the OGA into an actual desktop. Be prepared to have a USB hub, though, because the OGA only has one USB port and you’re going to want to connect at least a keyboard and mouse to use this. And unfortunately, since I’m only using an 8GB SD card, I wasn’t able to test Retro Arena – the image file is almost 16GB.
Default (Ubuntu)
The default image for the OGA is the one that Hardkernel supplies on their Odroid Wiki. This image is based on the ARM version of Ubuntu 18.04 that launches ES at boot time. ROMs can either be put on the SD card directly from your computer or remotely transferred through SSH. ROMs are put in “/roms/(name of console)/”.
A big issue with this OS is a lot of ROMs won’t show up in ES, even though they’re there on the SD card. I learn later on that this is because the file “es_settings.conf” is written incorrectly. If we go to the Odroid Forums, we can supposedly find a fix there, but I had no luck trying that.
When I wanted to have background music play, I SSH’d into my OGA, tried to download and install bgm-for-es, but the repository is dead. I tried the older way by activating a Python script. This worked, but the music played oddly, like the tempo was slowed down. Not being content with this, I increased the tempo of the music with Audacity. After several tried-and-failed tweaks, I finally got to the point where the music sounded like normal. Was that the end of it? Nope.
The music would keep playing after selecting a ROM in ES. Not worth my time trying to fix anymore.
Batocera
I like this a lot better than the default image, but not as much as EmuELEC. All of my ROMS were properly detected, a good sign. I can change the volume and brightness with the buttons below the LCD. A bonus with this OS is that music is already included and plays in the background in ES. The music fits well!
The PSP emulator is not pre-configured. So trying to run Crisis Core: Final Fantasy VII was slow and blurry. After doing some tinkering with the PPSSPP settings on a rotated screen, I changed the rendering to two PSPs. That fixed the blurry picture. After turning off a few other tweaks, the framerate started to go up, enough to the point where the game was running smoothly. I still wouldn’t recommend playing PSP games though, because the emulator will experience random crashing.
EmuELEC
EmuELEC, even though it’s in its release candidate stages for the OGA, has got to be my favorite OS for the handheld so far. PSP games work great out of the box with this. All of my ROMs were detected. The Retroarch menu isn’t rotated portrait-wise and therefore can easily be viewed, so tweaking the settings for individual emulators becomes possible. Background music can be played in ES by placing mp3 or OGG files in the /roms/BGM/ directory. Tony Hawk’s Pro Skater for PS1 ran fine, although, I couldn’t figure out a way to increase the size of the emulation window since it wasn’t fullscreen.
The only thing I’ve had an issue with, is that neither the volume nor the brightness can be changed with the buttons on the bottom of the device; they have to be set in ES itself. This can be an inconvenience while playing a game; I don’t think there is a way to access ES settings until you quit the game.
Avoid These Pitfalls
Along the way in assembling/disassembling this product, I made a few mistakes. I’m documenting them in the hopes that you won’t make these yourself if you decide to get one:
- If you want to paint the shells, plan so in advance before you assemble the unit. If you assemble the OGA and decide you want to paint it later, you’re going to have to take the whole thing apart again because all you want to paint is the interior of the shell, without any of the components in the way. ETA Prime has an excellent tutorial on how to spray paint the shell
- If you want modded buttons, get buttons that actually fit. The DS Lite buttons I got were too small. So save your money for something that actually works. ETA Prime mentions that the Gameboy Pocket buttons will fit just right; just some of the stubs will have to be cut off.
- MicroSD cards are flimsy and easy to break. The reason why I know this, is because I tried separating the front shell from the back with the SD card still in the PCB. The thing split in two. I’m hoping I can recover the data (like the savefile that contains the five or so hours I put in Metroid Fusion) by applying some super glue, with nail polish remover to get rid of any excessive glue that may leak into the contacts of the card. If you have a MicroSD card inserted in the PCB, take it out before disassembling the OGA. And be sure to have a regular backup of your saves or other important data, because you might accidentally get them lost while transferring files or doing something else
- Be very, very careful when putting the LCD in. The gray part that covers the back will keep the backlight from spitting out in unintended areas inside the case. I had to take that gray part out because a ripple was formed when I tried to apply pressure, and I couldn’t fit it inside the case. I mean, it’s not really a big deal for me, especially after I painted the shell, but that spilled backlight can irk some users
The reason why I added a question mark to the title of this review, is because the OGA is not perfect. While we may have multiple operating systems to choose from, none of them are flawless. Some have advantages that others don’t, but have their own drawbacks as well. Still, for a product that’s only $55, and can run games with graphics as advanced as the PSP, you’re getting good bang for your buck. Like, really good bang. Upgraded hardware, an analogue stick, and a couple of extra face buttons are a welcome addition from the original Odroid-GO. And it looks almost like a Gameboy Advance. You can’t get much more nostalgic than that, unless you paint the shell purple, just like the original GBA.
Improvements/Additions I’d Like To See In a Future Unit
You can tell by the feel of the buttons and the ergonomics of the case that Hardkernel tried to cut corners to keep the OGA as affordable as possible. That’s great, but I’d be willing to shell out a little extra for a case that’s not so rectangular and more rounded in shape, to make the unit more comfortable to fit in my hands. I’d also like a bigger screen; even though it’s a bit larger than the GBA screen, you might need to squint or otherwise get a pair of glasses on to see what’s going on on that tiny screen.
Having a couple of extra shoulder buttons would be welcome as well. A second analog stick that’s more comfortable (you can apparently replace the OEM stick with a PS Vita stick in the meantime though) would be great. Once we get to the point where single board computers can comfortably emulate GameCube/Wii games on a handheld, I would go all in on that. Lastly, if I could stream my Steam games to the device, or even natively play them by upgrading to the x86 architecture, that would be awesome! I’d call it the Steamboy (you’re probably making a look right now like I got three heads. Yeah, I know, I’m a bit unrealistic).
The way of selecting an operating system for the OGA is a bit unprofessional right now. You have to lurk in the Odroid forums and find a link to a download, or use the Odroid Wiki to find the original image. I understand these OSs are in beta development, but it would be much cleaner to me if we could download the images from the official websites of these distributions (as far as I know only Batocera has done this). That way, we spend less time searching and are less likely to accidentally download an outdated version.
For now, though, I’m pretty happy with my OGA. The fact that it’s easy to mod, and something that you build yourself, makes you feel like this is actually your own handheld. Have fun re-living your GBA/SNES days!