
Making Third-Party Gamepads Work With Steam Games
So, you were pressured by that GameStop employee to buy that cheap, store-branded knockoff controller…then when you get home and try it on your GNU/Linux PC, nothing happens, even though jstest can detect it. Or, you have a couple of spare controllers that have been on the shelf for the past six months. Now that you finally have the opportunity to try them out by inviting your drunk penguin buddies over for a game of Gang Beasts, they, out of their half-consciousness, recognize the controller works to a certain extent, but the buttons are not mapped in the right places, with no easy way to remap the controls.
What’s going on here? You’re not going to resort to Windows now, are you? I hope not.
Some gamepads aren’t officially supported in the Linux kernel. Heck, even if you bought that shiny new $60 Xbox One controller, you’re going to be bummed to find out you can’t play DiRT Showdown with it. This is because your gamepad is classified as generic, and only a small handful of games support these. It’s possible to use SteamOS or just launch Steam in Big Picture Mode (BPM) and most games will now work with the gamepad, but it’s a bit of a pain to have to do that, then reconnecting your controller while in-game, then restarting the application every time you want the support. Plus, navigating with the BPM interface isn’t the most comfortable thing with me. I want to be able to access a game’s discussion board without having to use that ugly, super-buggy web browser that offers little-to-no customization, records your browsing history with no option to turn it off, a bit tedious to multi-task with, and not compatible with any add-ons, while hearing creepy-rear-end music in the background.
Yeah okay, I’m exaggerating a bit. I know music can get turned off, and the browser only serves as a quick thing when you need it, but it’s still pretty bad. The question is. is it possible to play a game with a generic gamepad without having to resort to BPM?
Can’t say I would be writing this article if there wasn’t a way. Matter of fact, it’s not too difficult to get set up. Apparently some of you are able to reconfigure your controls through BPM, but am I the only exception to this? All I can do is see which controllers are connected. So I have an alternative solution here.
Before I get started, I would like to give my personal thanks to Reddit user rohitn for his patience in putting up with all of the questions I had in getting this to work and for his extensive knowledge of GNU/Linux. He would probably answer your questions better than I can if you get stuck.
Most, if not all games in your Steam library use what is called Simple DirectMedia Layer (SDL). Instead of trying to word this myself, I’ll let the official web site’s description explain what it does:
Simple DirectMedia Layer is a cross-platform development library designed to provide low level access to audio, keyboard, mouse, joystick, and graphics hardware via OpenGL and Direct3D. It is used by video playback software, emulators, and popular games including Valve’s award winning catalog and many Humble Bundle games.
SDL (or SDL2) -based games use a controller database file for adding support to various joysticks. Sometimes, you’ll find this file directly within a game’s installation directory. For instance, for Skullgirls, this file is located in ~/.steam/steam/steamapps/common/Skullgirls/gamecontrollerdb.txt. If you find your joystick isn’t working, it’s probably because the information needed for it is not in the file.
Fortunately for us, SDL is Free-Software (zlib license), and by downloading and compiling the source code, we can find the needed string to add support for our controller. Let’s go ahead and do that.
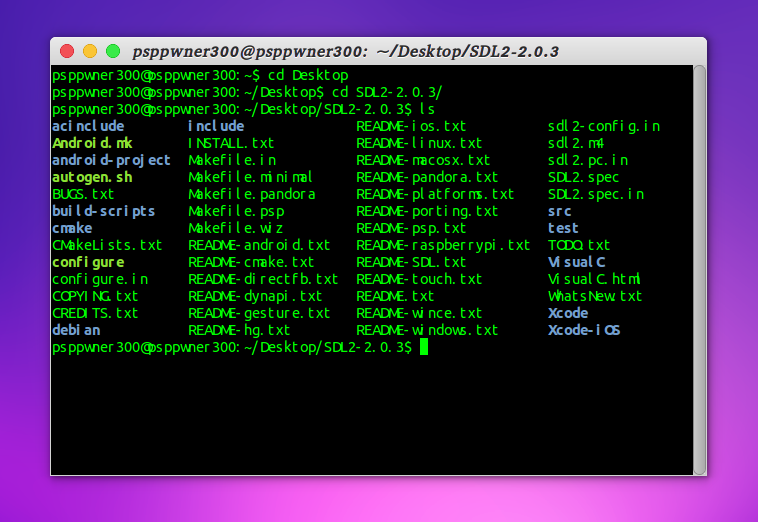
Download the tar.gz edition of the SDL 2.0.3 source code. I don’t think there’s much of a difference in downloading the zip edition, but most tutorials I’ve followed recommend the tarball. Extract it anywhere convenient for you to access (I used the desktop in my case). Now open up a terminal and navigate to the directory where you extracted the tarball. Like so (you might need to take a closer look by clicking the screenshot):
See that configure file? That’s a script we need to execute. Do so with the following command:
./configure
You should now have a Makefile, along with a few extra files. Now run the “make” command (most modern distributions should have this package pre-installed. If that’s not the case for you, install it with “sudo apt-get install make”):
makeThis will probably take a few minutes. Once that is complete, run this:
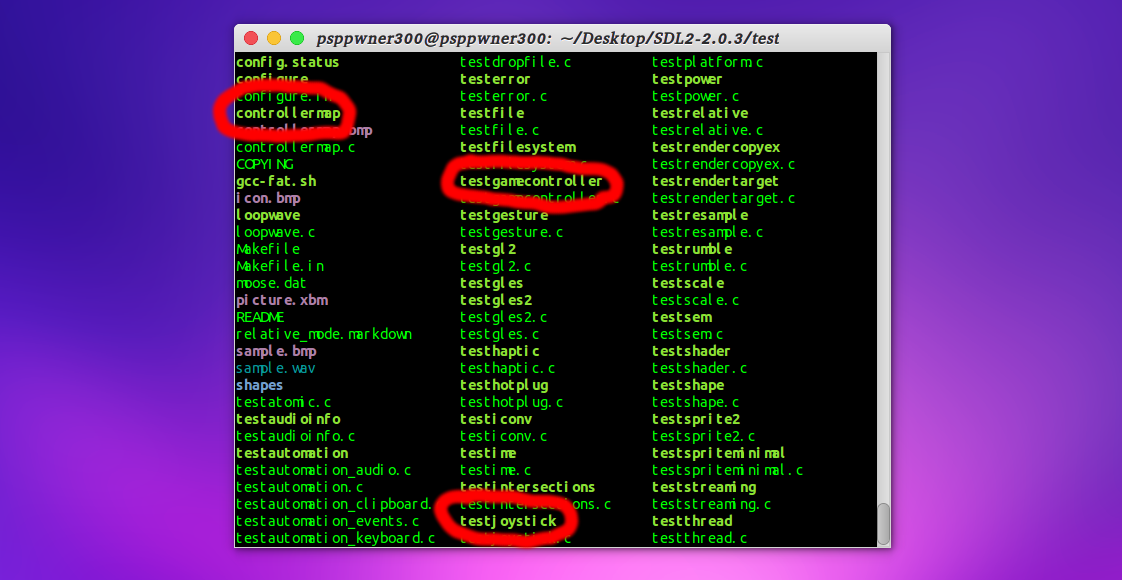
sudo make installNow we need to do the same in the /test directory. Navigate to it and run these commands. No “make install” command is needed this time:
./configure
 make
We should now have a few different binary files available; in particular, **controllermap, testgamecontroller, **and testjoystick. These are the binaries we need for the next few steps.
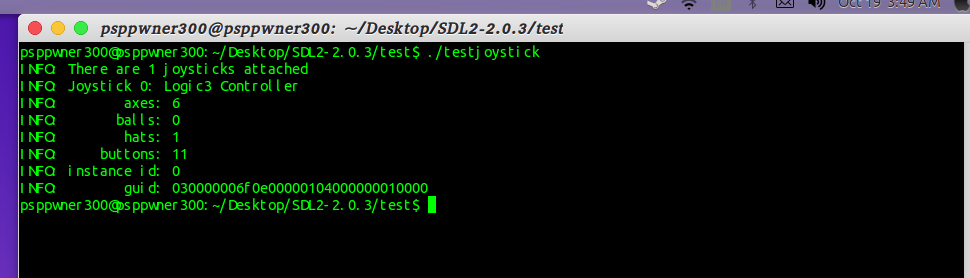
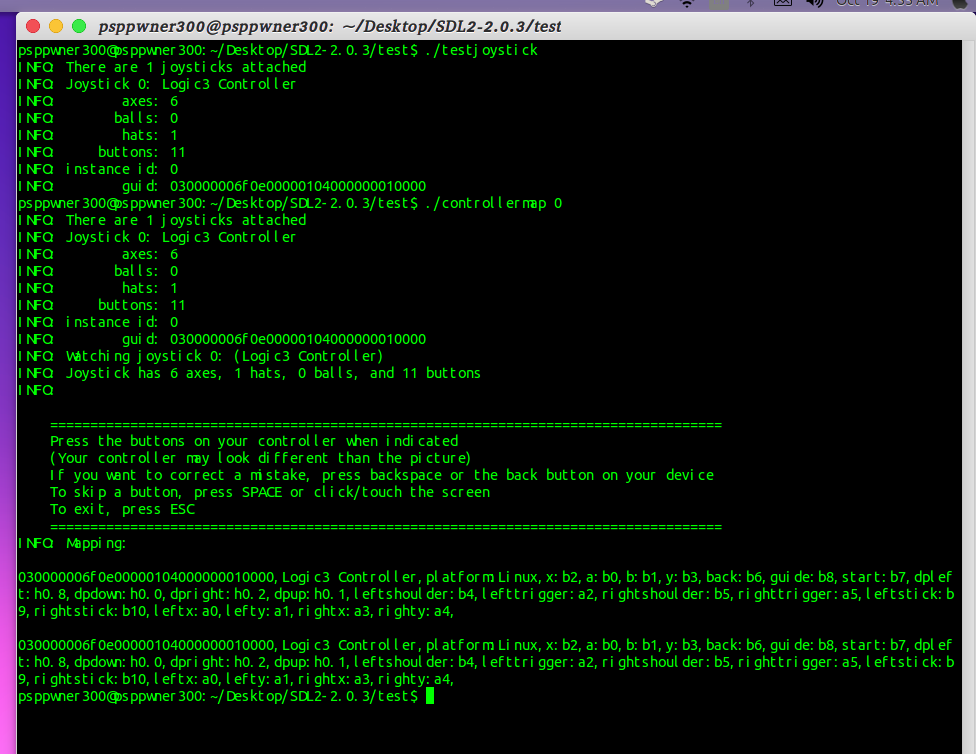
If you haven’t plugged in your gamepad yet, do so now. As far as I’m concerned it doesn’t make a difference whether you have it plugged into a USB 2.0 or USB 3.0 slot. Yeah, I bought that cheap knockoff controller, so that’s what I’ll be using as an example. Run either testgamecontroller or testjoystick while still in the terminal. I had to use testjoystick because apparently it’s a joystick, not a game controller.
 The controller I’ll be using, photo taken by a crappy rear-end webcam
./testgamecontroller
or
./testjoystick
If you get
ERROR: Couldn't initialize SDL: No available video devicethen you need to install a couple of extra dependencies (this is for Debian/Ubuntu/Mint obviously, the below dependencies may differ in names if you are using a different distribution):
sudo apt-get install build-essential xorg-dev libudev-dev libgl1-mesa-dev libglu1-mesa-dev libasound2-dev
 libpulse-dev libopenal-dev libogg-dev libvorbis-dev libaudiofile-dev libpng12-dev libfreetype6-dev
 libusb-dev libdbus-1-dev zlib1g-dev libdirectfb-dev
Run one of the binaries again to see if the program detects your controller. You should get something like this:
After verifying that our controller is detected, we can now give it a mapping of our choice with controllermap. Execute this binary followed by the instance ID of the joystick. For example, if you wanted to configure your first connected gamepad, you would run this:
./controllermap 0And then you should get a controller map window:
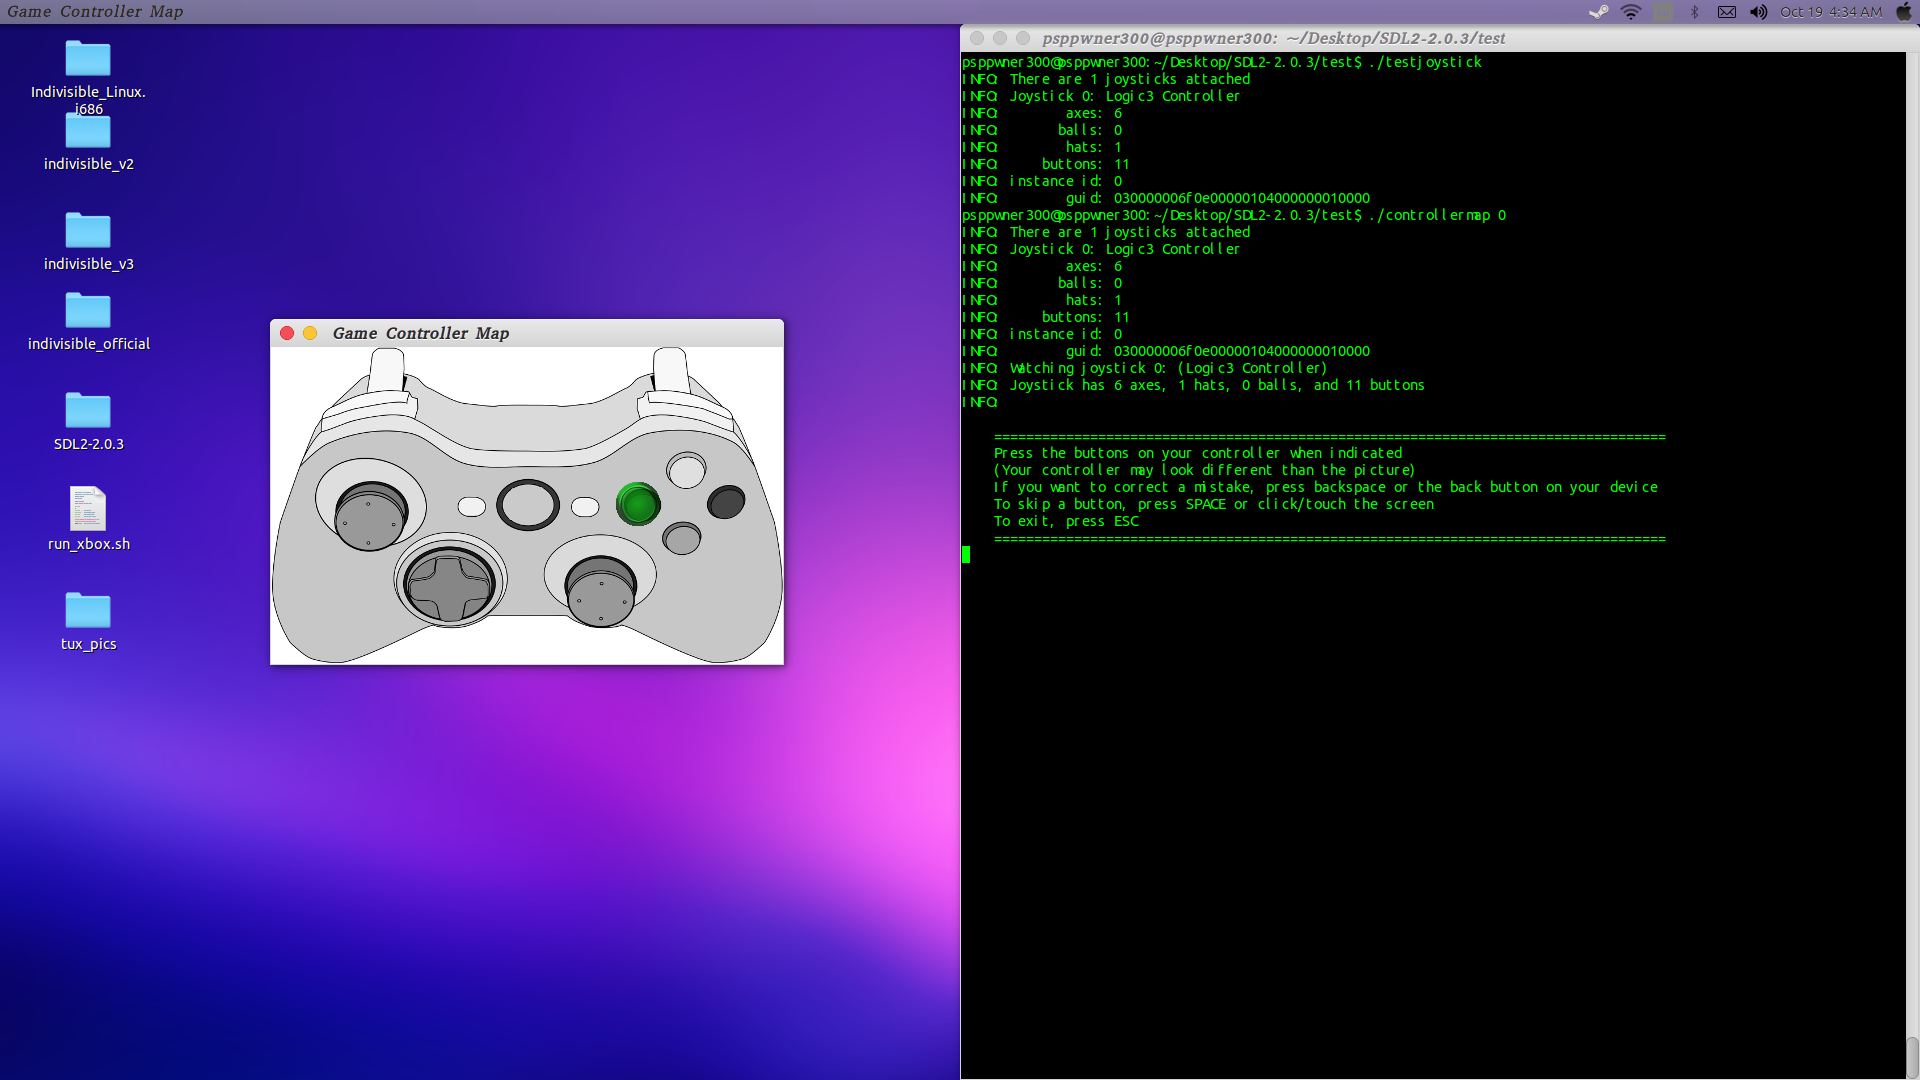
Follow the instructions that are provided. On some controllers I have, I couldn’t map the Guide button, so I skipped it by pressing SPACE on the keyboard. Also, I couldn’t map anything to D-Pad Down because the prompt skips it. When finished, a string should be generated that contains the GUID of the gamepad, the name of the gamepad, the platform the string was made with, and all the mappings you input. For some reason this is printed twice; you can copy either one. Keep this window open; we’ll need it for the script we are about to make.
Grab your favorite text editor (I use gedit) and create a script in the location of your choice with any name, ended by .sh. I have this script saved on my desktop with the name “run_xbox.sh”. We’re going to be adding some simple code that exports our new controller mapping into any executable of our choice. The syntax goes like this:
#!/bin/sh
 export SDL_GAMECONTROLLERCONFIG="[the string you received from controllermap]"
 exec PATH_TO_EXECUTABLE
Paste this code into your script, then replace the brackets with the controller mapping that was generated in the terminal. Replace PATH_TO_EXECUTABLE with either the absolute path to an executable - be it a single game itself, an emulator, or Steam - or just replace it with the name of of an installed package. Here’s my script:
#!/bin/sh
 export SDL_GAMECONTROLLERCONFIG="030000006f0e00000104000000010000,GameStop X360,platform:Linux,
 x:b2,a:b0,b:b1,y:b3,back:b6,guide:b8,start:b7,dpleft:h0.8,dpdown:h0.0,dpright:h0.2,dpup:h0.1,
 leftshoulder:b4,lefttrigger:a2,rightshoulder:b5,righttrigger:a5,leftstick:b9,rightstick:b10,
 leftx:a0,lefty:a1,rightx:a3,righty:a4,"
 exec steam
I replaced the second parameter of the string with “GameStop X360” to give my mapping a more suitable name, and I have set Steam as the executable, so any SDL2-based games launched within Steam should now be able to pick up the gamepad. In other words, all games that work in BPM should now work in desktop mode. If I was desperately looking to get D-Pad Down to work, I might keep changing the value of dpdown till it works in-game, but it’s not much of a concern to me, so I will leave it as it is.
If you want to add support for more than one joystick, simply add a new line before the ending quotation mark and insert the new string. This example script also adds support for the Disney Infinity Xbox 360 controller (stop making fun of me :P):
#!/bin/sh
 export SDL_GAMECONTROLLERCONFIG="030000006f0e00000104000000010000,GameStop X360,platform:Linux,
 x:b2,a:b0,b:b1,y:b3,back:b6,guide:b8,start:b7,dpleft:h0.8,dpdown:h0.0,dpright:h0.2,dpup:h0.1,leftshoulder:b4,
 lefttrigger:a2,rightshoulder:b5,righttrigger:a5,leftstick:b9,rightstick:b10,leftx:a0,lefty:a1,rightx:a3,righty:a4,
 030000006f0e00002a01000000010000,Disney Infinity X360,platform:Linux,
 x:b2,a:b0,b:b1,y:b3,back:b6,start:b7,dpleft:h0.8,dpdown:h0.0,dpright:h0.2,
 dpup:h0.1,leftshoulder:b4,lefttrigger:a2,rightshoulder:b5,righttrigger:a5,
 leftstick:b9,rightstick:b10,leftx:a0,lefty:a1,rightx:a3,righty:a4,"
 exec steam
If you look carefully, you’ll notice there isn’t a mapping for the Guide button for the second entry. Since the mappings are very similar to the one above it (both controllers are manufactured by the same company), one could probably just add guide:b8 after back:b6 to get it to function.
For games that only work with one gamepad at a time, you’re going to have to disconnect the one you don’t want to use; only one or the other is going to work. Local multiplayer games should be able to use both or all gamepads.
Save the script and close the text editor. In the terminal, navigate to the directory that contains the script. Mark the script as an executable with the following, replacing filename with the name of the script:
chmod +x filename
Example:
chmod +x run_xbox.sh
Exit Steam if you’re logged in. Now run the script, again replacing filename with the name of the script:
./filenameThis should launch Steam. Run any game that supports joysticks and your controller should now be working, so long as you have that terminal window open! This script has worked for me on the following games:
- ARK: Survival Evolved
- Indivisible Demo
- Skullgirls
- Storm United
 The result of executing the script
Proof-of-concept (you might want to keep annotations on - you’ll probably tell I was a bit clumsy getting this set up):
It would be helpful to add your controller mappings to GitHub if they aren’t there by logging in and making a pull request. Once the request is approved, any games that are released in the future should run with the updated controller database, and you won’t have to run the script with that game.
There’s probably an easier way of doing this without having to run this script every time you want the joystick support; perhaps there’s a script somewhere in Steam’s installation directory where we can add our controller mappings. For now, hopefully this at least works for you all.
Now to take that knockoff controller apart, get some water and black food dye, and dye the D-Pad and thumbsticks…